

Transforming kitchen scraps and garden clippings into crumbly, dark ‘black gold’ is the single most transformative habit any gardener can adopt.
Every year, up to 30% of household waste sent to landfills consists of compostable food scraps and yard trimmings—where they decompose without oxygen, producing harmful methane gas. By recycling that organic matter right at home, you break the waste cycle, enrich your soil with billions of beneficial microbes, and eliminate the need for expensive synthetic fertilizers. Whether you live in a third-floor apartment with no balcony, a suburban home with a postage-stamp lawn, or a multi-acre homestead, there is a proven composting method tailored to your lifestyle.
Whether you’re contending with a tiny studio apartment, a neighborhood with strict HOA rules, or an expansive backyard vegetable patch, here are 10 practical, odor-free ways to start composting at home, along with their pros, setup instructions, and pro-tips.
At-a-Glance Composting Method Matrix
| Composting Method | Space Required | Harvest Speed | Odor Risk | Ideal Setting |
|---|---|---|---|---|
| #01 Classic 3-Bin Wooden Pallet System | Large Backyard (8×3 ft) | 2 to 4 Months (Hot) | Low (if balanced) | Large gardens, heavy yard debris & lawn clippings |
| #02 Dual-Chamber Tumbling Bin | Small-to-Medium Patio / Yard | 4 to 8 Weeks | Zero (Sealed & pest-proof) | Suburban homes, busy gardeners wanting fast batches |
| #03 Indoor Vermicomposting (Worm Farm) | Compact (Under sink / closet) | 2 to 3 Months | Zero (Smells like fresh forest floor) | Apartments, renters, zero-backyard kitchens |
| #04 Japanese Bokashi Fermentation | Kitchen Countertop / Under Sink | 2 Weeks Ferment + 2 Weeks Bury | Low (Slight pickling / cider scent) | Composting meat, dairy, bones & small spaces |
| #05 Trench / Pit Composting | In-Ground Garden Beds | 3 to 6 Months (Passive) | Zero (Buried 12 inches deep) | Zero-budget gardeners, direct vegetable bed feeding |
| #06 Lasagna Sheet Mulching | New or Existing Garden Beds | 4 to 6 Months (Ready by spring) | Zero (Covered in straw/mulch) | Smothering lawn, building new fertile planting beds |
| #07 Wire Mesh Leaf Mold Cage | Corner of Backyard / Under Trees | 12 to 24 Months (Slow Fungal) | Zero (Autumn woods aroma) | Properties with heavy deciduous autumn leaf fall |
| #08 Electric Kitchen Countertop Appliance | Kitchen Counter (Coffee maker size) | 4 to 8 Hours (Dehydration/Grind) | Zero (Internal carbon filters) | Apartment dwellers wanting instant food waste reduction |
| #09 DIY 5-Gallon Aerated Bucket | Balcony / Small Porch | 2 to 3 Months | Low (requires proper brown balance) | College students, DIYers on a $10 budget |
| #10 Hugelkultur Wood-Decay Mounds | Yard / Permaculture Homestead | Ongoing for 5 to 10 Years | Zero | Repurposing fallen logs, tree trimmings & drought beds |
#01. The Classic 3-Bin Wooden Pallet System
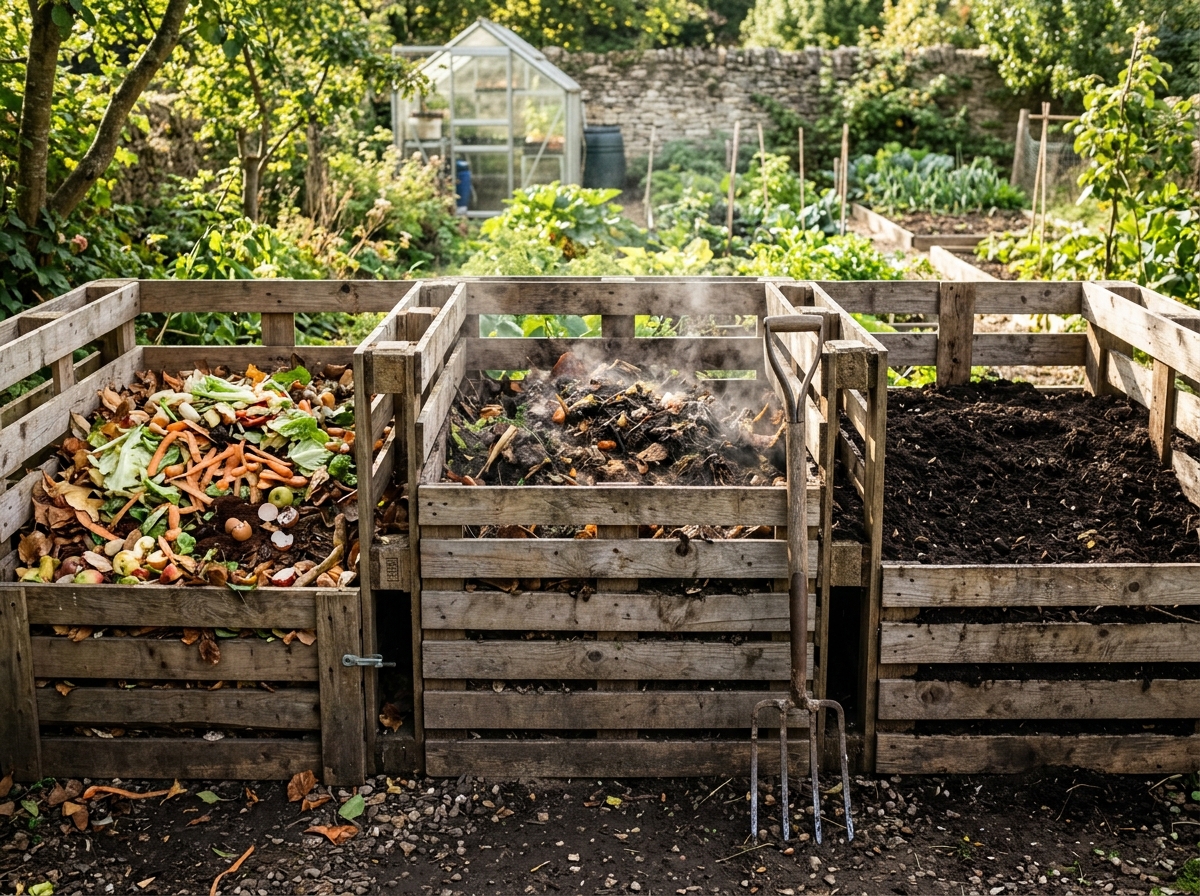
The three-bin wooden pallet system is the gold standard for homesteaders and serious vegetable gardeners. It operates on a continuous rotation assembly line: Bin 1 collects fresh daily kitchen scraps and carbonaceous brown yard trimmings; Bin 2 holds the actively cooking, high-heat batch; and Bin 3 stores dark, sifted, finished compost ready for top-dressing vegetable beds.
Materials & Tools Needed
- 4 to 7 heat-treated wooden shipping pallets (stamped ‘HT’)
- Galvanized wood screws or heavy-duty wire zip-ties
- Long-handled steel pitchfork or compost aerator
- Compost dial thermometer (18-to-24 inch stem)
How to Set Up & Operate
Secure shipping pallets together in an ‘E’-shaped configuration using exterior-grade screws. Ensure you choose pallets marked ‘HT’ (Heat Treated) rather than ‘MB’ (chemically treated with methyl bromide). Fill Bin 1 with alternating 4-inch layers of greens (nitrogen) and browns (carbon). When full, fork the entire mass into Bin 2 to aerate and trigger thermophilic heating (130°F–155°F).
Ideal Feedstock & Ingredients: High-volume lawn clippings, autumn leaves, spent tomato and zucchini vines, straw bedding, and kitchen peelings.
🌿 Horticulturist Pro-Tip: Keep a piece of black silage plastic or a permeable canvas tarp over the active cooking bin. This retains internal heat and prevents heavy rainstorms from waterlogging the pile and washing away water-soluble nitrogen.
#02. The Dual-Chamber Tumbling Composter
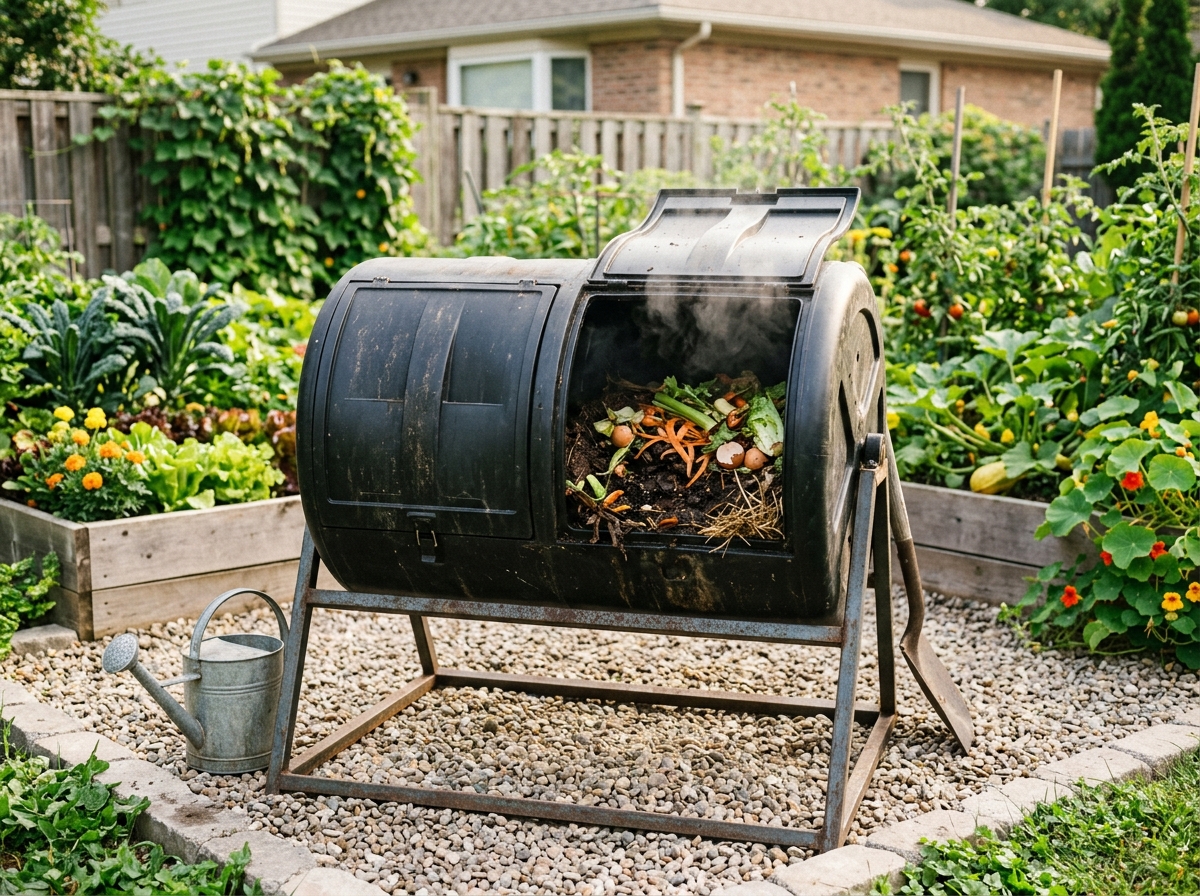
For suburban backyards where raccoons, rodents, and neighborhood aesthetics are top concerns, an elevated tumbler bin is unbeatable. Because the drum sits off the ground on steel legs and features tight latching doors, pests cannot burrow or chew their way in. Furthermore, aerating the pile requires merely spinning the handle rather than back-breaking pitchfork work.
Materials & Tools Needed
- Dual-chamber elevated tumbling bin unit
- Hand pruners to chop scraps into 1-inch chunks
- Bag of dry brown carbon (wood shavings, coco coir, or shredded cardboard)
- Small hand cultivator or scoop
How to Set Up & Operate
Fill Chamber A with chopped kitchen scraps paired with equal volumes of dry carbon (shredded egg cartons or hardwood shavings). Give the drum 3 to 5 full spins every 2 to 3 days. Once Chamber A is full, slide its door shut to cure and begin filling Chamber B. Within 4 to 6 weeks of turning, Chamber A will produce dark, sweet-smelling compost.
Ideal Feedstock & Ingredients: Kitchen vegetable scraps, coffee grounds, crushed eggshells, shredded brown paper bags, and dry sawdust.
🌿 Horticulturist Pro-Tip: Tumblers can easily become too soggy because they don’t touch the earth to drain excess moisture. Always add a handful of dry shredded cardboard every single time you empty wet kitchen greens into the drum.
#03. Indoor Vermicomposting (Worm Farming)
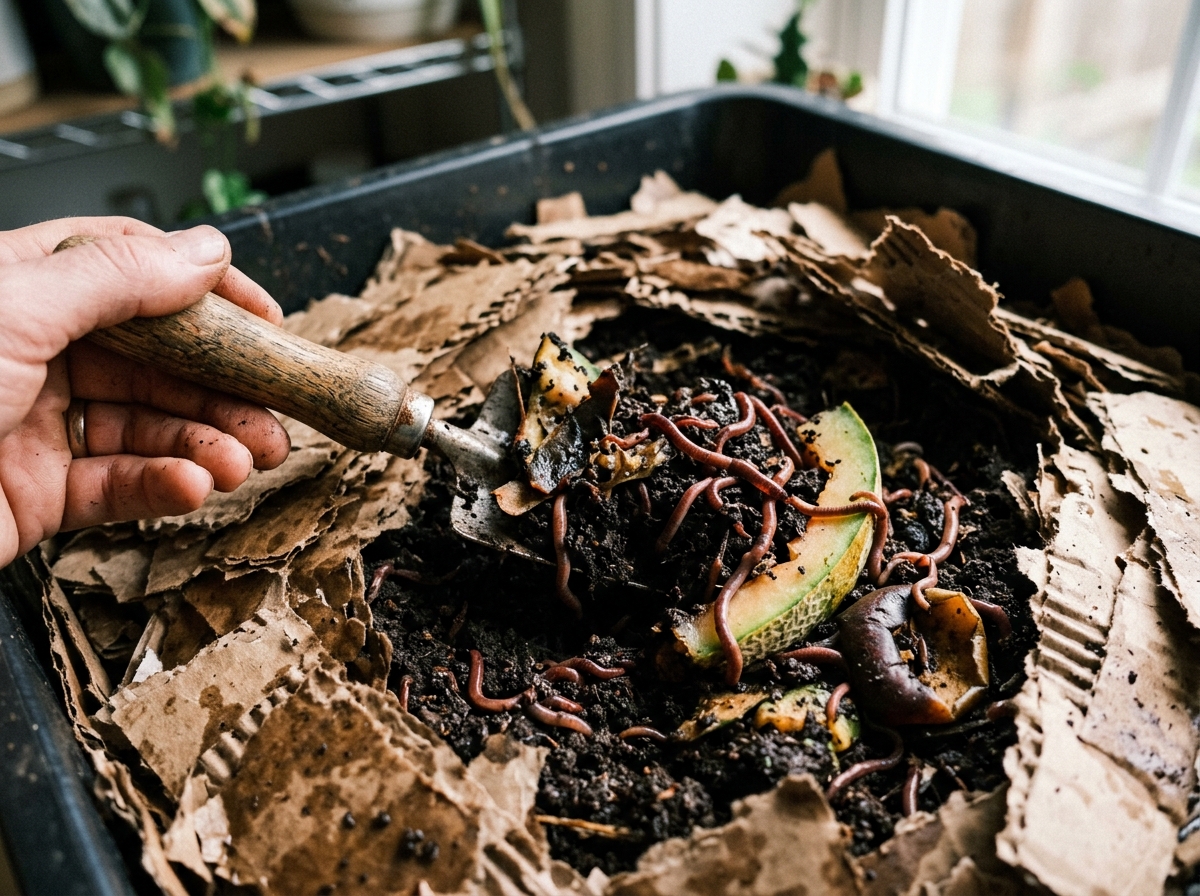
Vermicomposting is the ultimate apartment-friendly composting solution. Specially bred composting worms—Red Wigglers (*Eisenia fetida*)—consume half their body weight in decomposing matter daily, passing it through their digestive tracts to produce worm castings. Worm castings are the most biologically active, nutrient-dense organic fertilizer known to agriculture.
Materials & Tools Needed
- 10-to-18 gallon dark plastic storage tote or stackable worm condo
- 1 lb of Red Wiggler worms (Eisenia fetida—NOT regular earthworms)
- Non-glossy black-and-white newsprint or unbleached corrugated cardboard
- Hand misting spray bottle
How to Set Up & Operate
Drill 1/16-inch ventilation holes around the top rim of an opaque plastic tote. Tear cardboard into 1-inch strips, soak them in water, wring them out until damp like a wrung-out sponge, and fluff into a 6-inch bedding layer. Add your red wigglers. Bury food scraps beneath the bedding in alternating corners of the bin each week.
Ideal Feedstock & Ingredients: Melon rinds, lettuce leaves, carrot peels, apple cores, coffee grounds with paper filters, and crushed eggshells (calcium is vital for worm reproduction).
🌿 Horticulturist Pro-Tip: Never feed worms citrus peels (acidic limonene irritates worm skin), onions, garlic, hot chili peppers, or oils. Keep the bin indoors at temperatures between 55°F and 77°F (13°C–25°C).
#04. Japanese Bokashi Kitchen Fermentation
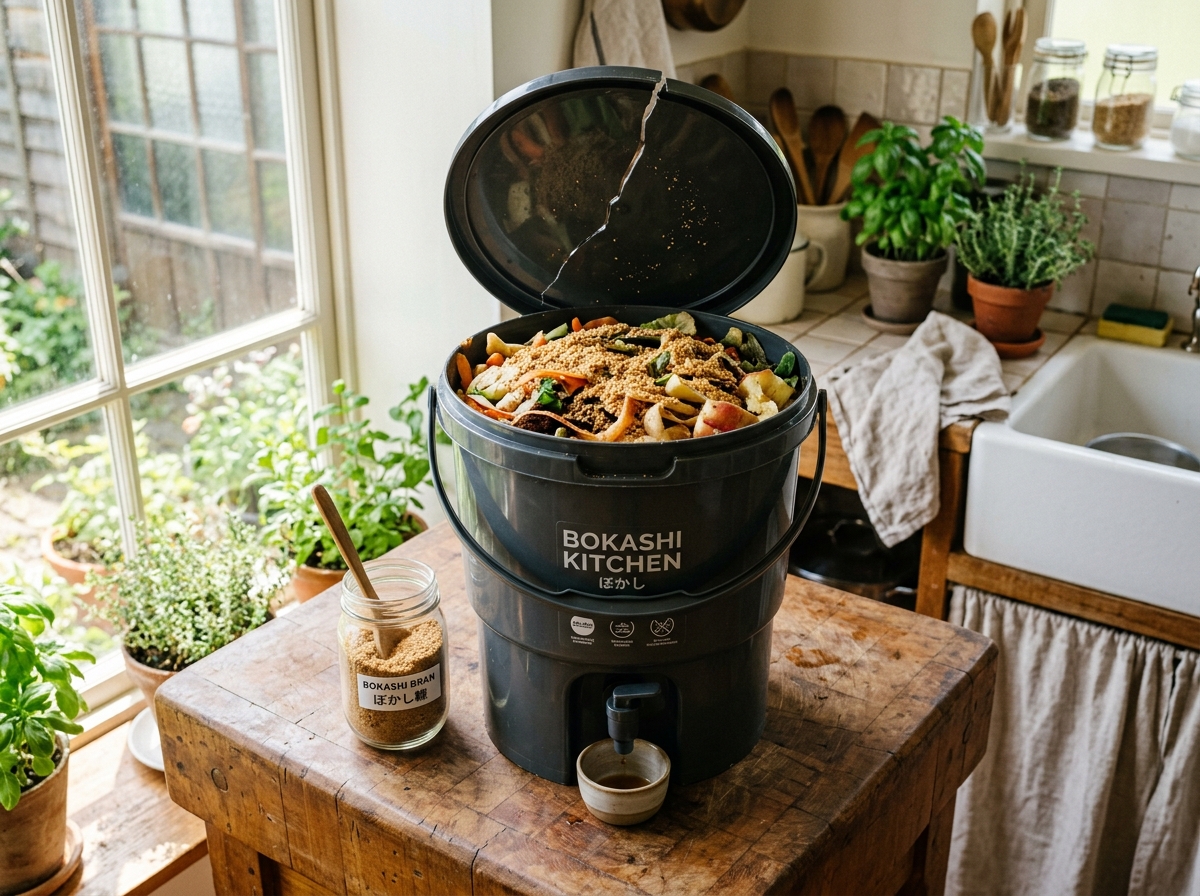
Unlike traditional composting which relies on aerobic (oxygen-loving) bacteria, Bokashi is an ancient Japanese anaerobic fermentation process. Because it functions via beneficial lactobacillus fermentation (similar to making sauerkraut or kimchi), you can safely compost items normally strictly forbidden in home composting—including meat trimmings, small poultry bones, cheese rinds, and cooked leftovers.
Materials & Tools Needed
- Airtight Bokashi bucket with interior strainer grid and drainage spigot
- Bokashi Bran (wheat bran inoculated with Effective Microorganisms / EM-1)
- Flat tamper or potato masher to compress food scraps
How to Set Up & Operate
Deposit your daily food scraps into the airtight bucket. Compress them firmly with a tamper to eliminate air pockets. Sprinkle 1 to 2 tablespoons of dry Bokashi bran across the surface. Seal the airtight lid. Drain the liquid ‘Bokashi tea’ from the base spigot every 3 to 4 days to dilute 1:100 with water for houseplants.
Ideal Feedstock & Ingredients: Table scraps, cooked rice, pasta, meat scraps, fish skins, cheese, vegetable peels, and stale bread.
🌿 Horticulturist Pro-Tip: When the bucket is full, let it ferment undisturbed for 14 days. It won’t look like dirt—the food retains its shape but will be thoroughly pickled. Dig a 10-inch trench in your garden and bury the fermented mass; soil microbes and earthworms will completely dissolve it into rich soil within 14 days.
#05. Trench & Pit Composting (Direct Burial)
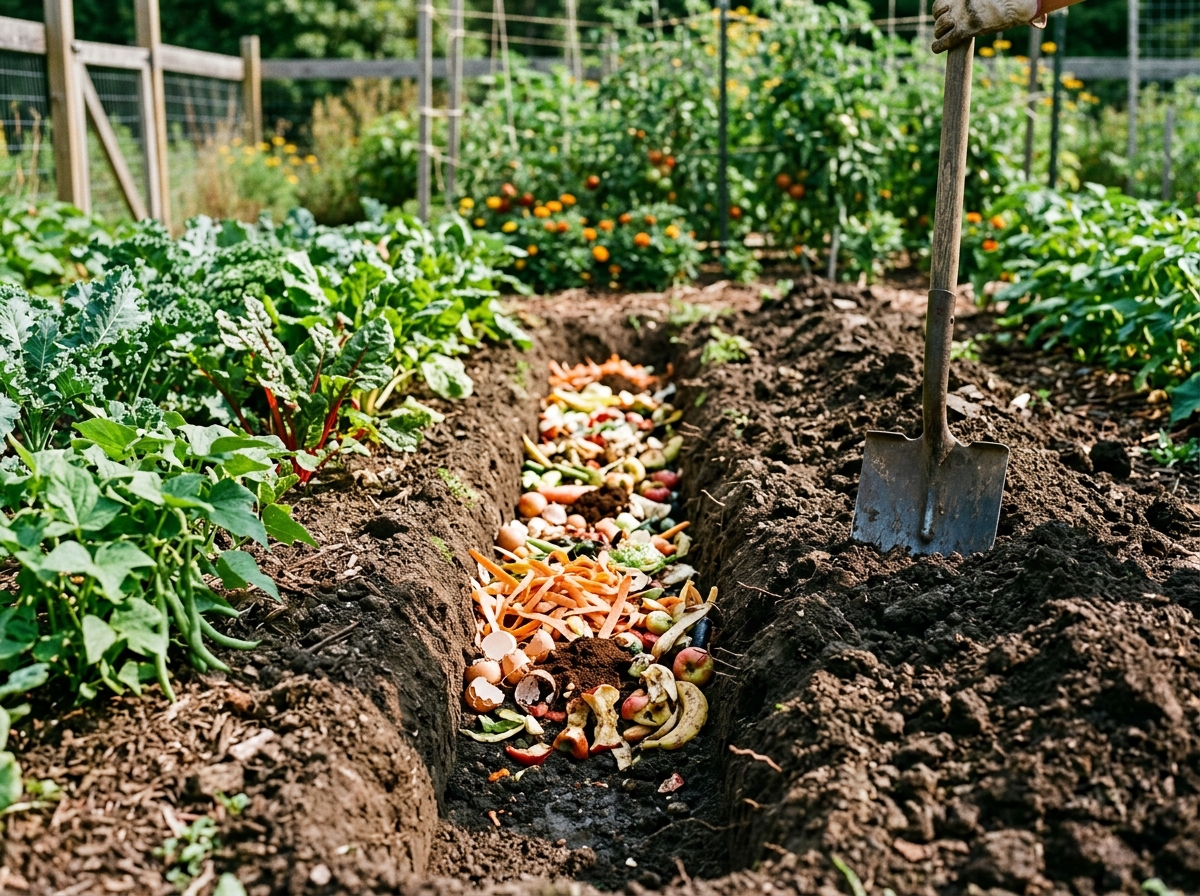
Trench composting is the oldest, simplest, and most discreet composting technique in existence. It requires zero plastic bins, zero pallets, zero turning, and zero maintenance. By burying raw scraps 10 to 12 inches beneath garden soil, earthworms and subterranean bacteria break down the organic matter right where future plant roots will forage.
Materials & Tools Needed
- Sharp round-point garden spade or trenching shovel
- Kitchen scrap collector bucket
- Wood stakes or garden markers to track buried trenches
How to Set Up & Operate
Dig a trench 12 inches deep and 10 to 12 inches wide along an empty garden bed or between vegetable rows. Fill the bottom 4 inches with chopped kitchen scraps. Chop with the blade of your spade, then backfill with at least 8 inches of excavated garden soil, tamping it down firmly.
Ideal Feedstock & Ingredients: Chopped fruit rinds, vegetable parings, coffee grounds, used tea leaves, crushed eggshells, and soft garden trimmings.
🌿 Horticulturist Pro-Tip: Adopt the English 3-Year Rotation System: Divide your garden bed into three parallel strips. Year 1: Bury scraps in Strip A; plant heavy feeders (tomatoes/corn) in Strip B; leave Strip C as a walkway. In Year 2 and 3, rotate the trenches so your entire plot is naturally fertilized on a cycle.
#06. Lasagna Sheet Mulching (Sheet Composting)
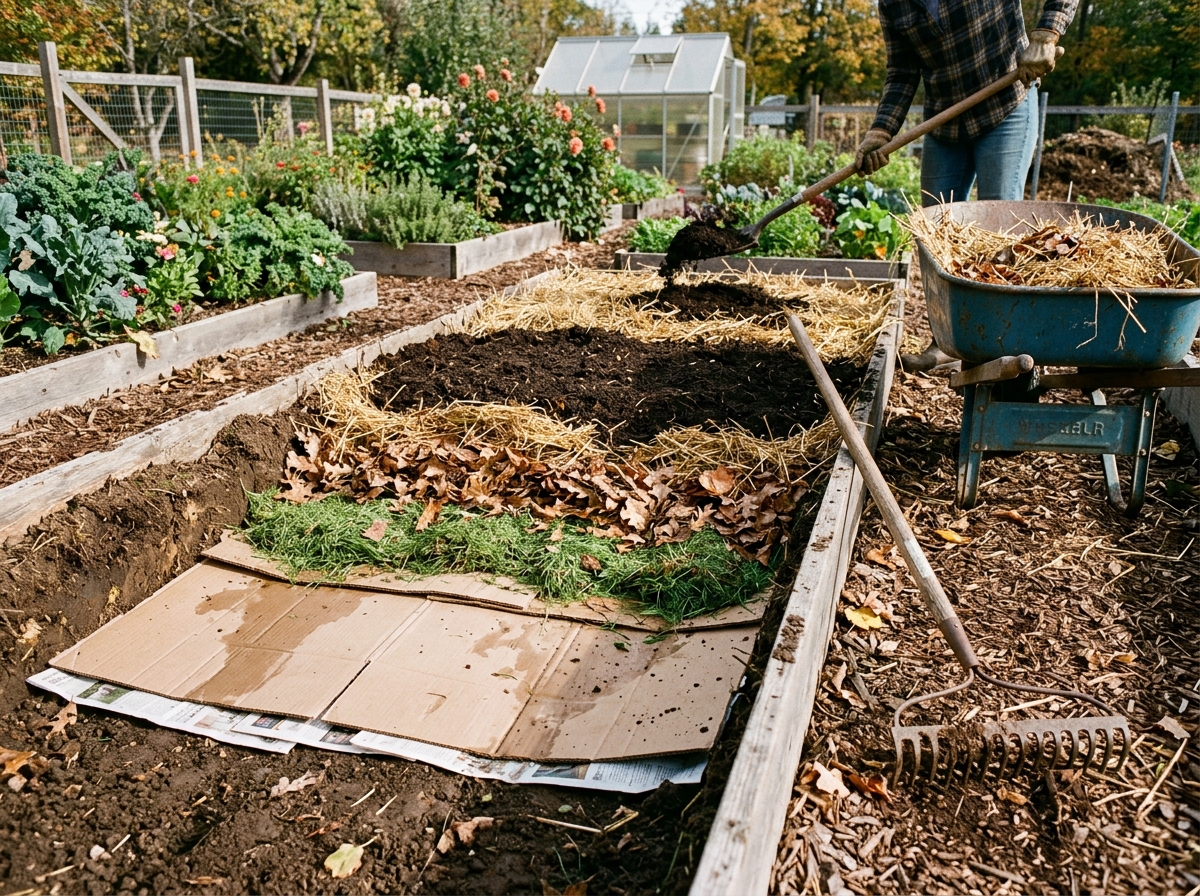
Lasagna composting (also called sheet mulching) builds soil directly in place without tilling or digging. If you want to transform a patch of crabgrass or compacted lawn into an ultra-fertile flower or vegetable garden bed without digging up turf, lasagna layering breaks down organically over a few months while smothering weeds.
Materials & Tools Needed
- Plain non-waxed corrugated brown cardboard (tape removed)
- High-nitrogen green materials (fresh grass clippings, aged animal manure, green scraps)
- High-carbon brown materials (shredded autumn leaves, clean seedless straw)
- Garden hose with spray nozzle
How to Set Up & Operate
Mow the grass short. Lay down two overlapping layers of thick brown cardboard directly over the grass, ensuring no gaps for weeds. Wet the cardboard thoroughly. Add a 2-inch layer of green nitrogen materials, followed by a 4-inch layer of brown carbon materials. Repeat like a lasagna until the bed reaches 18 to 24 inches high, topping with 2 inches of finished compost or straw.
Ideal Feedstock & Ingredients: Cardboard, shredded tree leaves, horse or chicken manure, alfalfa hay, grass clippings, and kitchen scraps.
🌿 Horticulturist Pro-Tip: You can plant directly into a freshly built lasagna bed on day one! Simply use a trowel to slice an ‘X’ through the layers down to the cardboard, scoop in two handfuls of topsoil, and set your vegetable transplant right into the pocket.
#07. The Wire Mesh Leaf Mold Cage
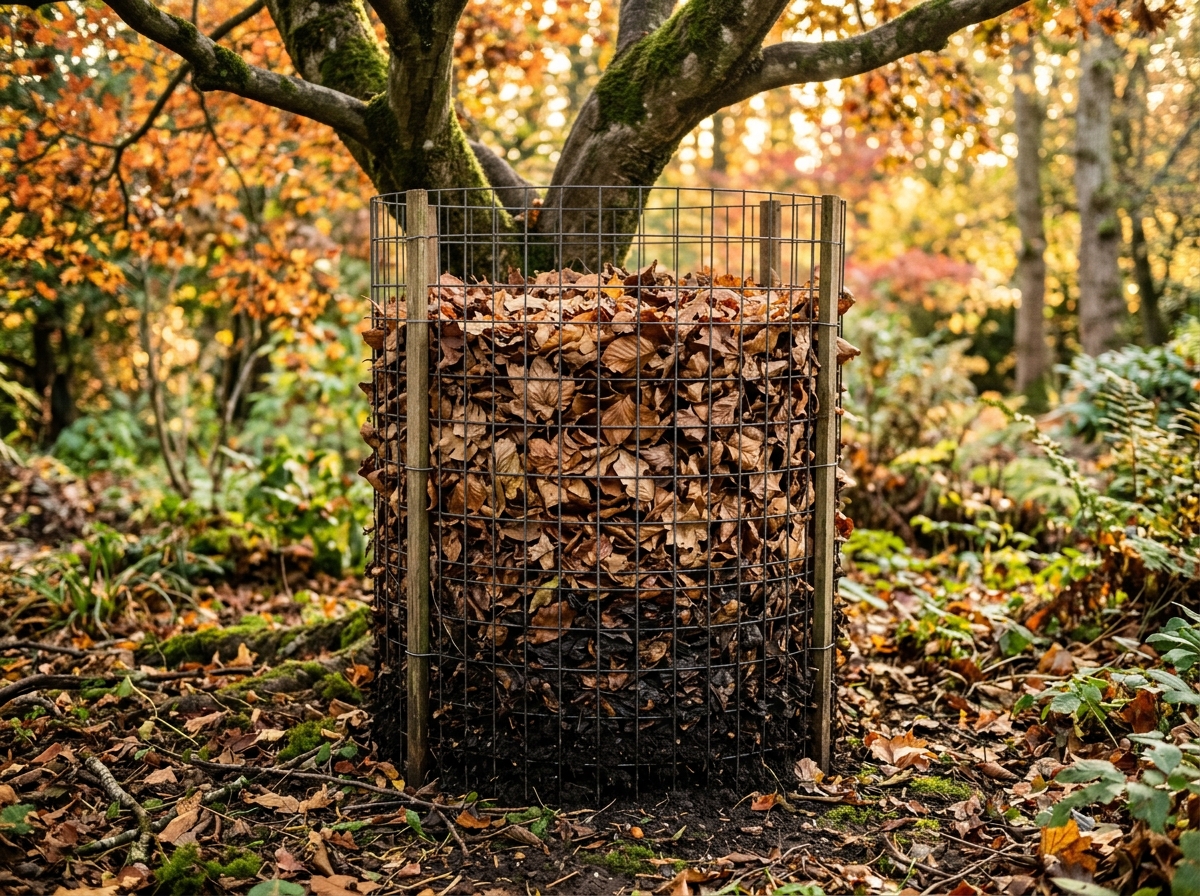
Leaf mold is distinct from ordinary compost: while hot compost relies primarily on fast bacterial decomposition of mixed greens and browns, leaf mold is produced purely through slow fungal decomposition of deciduous autumn leaves. The result is a velvety, moisture-retentive soil conditioner that holds up to 500% of its weight in water.
Materials & Tools Needed
- 10 to 12 feet of 14-gauge welded wire fencing or hardware cloth (3 to 4 feet tall)
- 3 wooden or metal T-posts to anchor the cylinder
- Lawn mower or string trimmer to shred fallen leaves
- Garden hose to soak the leaves
How to Set Up & Operate
Roll your wire fencing into a 3-to-4 foot diameter cylinder and secure the ends with wire. Drive two or three metal stakes into the soil to hold it upright in a shady corner. Run over dry fallen autumn leaves with a mulching lawn mower to shred them into small pieces. Fill the cage, soaking the leaves thoroughly with water every 12 inches.
Ideal Feedstock & Ingredients: Deciduous tree leaves: oak, maple, beech, ash, birch, and fruit tree foliage. Avoid thick waxy magnolia leaves or toxic black walnut leaves (which contain the juglone toxin).
🌿 Horticulturist Pro-Tip: Shredding the leaves before packing the cage cuts the decomposition timeframe from two years down to just 9 to 12 months. Finished leaf mold is the single finest natural peat moss alternative for seed starting mixes and potting soils.
#08. The Electric Kitchen Countertop Composter
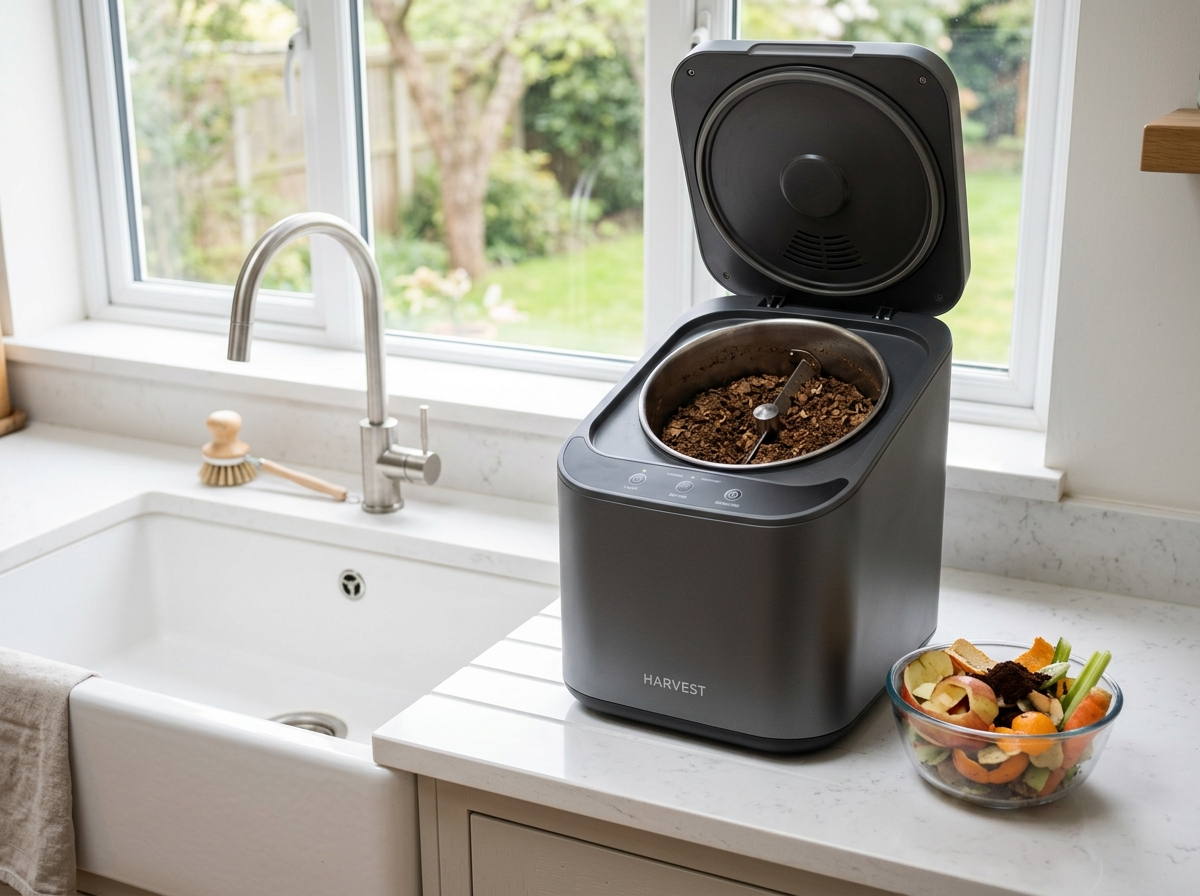
For high-rise urban apartment dwellers with zero outdoor access, electric food dehydrators and countertop cyclers have revolutionized kitchen waste. In 4 to 8 hours, these quiet appliances use heated grinding blades and moisture sensors to desiccate, pulverize, and reduce food scraps volume by 80% to 90%.
Materials & Tools Needed
- Electric food waste dehydrator/cycler (Lomi, Mill, or FoodCycler)
- Activated charcoal filter cartridges
- Small countertop storage container for daily scrap collection
How to Set Up & Operate
Plug in the unit on a level kitchen countertop. Dump your daily plate scraps, vegetable peelings, and coffee grounds into the removable cast-aluminum bucket up to the fill line. Lock the lid and press the start button. Internal carbon filters eliminate all cooking and food smells as the cycle runs quietly overnight.
Ideal Feedstock & Ingredients: Vegetable peels, fruit scraps, bread, pasta, poultry bones, coffee grounds, and plate leftovers.
🌿 Horticulturist Pro-Tip: Technically, electric appliances produce ‘pre-compost’ (sterilized dehydrated food flakes) rather than biologically cured compost. For best garden results, mix the dry flakes into your garden soil or outdoor potting containers and let soil microbes hydrate and activate them for 1 to 2 weeks before planting.
#09. The DIY 5-Gallon Aerated Bucket
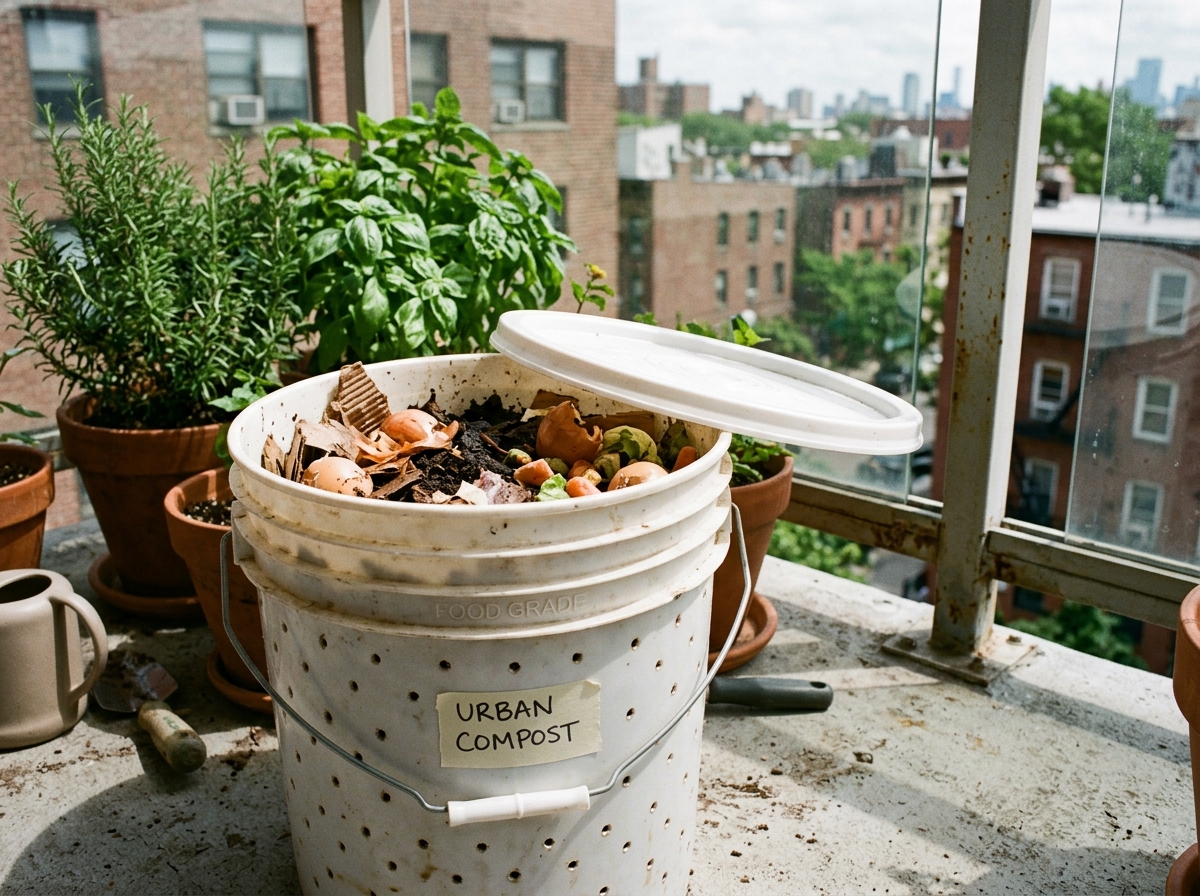
If you want to compost on a postage-stamp balcony, porch, or fire escape on a budget under $10, nested 5-gallon buckets create a clean, compact aerobic micro-composter. By drilling ventilation holes along the sides and bottom, air circulates naturally while excess liquid drains into the secondary collection bucket below.
Materials & Tools Needed
- Two 5-gallon food-grade plastic buckets (nesting)
- Tight-fitting snap-on bucket lid
- Power drill with 1/4-inch drill bit
- Small brick or block to separate the nested bucket bottoms
How to Set Up & Operate
Drill 20 to 30 small 1/4-inch holes along the upper sides and bottom of Bucket A. Place a 2-inch brick inside Bucket B, then nest Bucket A inside it. Add a 3-inch base layer of dry shredded newspaper and a handful of garden soil (to introduce native bacteria). Add chopped scraps and browns in a 1:2 ratio, shaking or rolling the bucket weekly to mix.
Ideal Feedstock & Ingredients: Crushed eggshells, shredded egg cartons, vegetable trimmings, coffee grounds, and loose tea leaves.
🌿 Horticulturist Pro-Tip: Empty the leachate liquid from Bucket B weekly and dilute it 1:10 with water. It provides an immediate, gentle liquid foliar feed for balcony herbs and container tomato plants.
#10. Hugelkultur Wood-Decay Mounded Beds
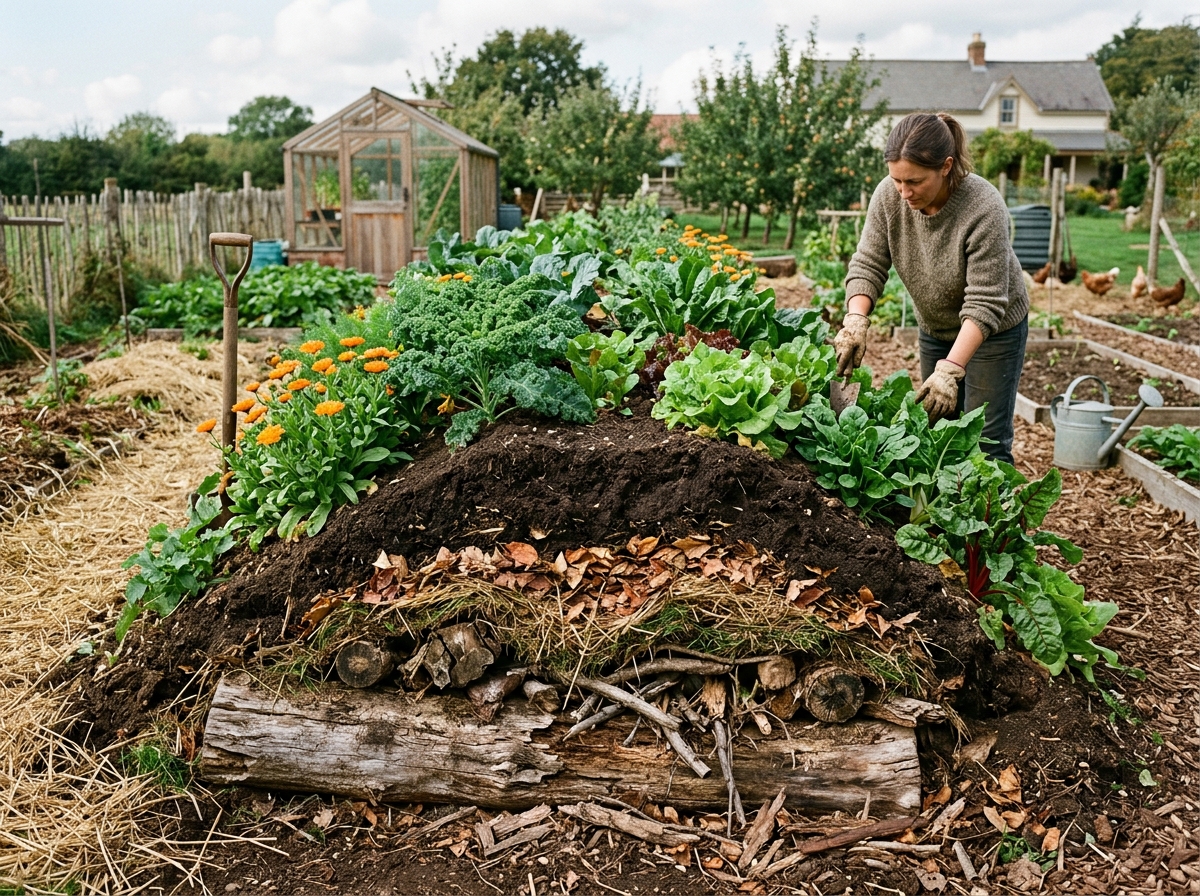
Hugelkultur (German for ‘hill mound’) is a centuries-old German permaculture technique that mimics the natural forest floor. By burying rotting tree logs and woody debris beneath sloped planting mounds, you create an underground sponge that holds moisture for months and slowly releases nutrients over a decade.
Materials & Tools Needed
- Fallen tree limbs, logs, and thick branches (hardwoods like oak, birch, or alder)
- Twig trimmings, inverted turf sod, and dry autumn leaves
- Finished compost and garden topsoil
- Shovel and wheelbarrow
How to Set Up & Operate
Excavate a shallow 1-foot trench (or build directly on top of the ground). Lay down your largest, most decayed hardwood logs. Fill the gaps between logs with smaller branches, twigs, and fallen leaves. Cover with upside-down sod grass, followed by a 6-inch layer of finished compost and topsoil to form a sloped 3-foot tall mound. Plant directly into the slopes.
Ideal Feedstock & Ingredients: Rotting hardwood logs (avoid cedar, walnut, and black locust which naturally resist decay or inhibit plant growth), pruned tree branches, leaves, and straw.
🌿 Horticulturist Pro-Tip: As the buried wood slowly rots underground, it acts as a massive thermal heat generator and water reservoir. By Year 2, an established Hugelkultur bed rarely requires any supplemental irrigation, even in the dead of midsummer heat.
5 Golden Rules for Odor-Free, High-Speed Composting
Whichever composting method fits your space and budget, biological decomposition follows five universal rules. Master these, and your compost will never smell, attract pests, or stall:
1. Master the 3:1 Brown-to-Green Carbon-Nitrogen Ratio
The most common reason compost fails or smells bad is an imbalance between nitrogen-rich ‘greens’ (kitchen scraps, fresh grass, coffee grounds) and carbon-rich ‘browns’ (dry leaves, straw, shredded cardboard, wood shavings). Aerobic decomposers require 3 parts carbon for every 1 part nitrogen by volume to thrive. When in doubt, always add an extra layer of dry brown cardboard or leaves.
2. Perform the ‘Wrung-Out Sponge’ Moisture Test
Beneficial composting bacteria and fungi live in a microscopic biofilm of water surrounding organic matter. If your pile is bone-dry, microbial activity stops completely. If it’s dripping wet, water fills all the air pores, killing aerobic bacteria and triggering foul anaerobic odors. Grab a handful of compost from the center of the pile and squeeze: it should feel moist like a damp sponge, yielding only one or two drops of water.
3. Oxygenate Regularly to Prevent Unwanted Odors
Foul-smelling compost (resembling rotten eggs or sour ammonia) is 100% preventable—it only happens when oxygen levels drop below 5%, allowing anaerobic bacteria to take over. Turn your backyard pile with a pitchfork every 7 to 14 days, spin your tumbler three times a week, or use a corkscrew aerator probe to introduce fresh oxygen channels into the core.
4. Chop scraps into 1-to-2 Inch Particles
Decomposition happens from the outside inward. A whole intact head of cabbage or large melon rind can sit in a compost bin for months without breaking down. Spend 60 seconds roughly chopping tough kitchen rinds, corn cobs, and stalks into 1-to-2 inch chunks before tossing them in. Smaller particle size drastically increases microbial surface area, cutting composting time in half.
5. Enforce the Strict ‘Never-Compost’ Blacklist for Beginners
Keep your home composting experience trouble-free by strictly excluding: pet feces (cats/dogs harbor pathogens like toxoplasmosis), meat and dairy (unless using Bokashi), diseased tomato or rose foliage, persistent perennial weeds with seed heads (bindweed/dandelion roots), and wood or yard waste treated with persistent synthetic herbicides.
Frequently Asked Questions
Can I really compost if I live in a small apartment without a yard?
Yes! Apartment dwellers have three excellent options: Indoor Vermicomposting (an odorless worm tote under the kitchen sink), Japanese Bokashi fermentation (an airtight bucket that handles all food scraps including meat), or an Electric Kitchen Dehydrator (which turns food waste into dry, sterile flakes in a few hours).
Why does my compost pile smell bad, and how do I fix it immediately?
Compost only smells bad if it is either too wet or has too much nitrogen (greens). If it smells like ammonia or sulfur, immediately turn the pile to introduce oxygen and blend in two to three buckets of dry, carbon-rich shredded cardboard, dry leaves, or sawdust. The dry browns will absorb excess moisture and neutralize odors within 24 hours.
How can I keep rodents, raccoons, and flies out of my compost bin?
Pests are attracted to exposed food odors and oils. To keep them out: (1) Use an elevated, locking tumbler bin or line wooden bins with 1/4-inch galvanized hardware cloth mesh; (2) Never leave fresh food scraps exposed on the top of the pile—always bury them 6 inches deep under dry leaves or brown mulch; and (3) Never add grease, oils, whole meats, or cheese to an outdoor aerobic pile.
How long does it take for compost to be ready to use?
Timing depends entirely on your method: A well-tended hot compost pile or tumbler can produce finished black gold in 4 to 8 weeks. Passive cold piles and wire leaf cages take 6 to 18 months. Worm castings take about 2 to 3 months. You know compost is ready when it is dark brown, crumbly, smells like a damp autumn forest floor, and no original food scraps are recognizable.
Can I add citrus peels and coffee grounds to compost?
Absolutely! Coffee grounds are a phenomenal ‘green’ nitrogen source packed with nitrogen (despite their dark brown color) and earthworms adore them. Citrus peels decompose effortlessly in outdoor hot compost piles, tumblers, and Bokashi systems. The only exception is indoor worm bins, where excessive acidic citrus should be limited so as not to irritate worm skin.
Start Small, Close the Loop
You don’t need expensive equipment or a massive homestead to start composting. Begin with a simple Bokashi bucket under the sink, an aerated 5-gallon balcony pail, or a dual-chamber tumbler in the yard. Within a few short weeks, you’ll feel the unmatched satisfaction of turning kitchen waste into dark, fertile black gold that brings your garden to life.


0 Comments