

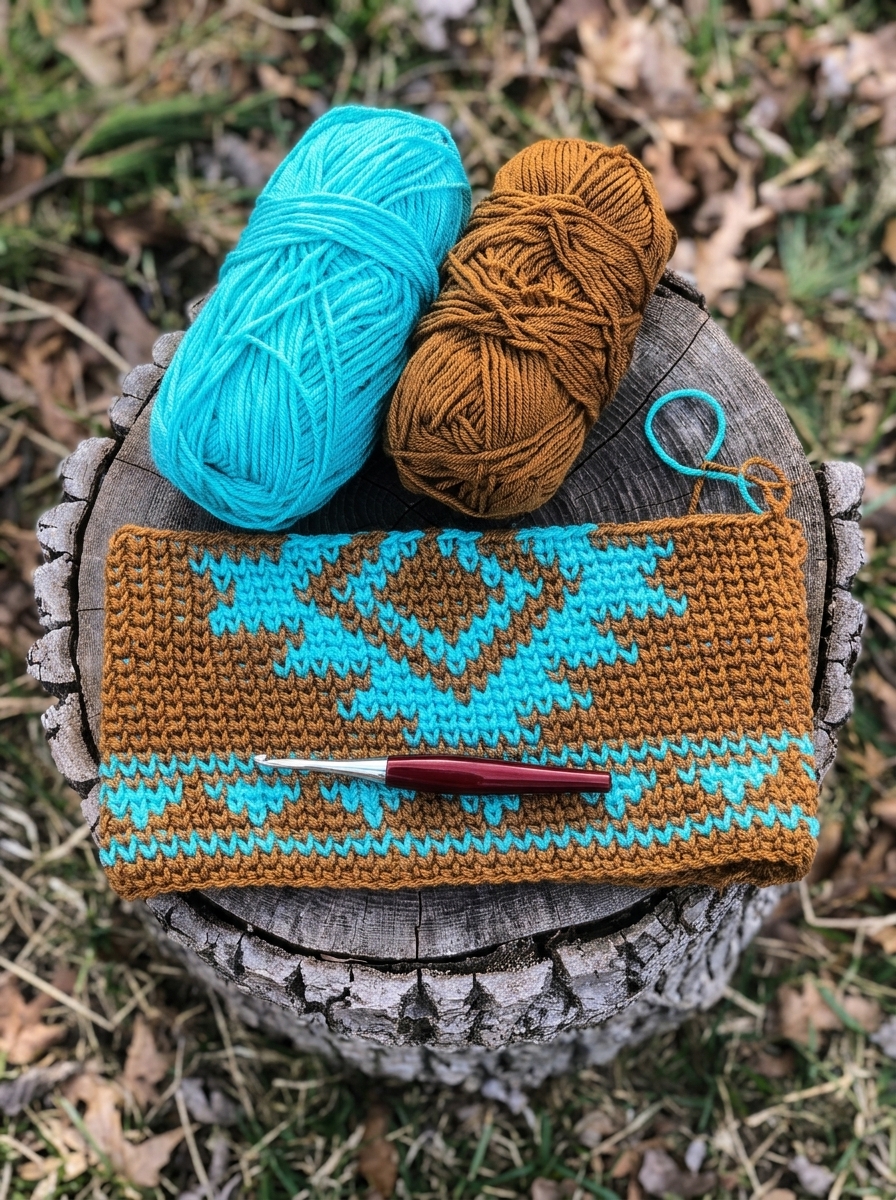
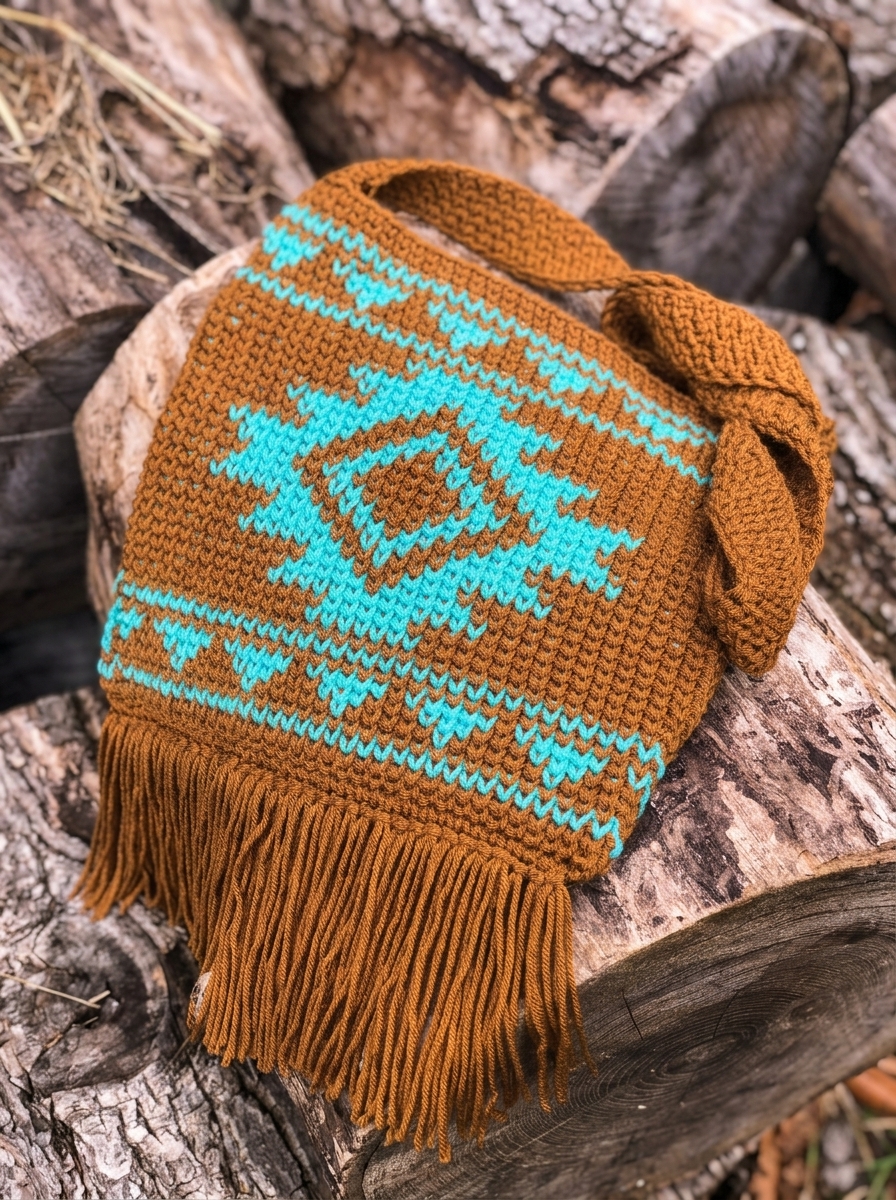
Hands-free convenience meets desert artistry in this free crochet crossbody bag pattern. Inspired by classic Southwest textiles, this sturdy shoulder purse pairs warm golden-brown yarn with a striking turquoise diamond medallion. Moreover, the entire body uses the knit-look waistcoat stitch to create a dense, non-stretch fabric. Because the stitches lock together so tightly, you never need to sew a fabric lining inside. Finally, a long waistcoat-stitch strap and knotted bottom fringe complete the bohemian look.
Why the Waistcoat Stitch Makes the Best Crochet Crossbody Bag Pattern.
Standard single crochet or double crochet bags often stretch out as soon as you drop your wallet and keys inside. Fortunately, this crochet crossbody bag pattern solves that problem by using the waistcoat stitch, also known as the center single crochet. First, working directly between the vertical legs of each stitch produces a beautiful knit-like V texture. Second, the waistcoat stitch keeps tapestry crochet color changes crisp and aligned from round to round. Third, the resulting fabric is thick and structured enough to hold small items without a sewn lining.
In addition to its no-sew body construction, this project works up seamlessly in the round as a 72-stitch tube. Once you finish Round 42 of the colorwork chart, you simply fold the bottom flat and single crochet the lower edge closed. Afterward, you crochet a six-row strap in turning rows and tie lark’s head fringe knots right along the bottom seam. If you love compact hands-free bags, check out our crochet phone pouch pattern next.
Exact Measurements, Gauge, and Sizing (3barat).
Reviewing the finished dimensions and gauge before you begin ensures that your bag body and strap turn out comfortably proportioned. Below are the exact specifications for this crochet crossbody bag pattern.
- Skill Level. Intermediate (makers should understand basic tapestry crochet color changes and carrying yarn).
- Finished Bag Width. Approximately 14 inches (35.5 cm) measured flat across the body tube (36 stitches per side).
- Finished Bag Height. Approximately 14 inches (35.5 cm) tall across 42 rounds before adding the bottom fringe.
- Body Circumference. 72 stitches worked in joined rounds, measuring approximately 28 inches (71 cm) around.
- Crossbody Strap Dimensions. 99 starting chains (98 stitches per row) worked for 6 turning rows, measuring about 38 to 40 inches (96 to 101.5 cm) long.
- Bottom Fringe Length. Cut from 16-inch (40.5 cm) strands halved to 8 inches (20.5 cm) and folded in half, creating a 3.5 to 4 inch (9 to 10 cm) finished fringe trim.
- Exact Gauge. 10 waistcoat stitches (ws) and 11 rows equal a 4 inch by 4 inch (10 cm by 10 cm) square using a 5.50 mm hook.
| Bag Component. | Starting Chain. | Stitch Count. | Total Rounds / Rows. | Finished Measurement. |
|---|---|---|---|---|
| Main Bag Body Tube. | Ch 72 (joined). | 72 sts per round (36 per side). | 42 rounds. | 14 in x 14 in (35.5 cm x 35.5 cm). |
| Bottom Closing Seam. | Folded flat. | 36 SC through both layers. | 1 seam row. | 14 in (35.5 cm) wide base. |
| Crossbody Shoulder Strap. | Ch 99 (loosely). | 98 sts per row (1 SC + 97 WS). | 6 turning rows. | Approx. 39 in x 1.75 in (99 cm x 4.5 cm). |
| Knotted Bottom Fringe. | 16 in strands cut in half. | 4 strands per bottom stitch. | 36 fringe knots. | Approx. 3.5 in (9 cm) trimmed length. |
Materials and Tools You Need (Matrial).
Choosing a smooth, medium worsted weight yarn makes inserting your hook into the center post of each stitch effortless. Gather these exact supplies before starting your crochet crossbody bag pattern.
- Main Color Yarn (MC – Golden Brown). Approximately 5 oz (142 g, or roughly 250 to 280 yards) of Category #4 Medium Worsted weight acrylic yarn.
- Contrasting Color Yarn (CC – Turquoise). Approximately 3 oz (85 g, or roughly 150 to 170 yards) of Category #4 Medium Worsted weight acrylic yarn.
- Crochet Hook. US Size I-9 (5.50 mm) ergonomic crochet hook.
- Tapestry Needle. Blunt metal or plastic darning needle for sewing the strap ends to the bag and weaving in tails.
- Scissors. Sharp craft shears for cutting the 16-inch fringe strands and trimming the bottom edge evenly.
Stitches and Abbreviations (US Terms).
This crochet crossbody bag pattern is written in standard US crochet terms. Review these abbreviations and special techniques before casting on.
- ch. Chain stitch.
- st / sts. Stitch / Stitches.
- sl st. Slip stitch.
- sc. Single crochet (insert hook under top two loops, yarn over, pull up a loop, yarn over, draw through 2 loops).
- ws. Waistcoat stitch (also called center single crochet; worked identically to a single crochet, except you insert the hook directly through the center V post of the stitch below).
- MC. Main Color yarn (Golden Brown).
- CC. Contrasting Color yarn (Turquoise).
How to Work the Waistcoat Stitch (In the Round & Turning Rows).
Mastering one golden rule will make this entire project a breeze: keep your tension very loose! If you crochet tightly, pushing your hook between the vertical legs of the stitch post becomes difficult. Practice a small swatch first so your hands relax into a loose, comfortable rhythm.
Working the Waistcoat Stitch in the Round.
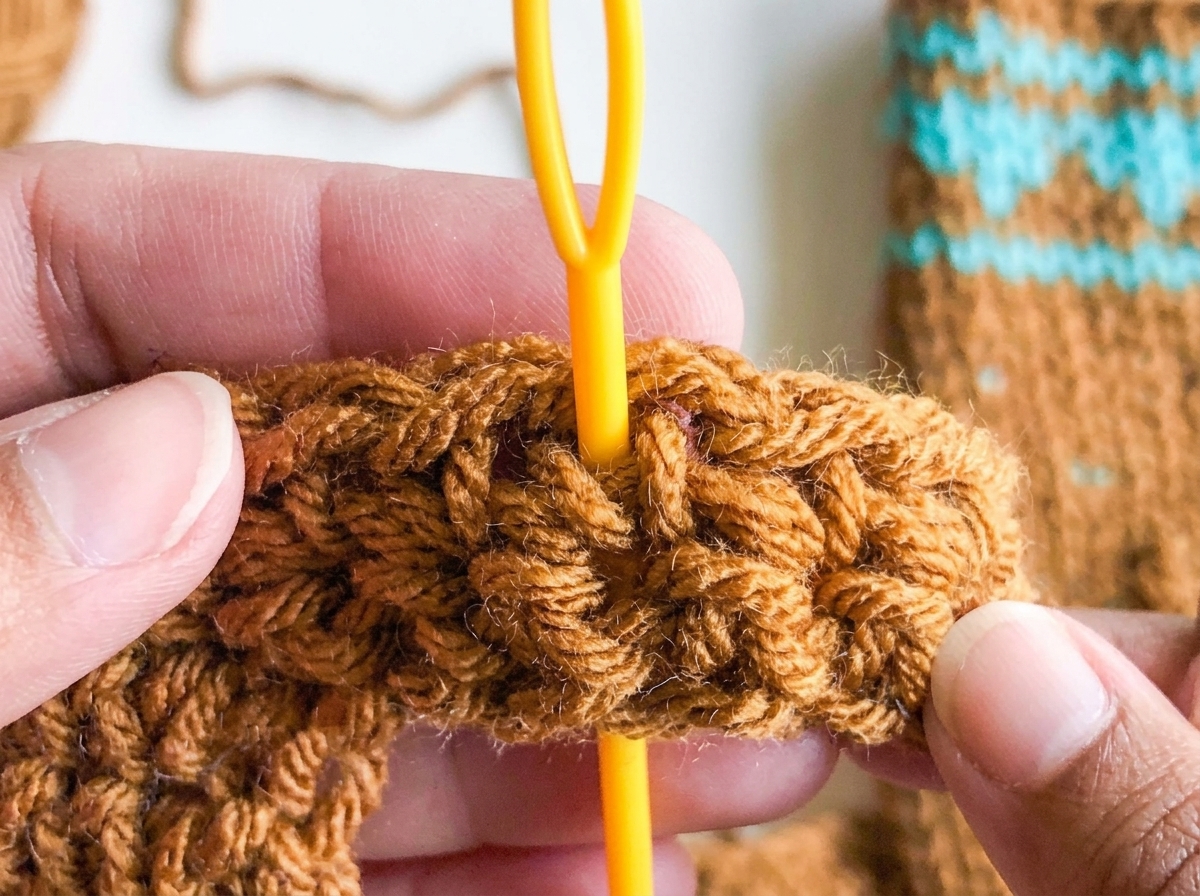
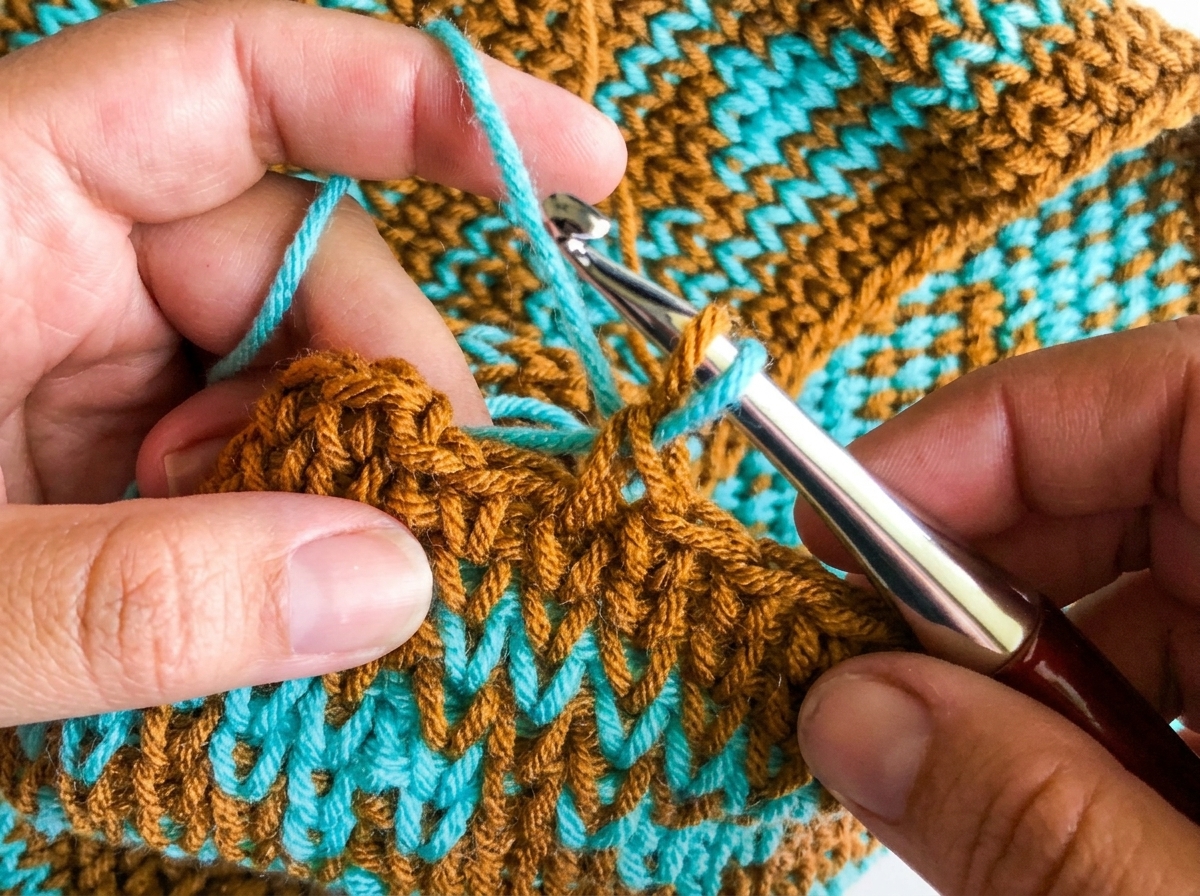
In traditional single crochet, you insert your hook underneath the two horizontal loops at the top of the stitch. For the waistcoat stitch (ws), look directly below those top loops at the front post of the single crochet stitch. You will see two vertical strands forming a neat “V” shape. Insert your 5.50 mm hook straight through the center of that V, right between the two legs. Yarn over, pull up a loose loop, yarn over, and draw through both loops on your hook.
Working the Waistcoat Stitch in Turning Rows (For the Strap).
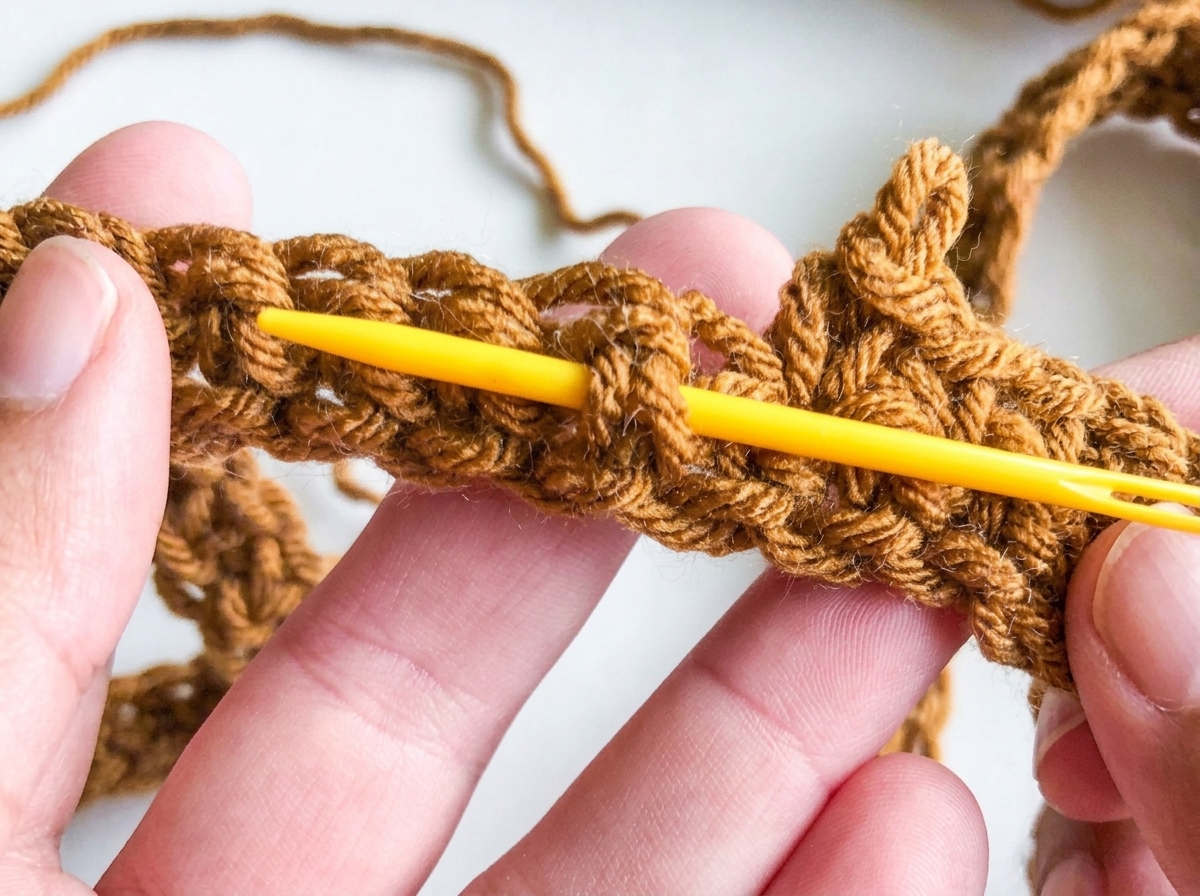
While the main bag body is worked continuously with the right side facing you, the crossbody strap is worked back and forth in turning rows. When you turn your strap to work on the wrong side, the stitch post looks like an upside-down “V” on the back of the fabric. Insert your hook carefully between the two legs of that upside-down V from the wrong side, and keep your loops extra loose on Row 2.
How to Change Colors cleanly in Tapestry Crochet.
Clean color transitions make the turquoise Southwest diamond and triangle borders pop against the golden-brown background. Follow these three tapestry crochet rules throughout your crochet crossbody bag pattern.
- First, Switch Colors on the Final Yarn-Over. Work the stitch immediately before a color change halfway: insert your hook into the center V and pull up a loop so two loops remain on your hook. Drop your current color, yarn over with the new color, and pull the new color through both loops to finish the stitch.
- Second, Carry the Unused Yarn Inside the Stitches. Never cut your yarn between color changes. Instead, lay the unused strand flat along the top of the previous round, and work your waistcoat stitches right over it so it remains hidden inside the fabric.
- Third, Drop Your Yarns Consistently to Prevent Tangling. Whenever you switch from MC to CC, always drop the MC strand to the back of your work. Conversely, whenever you switch from CC back to MC, always drop the CC strand to the front of your work.
Part 1: Crocheting the Crossbody Bag Body (Rounds 1–42).
The bag body is worked in joined rounds from the bottom up. Note that the initial ch 1 at the start of each round never counts as a stitch. Every round ends with a sl st join into the first stitch followed by ch 1, maintaining an exact count of 72 stitches per round.
Written Foundation Rounds (Rounds 1–2).
- First, Foundation Ring. Using your 5.50 mm hook and Main Color (MC), work ch 72 loosely. Being careful not to twist the chain, join with a sl st to the first ch, and work ch 1. (72 ch).
- Second, Round 1. Work 1 sc into the same ch as the ch 1 and into each ch around, keeping your tension very loose. Join with a sl st to the first sc, and work ch 1. (72 sc).
- Third, Round 2. With MC (and carrying CC inside your stitches starting near the end of the round if desired), work 1 ws into the first st and into each st around. Join with a sl st to the first st, and work ch 1. (72 ws).
How to Read the 36-Stitch Color Graph (Rounds 3–42).
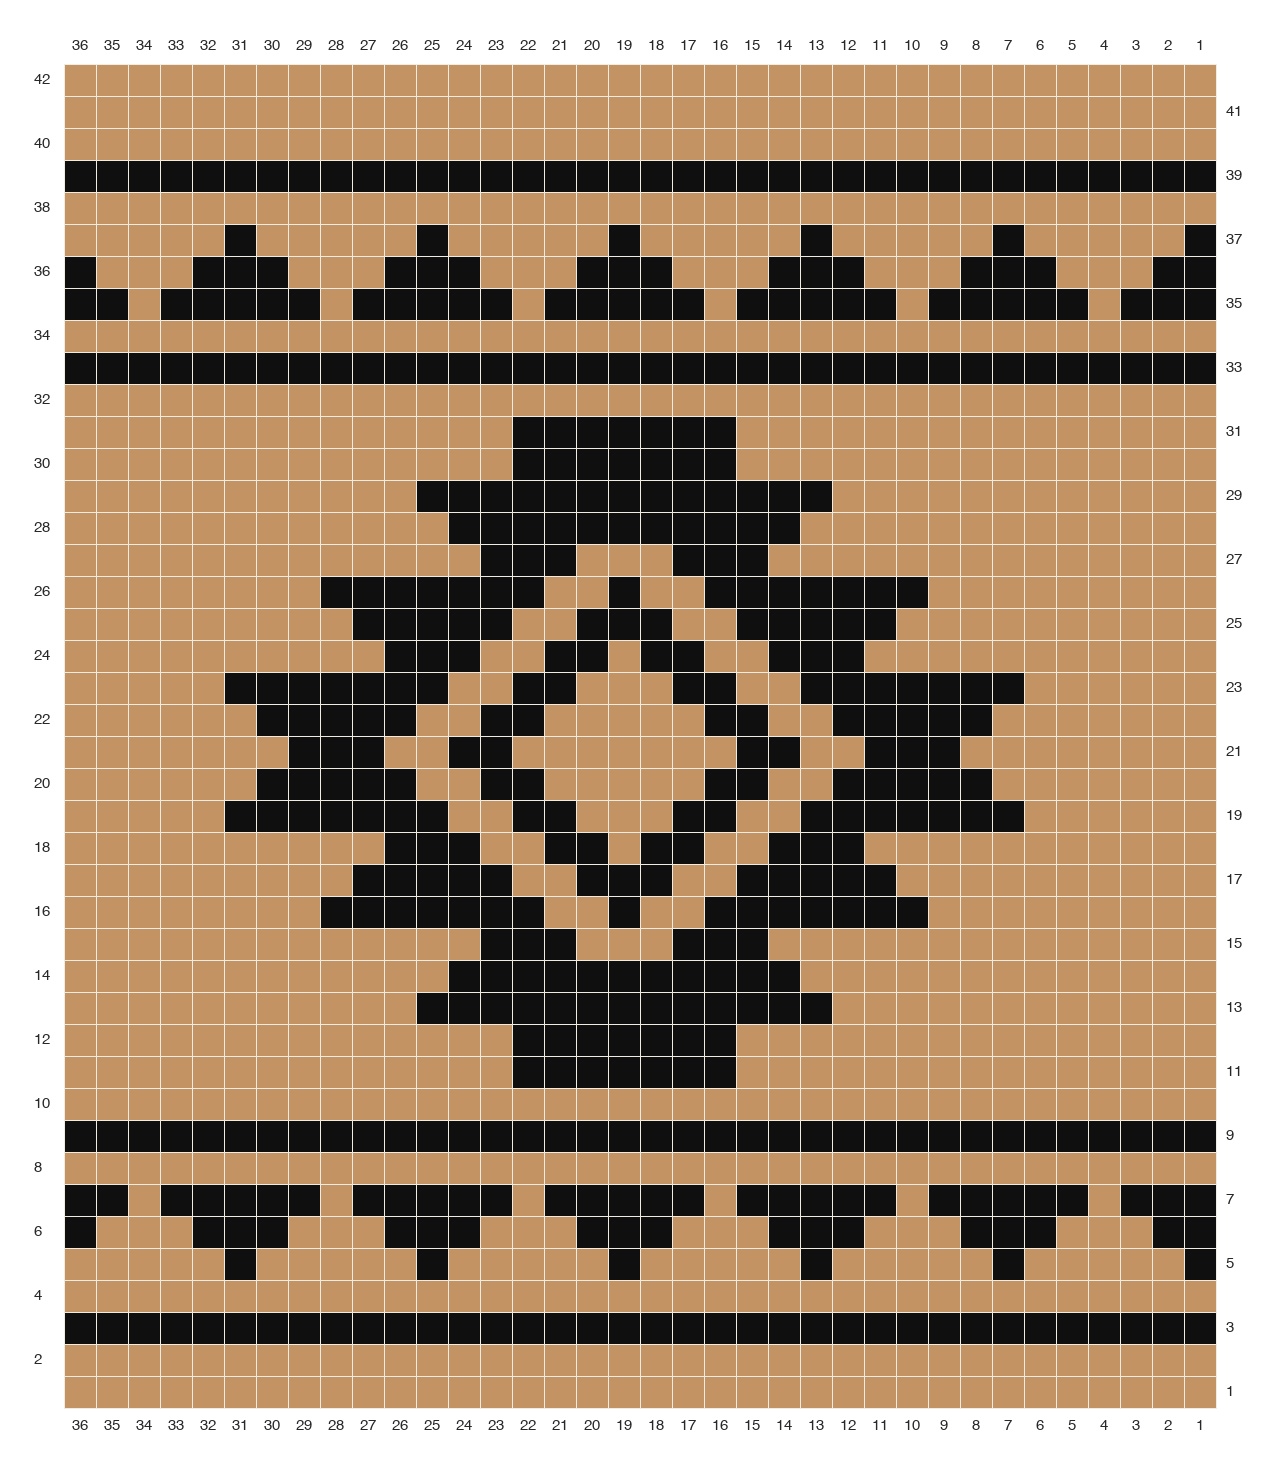
Starting at Round 3, continue working every stitch as a waistcoat stitch (ws) while following the Southwest color graph below. Each square on the chart represents one stitch. Because we crochet from right to left, read every round of the graph from right to left (from Column 1 to Column 36).
Important Repeat Rule. To keep the chart compact and easy to read, the graph displays 36 stitches (exactly half of the bag). To complete a full 72-stitch round, work Columns 1 through 36 once for the front of the bag, and immediately repeat Columns 1 through 36 a second time for the back of the bag. Join with a sl st to the first stitch and ch 1 at the end of every round.
Complete Written Stitch Counts for the Color Graph (36-Stitch Half-Round Repeat).
If you prefer written colorwork instructions alongside the visual chart, work each 36-stitch sequence below twice per round (72 ws total per round), reading from stitch 1 to stitch 36:
- Rounds 1–2. (36 MC) x 2 around. (72 ws).
- Round 3. (36 CC) x 2 around. (72 ws).
- Round 4. (36 MC) x 2 around. (72 ws).
- Round 5 (Lower Triangle Tips). (*1 CC, 5 MC* repeated 6 times) x 2 around. (72 ws).
- Round 6 (Lower Triangles Middle). (2 CC, *3 MC, 3 CC* repeated 5 times, 3 MC, 1 CC) x 2 around. (72 ws).
- Round 7 (Lower Triangles Base). (3 CC, *1 MC, 5 CC* repeated 5 times, 1 MC, 2 CC) x 2 around. (72 ws).
- Round 8. (36 MC) x 2 around. (72 ws).
- Round 9. (36 CC) x 2 around. (72 ws).
- Round 10. (36 MC) x 2 around. (72 ws).
- Rounds 11–12. (15 MC, 7 CC, 14 MC) x 2 around. (72 ws).
- Round 13. (12 MC, 13 CC, 11 MC) x 2 around. (72 ws).
- Round 14. (13 MC, 11 CC, 12 MC) x 2 around. (72 ws).
- Round 15. (14 MC, 3 CC, 3 MC, 3 CC, 13 MC) x 2 around. (72 ws).
- Round 16. (9 MC, 7 CC, 2 MC, 1 CC, 2 MC, 7 CC, 8 MC) x 2 around. (72 ws).
- Round 17. (10 MC, 5 CC, 2 MC, 3 CC, 2 MC, 5 CC, 9 MC) x 2 around. (72 ws).
- Round 18. (11 MC, 3 CC, 2 MC, 2 CC, 1 MC, 2 CC, 2 MC, 3 CC, 10 MC) x 2 around. (72 ws).
- Round 19. (6 MC, 7 CC, 2 MC, 2 CC, 3 MC, 2 CC, 2 MC, 7 CC, 5 MC) x 2 around. (72 ws).
- Round 20. (7 MC, 5 CC, 2 MC, 2 CC, 5 MC, 2 CC, 2 MC, 5 CC, 6 MC) x 2 around. (72 ws).
- Round 21 (Diamond Center Axis). (8 MC, 3 CC, 2 MC, 2 CC, 7 MC, 2 CC, 2 MC, 3 CC, 7 MC) x 2 around. (72 ws).
- Round 22. Repeat Round 20: (7 MC, 5 CC, 2 MC, 2 CC, 5 MC, 2 CC, 2 MC, 5 CC, 6 MC) x 2.
- Round 23. Repeat Round 19: (6 MC, 7 CC, 2 MC, 2 CC, 3 MC, 2 CC, 2 MC, 7 CC, 5 MC) x 2.
- Round 24. Repeat Round 18: (11 MC, 3 CC, 2 MC, 2 CC, 1 MC, 2 CC, 2 MC, 3 CC, 10 MC) x 2.
- Round 25. Repeat Round 17: (10 MC, 5 CC, 2 MC, 3 CC, 2 MC, 5 CC, 9 MC) x 2.
- Round 26. Repeat Round 16: (9 MC, 7 CC, 2 MC, 1 CC, 2 MC, 7 CC, 8 MC) x 2.
- Round 27. Repeat Round 15: (14 MC, 3 CC, 3 MC, 3 CC, 13 MC) x 2.
- Round 28. Repeat Round 14: (13 MC, 11 CC, 12 MC) x 2.
- Round 29. Repeat Round 13: (12 MC, 13 CC, 11 MC) x 2.
- Rounds 30–31. Repeat Round 11: (15 MC, 7 CC, 14 MC) x 2.
- Round 32. (36 MC) x 2 around. (72 ws).
- Round 33. (36 CC) x 2 around. (72 ws).
- Round 34. (36 MC) x 2 around. (72 ws).
- Round 35 (Upper Triangles Base). Repeat Round 7: (3 CC, *1 MC, 5 CC* repeated 5 times, 1 MC, 2 CC) x 2.
- Round 36 (Upper Triangles Middle). Repeat Round 6: (2 CC, *3 MC, 3 CC* repeated 5 times, 3 MC, 1 CC) x 2.
- Round 37 (Upper Triangle Tips). Repeat Round 5: (*1 CC, 5 MC* repeated 6 times) x 2.
- Round 38. (36 MC) x 2 around. (72 ws).
- Round 39. (36 CC) x 2 around. (72 ws).
- Rounds 40–42. (36 MC) x 2 around. Fasten off after Round 42 and weave in the top ends. (72 ws).
Part 2: Closing the Bottom of the Crochet Crossbody Bag.
Once all 42 rounds are complete, lay your crocheted tube flat on your work surface. Adjust the fold carefully so that the Southwest diamond medallion is centered on both the front panel and the back panel (36 stitches across the front and 36 stitches across the back).
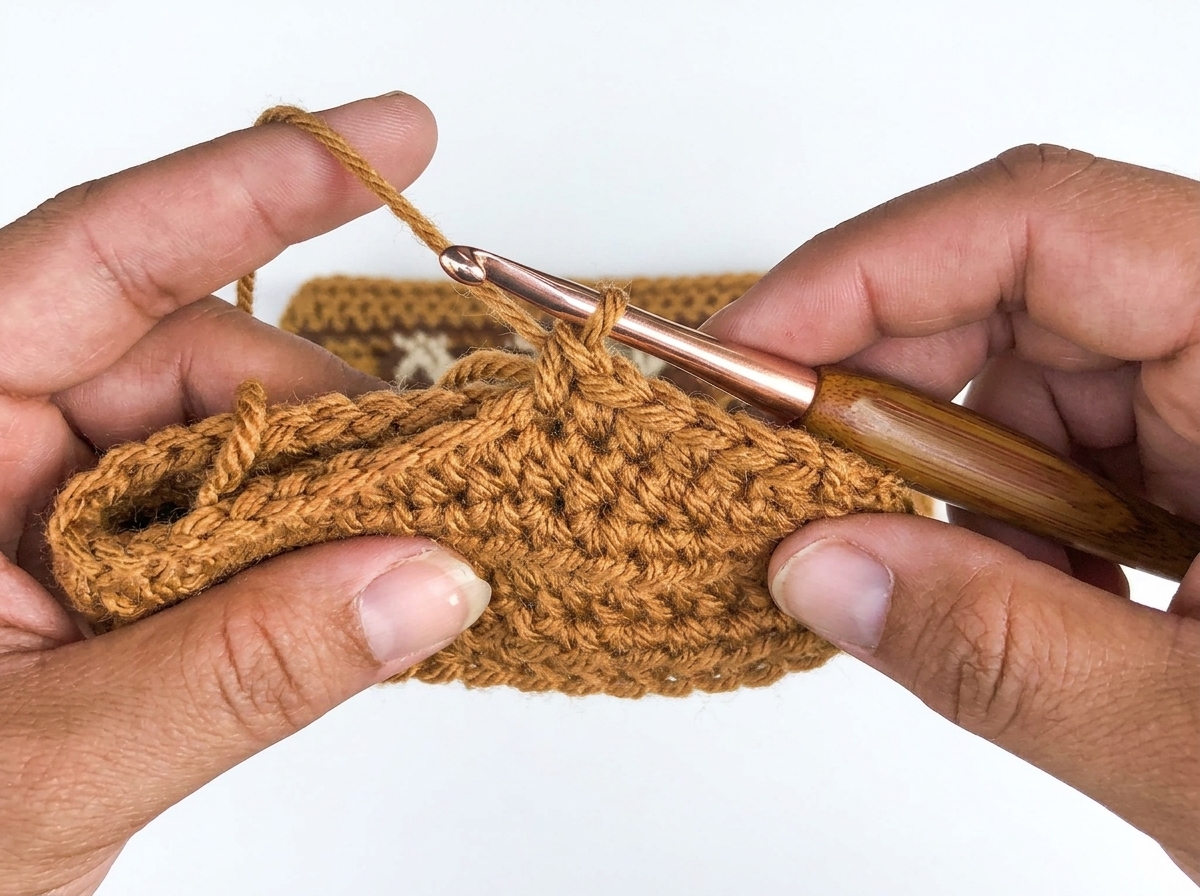
Insert your 5.50 mm hook through both the front stitch and the corresponding back stitch at the right corner of the bottom edge. Attach your Main Color (MC) yarn, pull up a loop, and work ch 1. Next, work 1 sc through that same first pair of front and back stitches. Continue working 1 sc through both the front and back stitches simultaneously all the way across the bottom edge (36 sc seam stitches total). Fasten off, and leave the yarn tail hanging at the bottom corner so it blends right into your fringe.
Part 3: Crocheting and Attaching the Waistcoat Stitch Strap.
The crossbody strap is worked in turning rows using Main Color (MC) yarn so that its knit-like texture matches the bag body. Remember to crochet very loosely on Row 1 and Row 2 so your hook glides easily into the stitch posts.
- First, Foundation Chain. With your 5.50 mm hook and MC yarn, work ch 99 loosely (or chain to your preferred crossbody strap length).
- Second, Row 1. Work 1 sc into the 2nd ch from your hook and into each ch across. Work ch 1, and turn. (98 sc).
- Third, Row 2. Work 1 sc into the very first st, and then work 1 ws (waistcoat stitch) into the next st and into each remaining st across the row. Work ch 1, and turn. (98 sts; note that Row 2 is the trickiest row, so keep your loops loose!).
- Fourth, Rows 3 to 6 (4 rows). Repeat Row 2 for four more rows, working 1 sc in the first st and 1 ws in each remaining st across. (98 sts per row).
- Finally, Attach the Strap. Fasten off, leaving long 18-inch yarn tails at both ends of the strap. Thread your tapestry needle and sew each end of the strap securely to the upper side edges inside the top rim of your bag. Weave in any remaining ends.
Part 4: Adding the Bottom Fringe to Your Crochet Crossbody Bag.
Adding a lush row of knotted fringe along the 36 bottom seam stitches gives your bag movement and authentic boho flair. Follow these four simple steps to attach each fringe bundle.
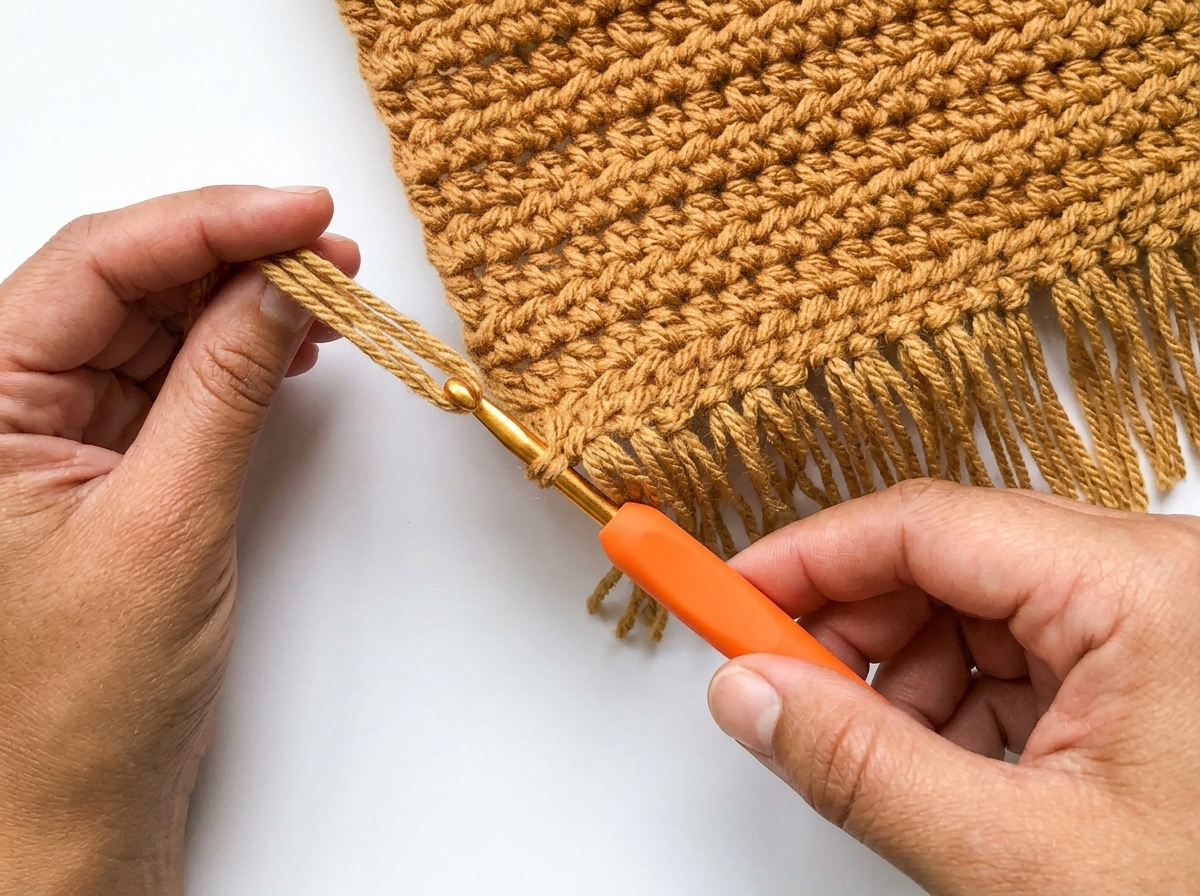
- First, Cut and Halve the Yarn Strands. Cut one strand of Main Color (MC) yarn measuring 16 inches (40.5 cm) long, and cut it in half so you have two 8-inch pieces.
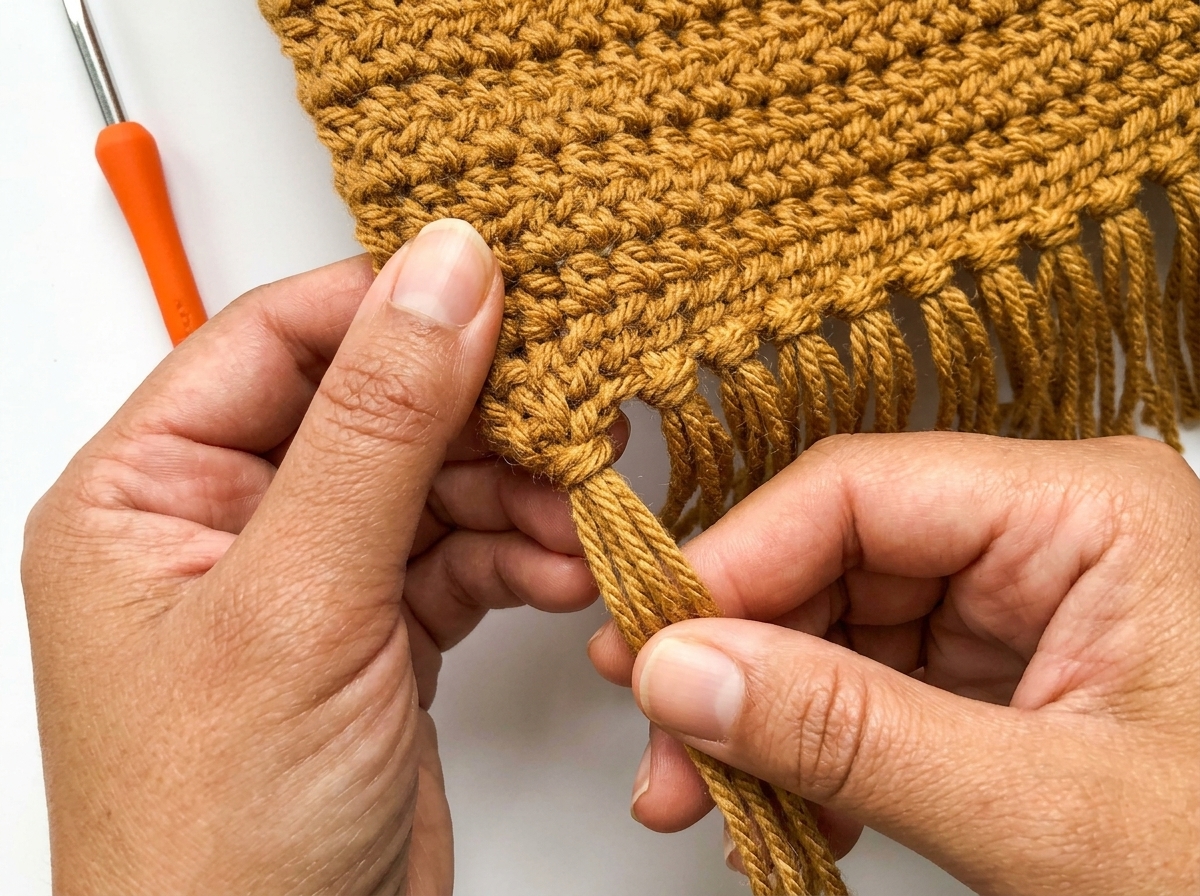
- Second, Fold to Create Four Fringe Tails. Line both 8-inch pieces up together and fold them in half at the center point. This creates a folded loop at the top and 4 strands of fringe at the bottom.
- Third, Pull the Loop Through the Bottom Stitch. Insert your crochet hook into the first stitch along the bottom seam of your bag, catch the folded yarn loop, and pull the loop partway through the stitch.
- Finally, Tighten and Trim Evenly. Pull all four loose yarn ends through the loop and tug firmly to lock the lark’s head knot against the bottom seam. Repeat across all 36 bottom stitches, and trim the bottom ends straight across with sharp scissors.
Customizing Your Southwest Crossbody Purse.
Once you finish your first bag, you can easily personalize future versions with different color palettes and closures. For more warm-weather accessory inspiration, browse our shell-edged crochet tote bag pattern and our granny square tote bag guide.
- Desert Color Combinations. Try pairing terracotta rust (MC) with cream ivory (CC), charcoal black (MC) with mustard gold (CC), or sage green (MC) with warm oatmeal (CC).
- Two-Tone Fringe. Alternate golden-brown and turquoise fringe knots across the bottom seam, or align turquoise fringe bundles directly beneath the center diamond medallion.
- Adding a Zipper or Magnetic Clasp. Although the deep 14-inch body keeps items secure, you can sew a magnetic snap or a 14-inch zipper just inside Rounds 40 to 42 for extra peace of mind on travel days.
Frequently Asked Questions (FAQ).
Why is my waistcoat stitch slanting or hard to work into?
Tight tension is the number one reason makers struggle with the waistcoat stitch. Consciously pull up a taller loop than usual each time you insert your hook between the vertical V legs. If you naturally crochet tightly, go up half a hook size to a 6.0 mm (US J-10) hook so the stitch posts open up comfortably.
Do I need to line this crochet crossbody bag pattern with fabric?
No fabric lining is needed! Because the waistcoat stitch inserts into the center post of each stitch and carries the second yarn strand inside the work, the resulting fabric is doubly thick, solid, and virtually inelastic. Even small items like lip balm or coins will not slip through the stitches.
Can I use 100% cotton yarn instead of acrylic yarn?
Yes, worsted weight (#4) 100% cotton yarn works wonderfully for bags because cotton has zero natural elasticity. However, because cotton glides less than acrylic, be extra mindful to keep your tension loose when working the waistcoat stitch rounds and the turning rows of the strap.


0 Comments