

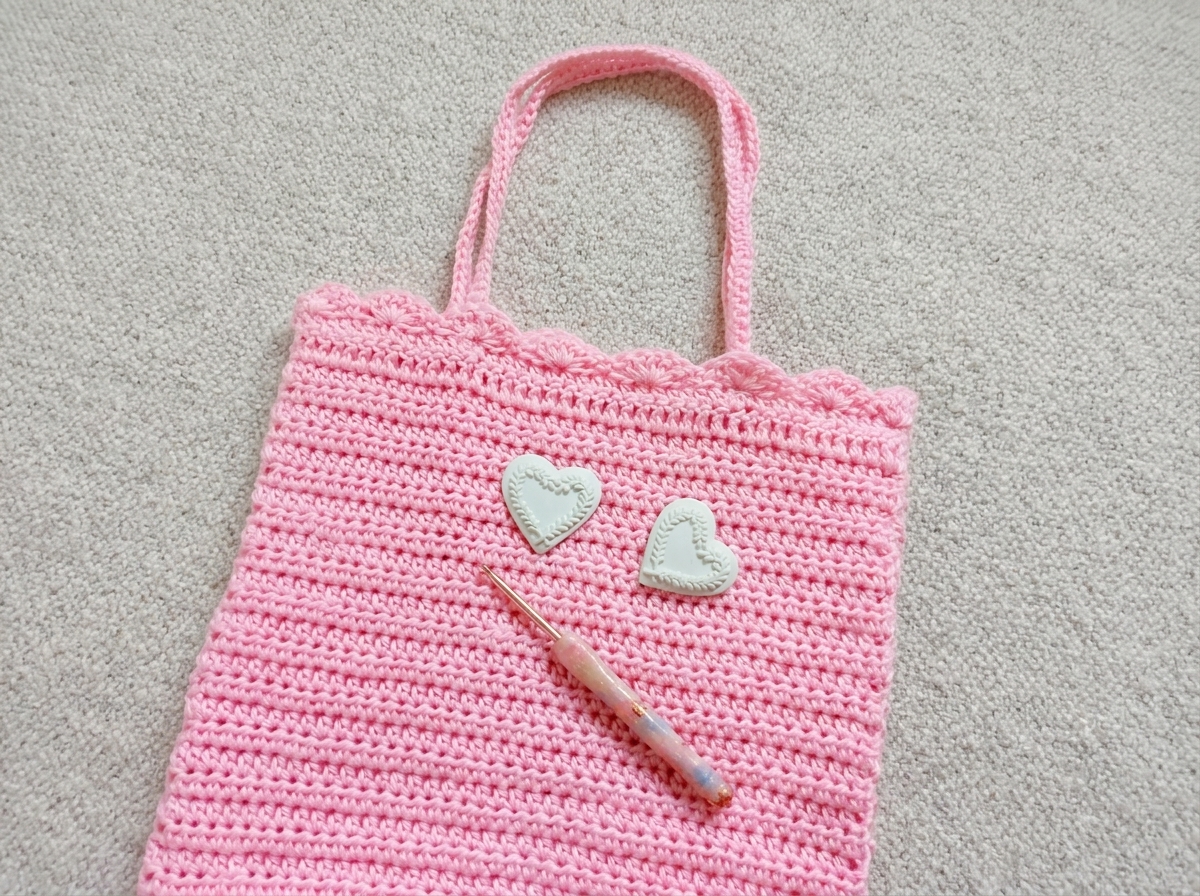
Every handmade wardrobe deserves a feminine carryall, and this free crochet tote bag pattern delivers effortless spring charm. Designed with a half double crochet body, it features a scalloped shell border and a boxy base. Moreover, this light pink shoulder bag combines vintage romance with everyday practicality. Because you construct the bag from three flat rectangles, even a confident beginner can finish it quickly. Afterward, you simply seam the panels and crochet the straps directly onto the interior rim.
Why You Will Love This Crochet Tote Bag Pattern.
Many drawstring pouches or market sacks lose their shape as soon as you place a book inside. Fortunately, this crochet tote bag pattern solves that issue through smart panel geometry and yarn selection. First, working dense half double crochet rows with a 5.0 mm hook creates a tight fabric. Therefore, the bag does not require a fabric lining for everyday essentials. Furthermore, attaching a dedicated seven-row rectangular bottom panel lets the lower corners wrap neatly around the base. Consequently, your finished tote sits flat and upright on café tables or picnic blankets.
In addition to its reliable structure, the top border elevates the design from basic to boutique. After completing twenty-eight rows of classic half double crochet, you work one accent row of double crochet. Next, you add a stabilizing half double crochet row right above it. Finally, Row 31 crowns the upper rim with five-double-crochet fan shells anchored by single crochet stitches. This scalloped edge frames the opening beautifully while hiding the interior anchor points for both straps. If you enjoy quick handbag projects, check out our simple crochet shoulder bag tutorial next.
Exact Measurements, Gauge, and Sizing (3barat).
Checking your tension and finished dimensions before seaming guarantees that your panels align at every corner. Below are the exact specifications for this crochet tote bag pattern.
- Skill Level. Easy+ (Familiar Beginner comfortable with basic stitches and mattress-stitch seaming).
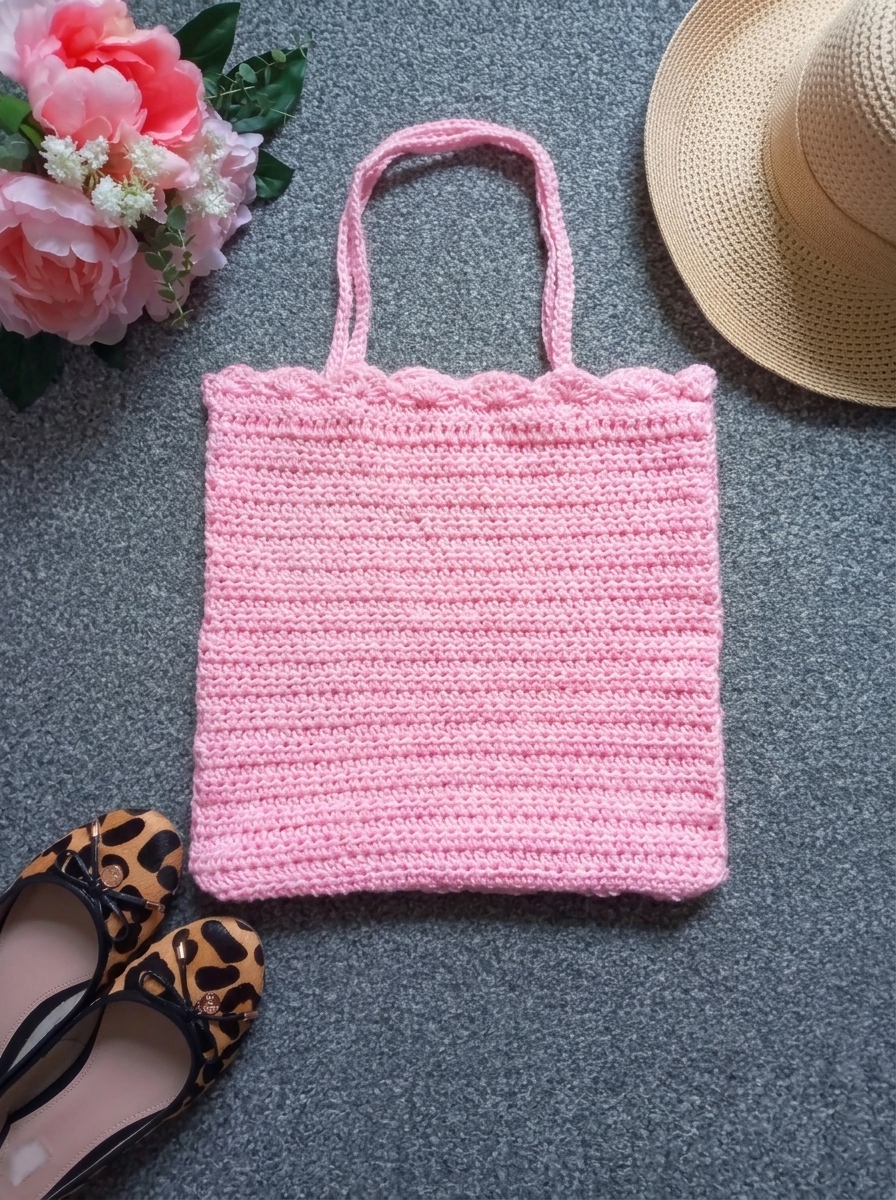
- Finished Bag Width. 12.5 inches (32 cm) measured flat across the front panel.
- Finished Bag Height. 11.5 inches (29 cm) measured from the bottom base to the top shell border (excluding straps).
- Bottom Base Panel Dimensions. 35 stitches wide by 7 rows deep, measuring 10 inches (25.5 cm) by 2.8 inches (7 cm).
- Front and Back Panel Dimensions. 43 stitches wide by 31 rows tall, measuring 12.5 inches (32 cm) by 11.5 inches (29 cm).
- Shoulder Strap Dimensions. 70 chains long by 1 single crochet row wide, measuring 20 inches (51 cm) end to end.
- Exact Gauge. 14 half double crochet (HDC) stitches and 10 rows equal 4 inches (10 cm) with a 5.0 mm hook.
| Bag Component. | Starting Chain. | Stitch Count Per Row. | Total Rows. | Finished Measurement. |
|---|---|---|---|---|
| Bottom Base Strip (Make 1). | Ch 36. | 35 HDC. | 7 rows. | 10 in x 2.8 in (25.5 cm x 7 cm). |
| Front Panel (Make 1). | Ch 44. | 43 sts (HDC, DC, Shells). | 31 rows. | 12.5 in x 11.5 in (32 cm x 29 cm). |
| Back Panel (Make 1). | Ch 44. | 43 sts (HDC, DC, Shells). | 31 rows. | 12.5 in x 11.5 in (32 cm x 29 cm). |
| Shoulder Straps (Make 2). | Ch 70. | 70 SC. | 1 row each. | 20 in (51 cm) total length. |
Materials and Tools You Need (Matrial).
Selecting a firm, non-stretchy yarn is the secret to making a durable handbag that keeps its silhouette. Gather these exact supplies before starting your crochet tote bag pattern.
- Primary Yarn. 2 skeins of Red Heart Soft Baby Steps yarn in shade 03 Light Pink.
- Skein Weight and Yardage. Each 100 g (3.5 oz) skein holds 164 meters (179 yards) of 100% acrylic yarn.
- Total Yarn Required. Two skeins provide 328 meters (358 yards) of Category #4 Medium Worsted / Aran weight yarn.
- Recommended Substitutes. Use any sturdy, low-stretch #4 worsted acrylic or mercerized cotton yarn like Lion Brand 24/7 Cotton.
- Crochet Hook. 5.0 mm (US Size H-8) ergonomic crochet hook.
- Tapestry Needle. A blunt darning needle for seaming the panels with the mattress stitch and weaving in ends.
- Scissors. Sharp craft snips for trimming yarn tails cleanly.
- Optional Helpers. Rust-proof sewing pins for centering the bottom strip, plus 4 stitch markers for marking strap placement.
Stitches and Abbreviations (US and UK Terms).
This crochet tote bag pattern follows standard US crochet terminology. However, if you normally read UK patterns, check the exact UK equivalents in brackets below.
- Ch. Chain stitch.
- Sl st. Slip stitch.
- St / Sts. Stitch / Stitches.
- SC. Single crochet (UK Double crochet – DC). Insert hook, yarn over, pull up a loop, and draw through 2 loops.
- HDC. Half double crochet (UK Half treble crochet – HTR). Yarn over, insert hook, pull up a loop, and draw through 3 loops.
- DC. Double crochet (UK Treble crochet – TR). Yarn over, pull up a loop, draw through 2 loops twice.
- Sk. Skip the indicated number of stitches.
- EOR. End of row.
- FO. Fasten off by cutting the yarn and pulling the tail through the last loop.
Important Pattern Notes Before You Begin.
Taking two minutes to review these structural rules will ensure your edges stay straight from Row 1 to Row 31.
- HDC Turning Chains Count as a Stitch. Throughout all HDC rows, the initial Ch 2 always counts as your first HDC stitch.
- DC Turning Chains Count as a Stitch. Similarly, in Rows 29 and 31, the initial Ch 3 counts as your first DC stitch.
- Skip the First Stitch Base. Because Ch 2 counts as the first HDC, always work your next HDC into the second stitch.
- Work into the Turning Chain at EOR. Always place your final stitch of each row into the top of the previous turning chain.
- Verify Your Stitch Counts. Count 35 stitches on the bottom strip and 43 stitches on the main panels every few rows.
- Leave Long Yarn Tails. Whenever you fasten off, leave a 24-inch (60 cm) yarn tail for seaming the panels together.
Part 1: Crocheting the Bottom of the Bag.
We begin this crochet tote bag pattern by making the narrow rectangular base strip. Even though the starting chain has 36 chains, the front and back panels will have 44 chains. That intentional 8-stitch difference leaves roughly 3 to 4 extra stitches at each lower corner of the main panels. During assembly, those extra corner stitches wrap smoothly around the short ends of the bottom strip.
Using your 5.0 mm (US H-8) crochet hook and Light Pink worsted yarn, make a slip knot. Next, work Ch 36.
- First, Row 1 (Foundation Row). Work 1 HDC into the 3rd ch from your hook (first ch 2 counts as 1 HDC).
- Second, Finish Row 1. Continue working 1 HDC into each chain across until EOR. (35 HDC total).
- Next, Row 2. Ch 2 (counts as 1 HDC throughout), turn, and work 1 HDC into the 2nd stitch.
- Then, Complete Row 2. Work 1 HDC into every HDC from the previous row across until EOR. (35 HDC).
- Afterward, Rows 3 to 7 (5 rows). Repeat Row 2 for five more rows, keeping 35 HDC stitches per row. (35 HDC).
- Finally, Fasten Off. After finishing Row 7, fasten off (FO) and leave a long 24-inch yarn tail for sewing.
Part 2: Crocheting the Front and Back Panels (Make 2).
Next, you will crochet two identical rectangular panels that form the front and back walls of your tote. First, Rows 1 through 28 build the solid half double crochet body. Second, Row 29 adds a decorative double crochet band. Third, Row 30 creates a sturdy anchor row for the handles. Finally, Row 31 finishes the top rim with a scalloped shell border.
Using your 5.0 mm (US H-8) hook and Light Pink yarn, make a slip knot. Then work Ch 44.
- First, Row 1 (Foundation Row). Work 1 HDC into the 3rd ch from your hook (first ch 2 counts as 1 HDC).
- Second, Finish Row 1. Work 1 HDC into each remaining chain across until EOR. (43 HDC total).
- Third, Row 2. Ch 2 (counts as 1 HDC throughout), turn, and work 1 HDC into the 2nd stitch.
- Fourth, Complete Row 2. Work 1 HDC into every HDC from the previous row across until EOR. (43 HDC).
- Fifth, Rows 3 to 28 (26 rows). Repeat Row 2 for twenty-six rows, keeping 43 HDC stitches per row. (43 HDC).
- Sixth, Row 29 (DC Accent Row). Ch 3 (counts as 1 DC), turn, and place 1 DC into the next stitch.
- Seventh, Complete Row 29. Work 1 DC into each remaining stitch across until EOR. (43 DC total).
- Eighth, Row 30 (Strap Anchor Row). Ch 2 (counts as 1 HDC), turn, and work 1 HDC into the 2nd stitch.
- Ninth, Complete Row 30. Work 1 HDC into every stitch across until EOR. (43 HDC total).
- Tenth, Start Row 31 (Shell Edging). Ch 3 (counts as 1 DC), turn, and place 3 DC into the very same first stitch.
- Eleventh, Anchor First Corner Shell. You now have 4 DC in the first stitch. Next, sk 2 sts, and work 1 SC in next st.
- Twelfth, Work Full Shell Repeats. Repeat *sk 2 sts, work 5 DC in next st, sk 2 sts, work 1 SC in next st* across.
- Finally, Finish Row 31. When 3 stitches remain before EOR, sk 2 sts and place 4 DC into the last stitch. Fasten off with a long tail.
Stitch Math Check for Row 31. Your first stitch holds the 4-DC corner cluster (1 st used). Next, you skip 2 and work 1 SC (3 sts used; 4 sts total). Repeating the 6-stitch shell sequence six times uses 36 stitches (40 sts total). Finally, skipping 2 and working 4 DC into the last stitch uses the final 3 stitches (43 sts total). Across the top of each panel, you will count 6 full 5-DC shells and 2 corner 4-DC half-shells.
Now repeat all instructions from Ch 44 through Row 31 a second time to complete your second identical panel. For another modular bag construction, explore our granny square tote bag pattern.
Part 3: Sewing the Crochet Tote Bag Pattern Together.
Proper seaming transforms your three flat rectangles into a three-dimensional handbag with crisp, boxy corners. We recommend using the mattress stitch because it pulls the edges together smoothly without adding bulk. Follow this step-by-step visual guide to assemble your crochet tote bag pattern.
Step 1: Center the Bottom Strip Under the Front Panel.
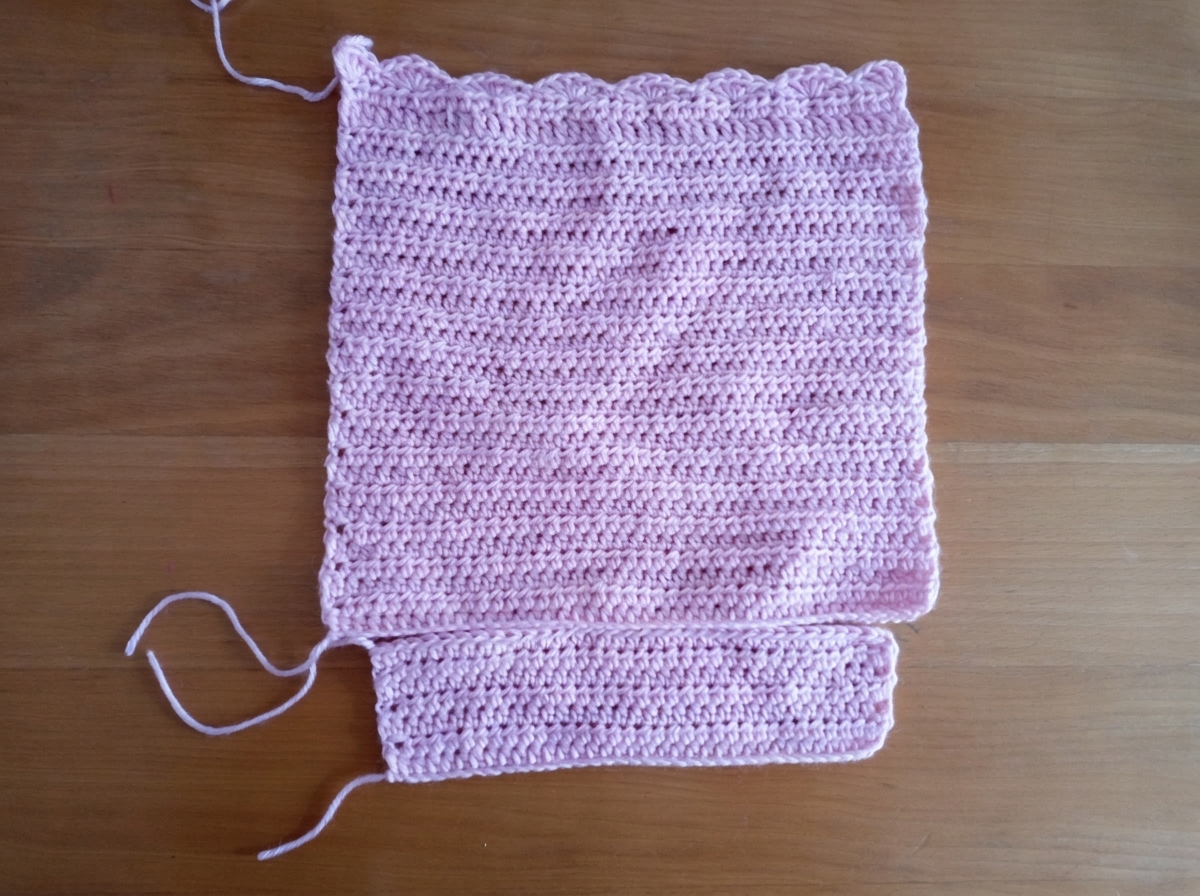
Lay your Front Panel flat on a wooden table with the shell stitch border at the top. Position the narrower 7-row Bottom Piece horizontally directly underneath the lower edge of the Front Panel. Because the front panel has 43 stitches and the bottom piece has 35 stitches, center the bottom strip carefully. Leave approximately 3 to 4 stitches of the front panel extending past either side of the bottom piece. You can hold the centered alignment in place with sewing pins.
Step 2: Mattress Stitch the Long Bottom Edge.
Thread your tapestry needle with the long Light Pink yarn tail attached to the bottom strip. Start at the corner where the bottom strip meets the front panel, roughly 3 stitches inward from the outer edge. Sew the two long horizontal edges together stitch for stitch using the mattress stitch. Keep your tension firm and even so no gaps appear along the bottom seam.
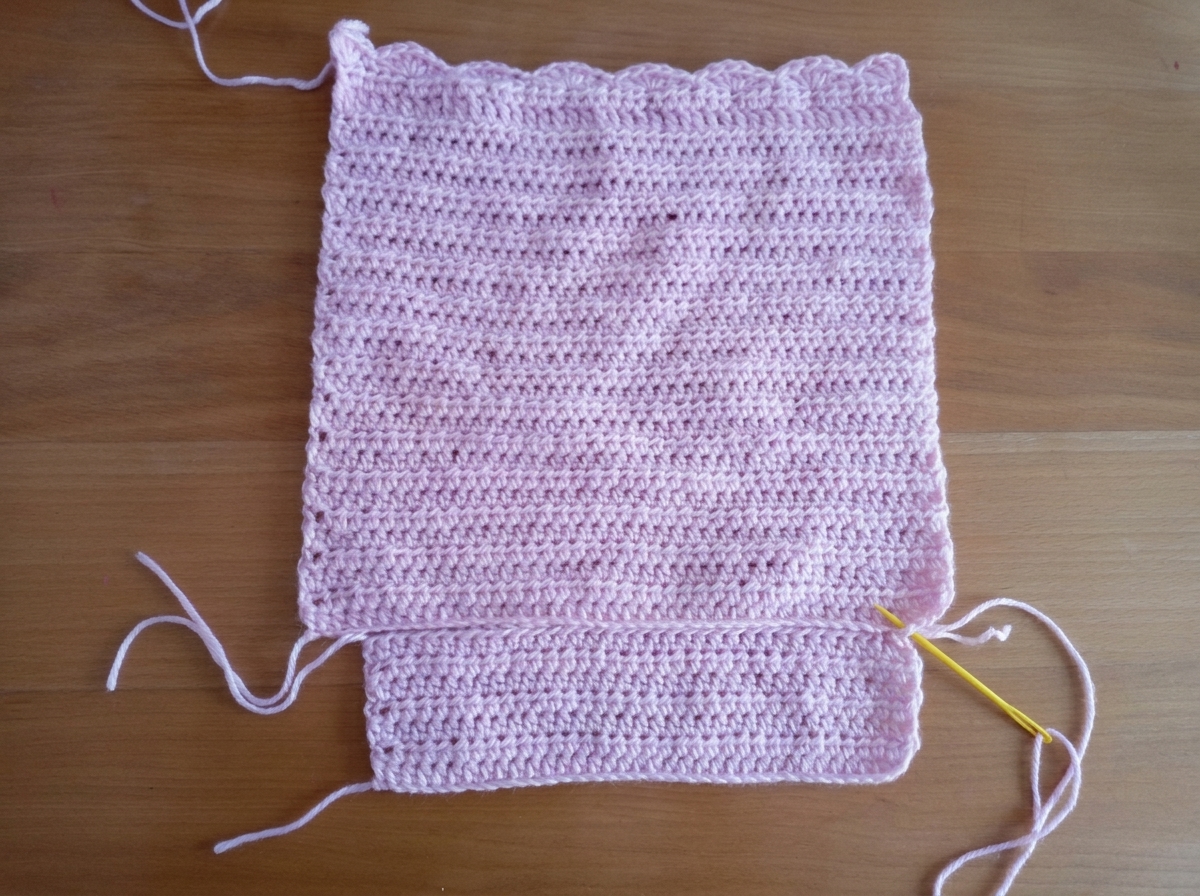
Step 3: Wrap and Stitch the Boxy Lower Corners.
Once you finish sewing across the long horizontal edge, look at the 3 to 4 unworked corner stitches on the front panel. Fold and wrap those 3 to 4 extra stitches around the 90-degree corner of the bottom piece. Align them flush against the short 7-row side of the bottom strip. Next, use your tapestry needle to stitch those wrapped corner stitches securely to both short ends of the bottom panel.
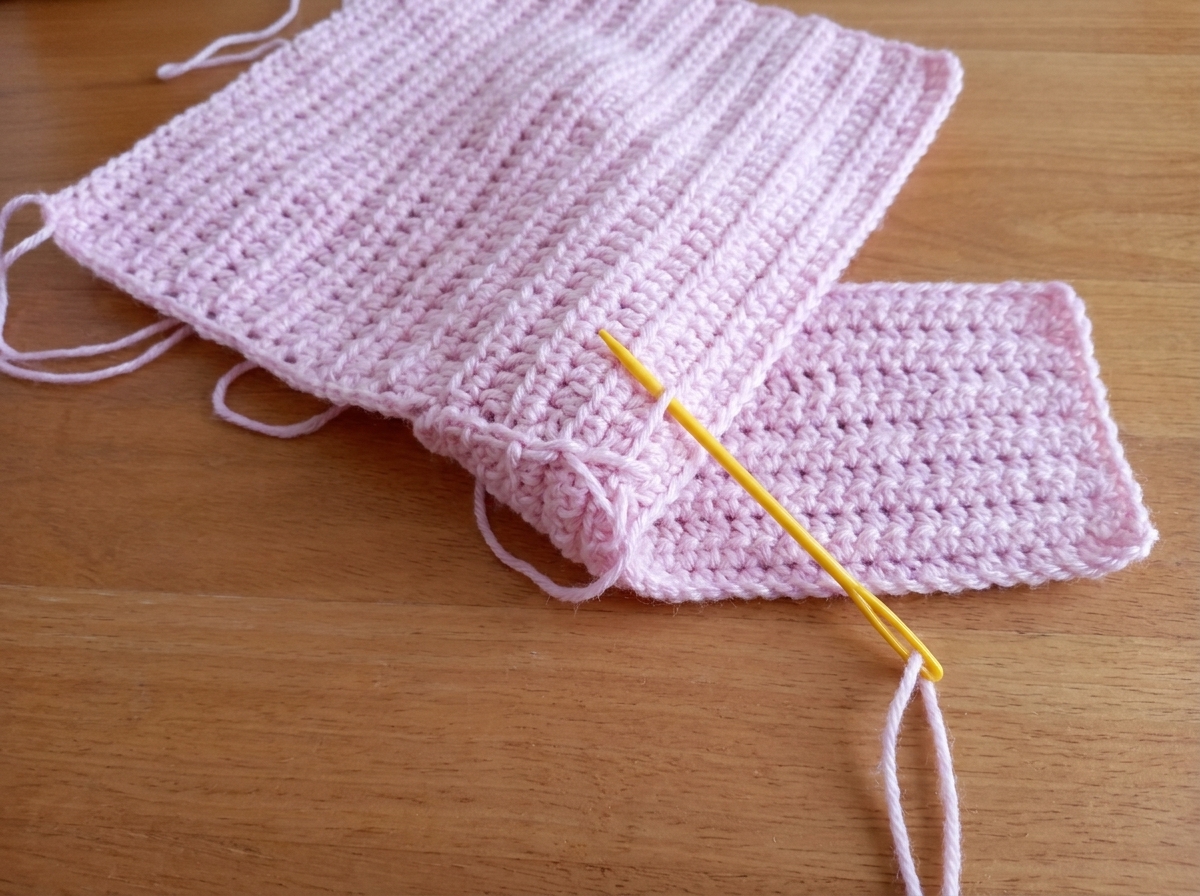
Step 4: Inspect the Structured Base and Attach the Back Panel.
When both corners of the front panel are sewn around the short ends of the bottom piece, the base forms a flat tray shape. Fasten off your yarn tail securely. Next, lay the Back Panel down and repeat Steps 1 through 3 on the opposite side of the bottom piece. Center the remaining long edge of the bottom strip against the lower edge of the back panel. Sew across the center with the mattress stitch. Then wrap the 3 to 4 corner stitches around the short ends of the bottom strip.
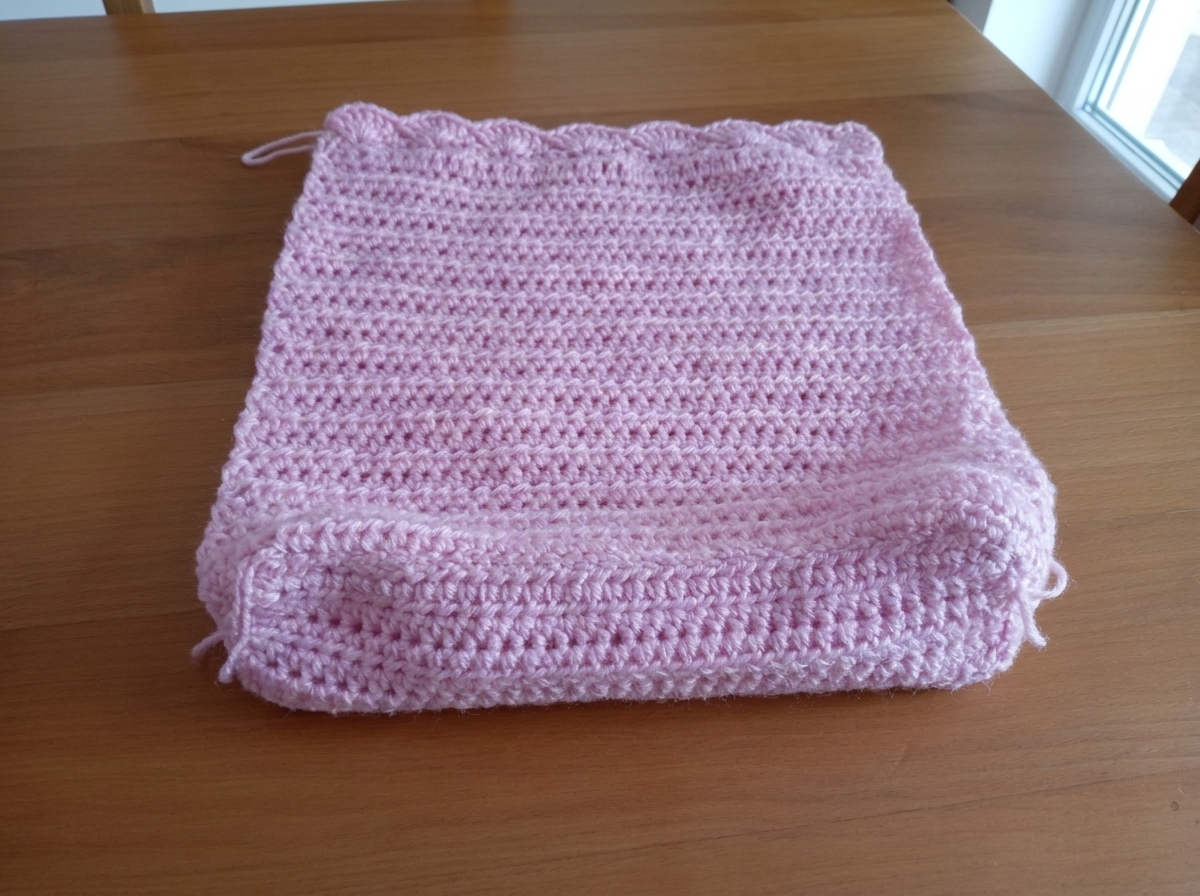
Step 5: Sew Both Vertical Side Seams.
Fold the front and back panels together so their outer edges align from the top shell border down to the base. Thread your tapestry needle with the long yarn tail left at the top corner of Row 31. Starting at the top rim, mattress-stitch down the first vertical side seam to the bottom corner. Fasten off and weave in the end. Afterward, repeat the exact same top-to-bottom seam along the second side of the bag.
Part 4: Crocheting the Two Straps Directly onto the Bag.
Rather than sewing on separate handles, this crochet tote bag pattern crochets the straps directly into Row 30 on the inside of the bag. Anchoring the straps into the interior HDC row guarantees maximum strength and keeps the exterior shell border uninterrupted.
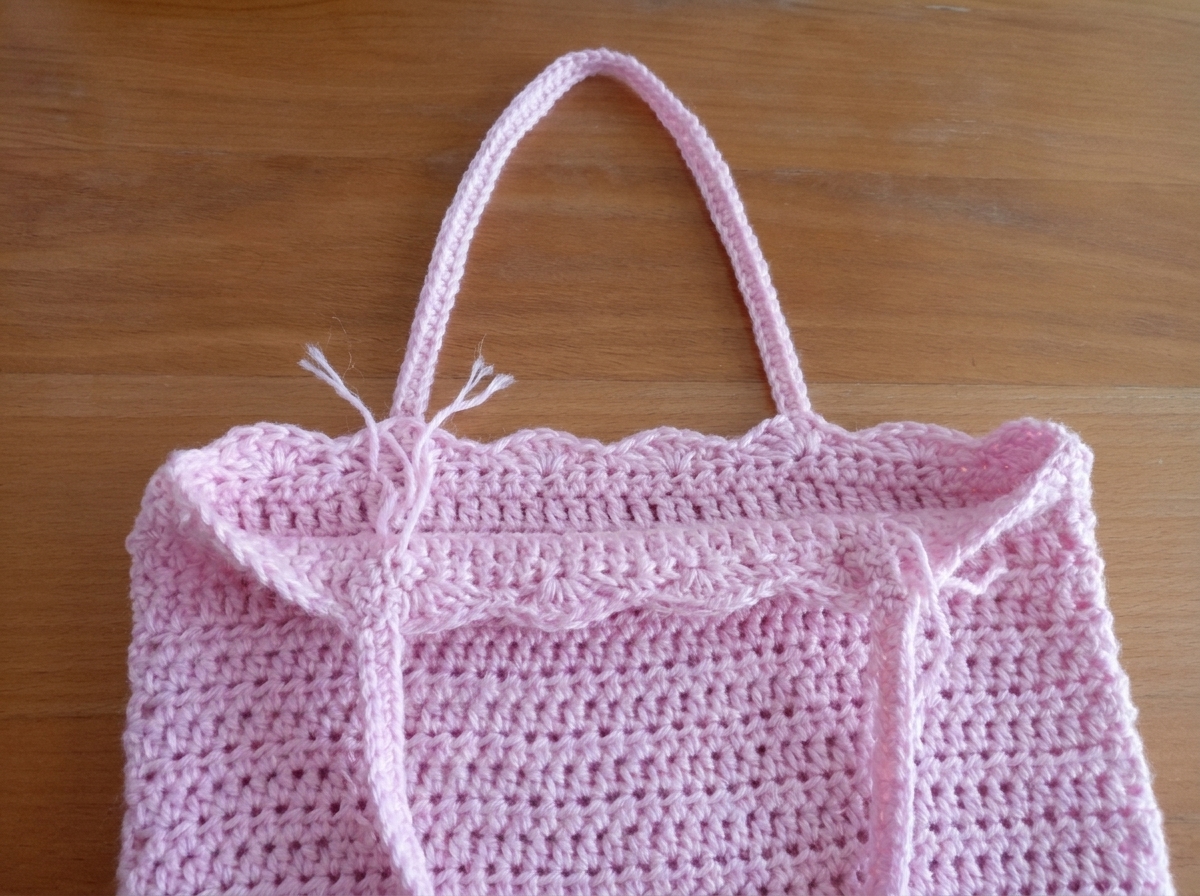
- First, Turn the Bag Inside Out. Turn your fully seamed tote bag inside out so the interior surface faces you.
- Second, Mark the Third Shell Stitch. On the first panel, count 3 shell stitches inward from both side seams and place stitch markers.
- Third, Join Yarn Under the First Shell. Attach Light Pink yarn with a Sl st into the Row 30 HDC stitch under the first marked shell.
- Fourth, Crochet the 70-Chain Foundation. Work Ch 70, and check that your chain is not twisted.
- Fifth, Anchor the Opposite Strap End. Insert your hook into the Row 30 HDC stitch under the second marked shell. Join with a Sl st.
- Sixth, Single Crochet Across the Strap. Work Ch 1, turn, and work 1 SC into each of the 70 chains across the strap. (70 SC).
- Seventh, Secure the Strap Base. Join with a Sl st into the starting HDC stitch at the base of the strap, and fasten off (FO).
- Finally, Crochet the Second Strap. Repeat Steps 2 through 7 on the opposite panel to create the second strap. Weave in all ends, and turn the bag right-side out.
Customization Ideas and Styling Tips.
Once you master the construction of this crochet tote bag pattern, you can easily customize the handles and details for any season. You can even pair your finished tote with a matching crochet phone pouch or a breezy mesh market crochet bag.
- Adjusting the Handle Length. A 70-chain strap creates a classic shoulder drop. However, chain 45 for short grab handles or chain 95 for a longer crossbody strap.
- Adding a Magnetic Snap Clasp. Sew a magnetic snap clasp onto the interior HDC row (Row 30) at the center of both panels.
- Color-Blocking the Shell Border. Work Rows 1 through 28 in cream yarn. Then switch to pastel pink for Rows 29 through 31 and the straps.
- Adding a Cotton Fabric Lining. Hand-sew a floral cotton pouch lining just below Row 30 if you plan to carry loose keys or pens.
Frequently Asked Questions (FAQ).
Can a beginner make this crochet tote bag pattern?
Yes! This pattern carries an Easy+ rating and suits any confident beginner. If you know how to chain, single crochet (SC), half double crochet (HDC), and double crochet (DC), you are ready. Even the scalloped shell border on Row 31 simply groups 5 double crochets into one stitch between single crochets.
Why is the bottom panel narrower than the front and back panels?
The bottom panel has 35 stitches (Ch 36), whereas the front and back panels have 43 stitches (Ch 44). That 8-stitch difference leaves 3 to 4 extra stitches on each side of the wider panels. Wrapping those extra corner stitches around the short ends of the bottom piece creates a boxy 3D base.
Will the crochet straps stretch out over time?
Choosing a sturdy, low-stretch yarn like Red Heart Soft Baby Steps or mercerized cotton keeps stretching to a minimum. Additionally, working a row of tight single crochet back across the 70 chains locks the foundation chain in place. For heavy books, you can also slip-stitch along the opposite edge of the strap to make it completely inelastic.
How should I wash and care for my finished crochet tote bag?
If you use 100% acrylic or cotton worsted yarn, spot-clean small marks with mild soap and cool water. You can also machine wash the bag on a gentle cold cycle inside a mesh laundry bag. Afterward, reshape the boxy bottom corners and shell border by hand. Finally, lay the tote flat on a towel to air dry.


0 Comments