

Staring down a blank, cavernous drywall and feeling paralyzed by high boutique price tags is a rite of passage for every home decorator and apartment renter.
Walk into any upscale home goods showroom, and a simple 24×36 plaster canvas or framed botanical print will effortlessly set you back $250 to $400. But here is the design industry secret every seasoned stylist knows: high-end wall decor rarely hinges on expensive materials. It hinges on thoughtful texture, intentional scale, tactile craftsmanship, and restrained color harmony.
Whether you are styling a cozy studio apartment with strict landlord rules, refreshing a neglected hallway, or elevating your master bedroom on a shoestring budget, you do not need hundreds of dollars to create gallery-worthy impact. In this comprehensive guide, I have curated and field-tested 30 clever DIY wall decor ideas that all cost under $30—complete with exact supply budgets, step-by-step instructions, and pro styling tips to make every piece look like a bespoke heirloom.
Quick Comparison: 30 Budget DIY Wall Decor Ideas at a Glance
Need a quick snapshot before grabbing your glue gun and hardware supplies? Scan this at-a-glance matrix to find the perfect project matching your budget, available time, and decor aesthetic:
| Project Idea | Estimated Budget | Time Required | Skill Level | Best Aesthetic Vibe |
|---|---|---|---|---|
| #01 Minimalist Joint Compound Arch Canvas | $14 – $18 | 45 minutes + drying | Beginner | Organic Modern / Wabi-Sabi |
| #02 Baking Soda & Acrylic ‘Stoneware’ Painting | $8 – $12 | 30 minutes | Beginner | Warm Minimalist / Earthy |
| #03 Cardboard & Spackle Geometric Relief Plaque | $10 – $14 | 1 hour | Beginner | Mid-Century / Bauhaus |
| #04 Tissue Paper & Mod Podge Wabi-Sabi Canvas | $9 – $13 | 40 minutes | Beginner | Japandi / Tactile Luxe |
| #05 Acoustic Slat Board Floating Art Piece | $22 – $28 | 1.5 hours | Intermediate | Scandinavian / Modern |
| #06 Abstract Yarn-Relief Framed Plaster | $12 – $16 | 50 minutes | Beginner | Contemporary Gallery |
| #07 Vintage Pressed Botanical Fern & Wildflower Gallery | $14 – $19 | 1 hour + pressing | Beginner | Cottagecore / Traditional |
| #08 Suspended Test Tube Botanical Propagation Wall | $16 – $22 | 45 minutes | Beginner | Biophilic / Modern Boho |
| #09 Framed Dried Eucalyptus & Lavender Herbarium | $12 – $16 | 30 minutes | Beginner | Earthy Botanical / Nordic |
| #10 Air Plant Driftwood Wall Sculpture | $14 – $18 | 35 minutes | Beginner | Coastal / Organic Modern |
| #11 Botanical Cyanotype Sun-Print Triptych | $16 – $22 | 45 minutes | Beginner | Artsy Vintage / Coastal |
| #12 Framed Dehydrated Citrus Slices | $10 – $14 | 40 minutes prep + baking | Beginner | Warm Rustic Kitchen |
| #13 Modern Fluted Wood Dowel Accent Panel | $20 – $26 | 2 hours | Intermediate | Japandi / Architectural |
| #14 Rustic Hanging Jute Rope Swing Shelf | $15 – $19 | 1 hour | Beginner | Modern Farmhouse / Rustic |
| #15 Renter-Friendly Painted Terracotta Arch Color-Block | $14 – $18 | 1.5 hours | Beginner | Warm Terracotta / Boho |
| #16 Minimalist Picture Ledge Floating Shelf | $12 – $16 | 1 hour | Intermediate | Scandinavian / Classic |
| #17 Hexagonal Wood Craft-Stick Honeycomb Shelves | $7 – $11 | 1 hour | Beginner | Geometric Boho |
| #18 Peel-and-Stick Faux Board & Batten Accent | $24 – $29 | 2.5 hours | Intermediate | Transitional / Tailored |
| #19 Birch Dowel & Chunky Wool Yarn Wall Tapestry | $15 – $20 | 1.5 hours | Beginner | Nordic Boho / Cozy Warmth |
| #20 Curated Thrifted Woven Basket Wall Gallery | $16 – $22 | 45 minutes | Beginner | Global Eclectic / Coastal |
| #21 Framed Heirloom Fabric or Quilt Remnant | $12 – $16 | 30 minutes | Beginner | Heritage / French Country |
| #22 Macramé Feather Leaf Wall Mobile | $10 – $14 | 1 hour | Beginner | Organic Boho / Nursery |
| #23 Embroidery Hoop Botanical Fabric Wall Cluster | $11 – $15 | 40 minutes | Beginner | Shabby Chic / Botanical |
| #24 Wooden Bead Garland with Jute Tassels Wall Swag | $8 – $12 | 30 minutes | Beginner | Neutral Boho / Mantel |
| #25 Framed High-End Wallpaper Sample Mural | $10 – $15 | 25 minutes | Beginner | High-End Editorial / Classic |
| #26 Antique Thrift Mirror Gold Leaf Transformation | $14 – $19 | 1 hour | Beginner | Vintage Baroque / Glam |
| #27 Handcrafted Geometric Air-Dry Clay Wall Mobile | $12 – $17 | 1.5 hours + drying | Beginner | Modern Sculptural / Zen |
| #28 Vintage Book Page French Poetry Gallery Wall | $8 – $12 | 45 minutes | Beginner | Dark Academia / Parisian |
| #29 Pressed Brass Wire Contour Silhouette Art | $9 – $13 | 40 minutes | Beginner | Picasso-Inspired Modern |
| #30 DIY Oversized Japanese Paper Globe Sconce | $18 – $24 | 45 minutes | Beginner | Akari-Style Warm Minimalist |
Category 1: Textured Canvas & Plaster Art (The Luxe Look for Less)
If you have browsed Architectural Digest or high-end design feeds recently, you know that minimalist 3D textured plaster art is currently commanding four-figure sums. The secret? You can replicate the exact depth, shadow lines, and matte chalky patina using ordinary hardware-store joint compound or spackle over an inexpensive stretched canvas.
01. Minimalist Joint Compound Arch Canvas
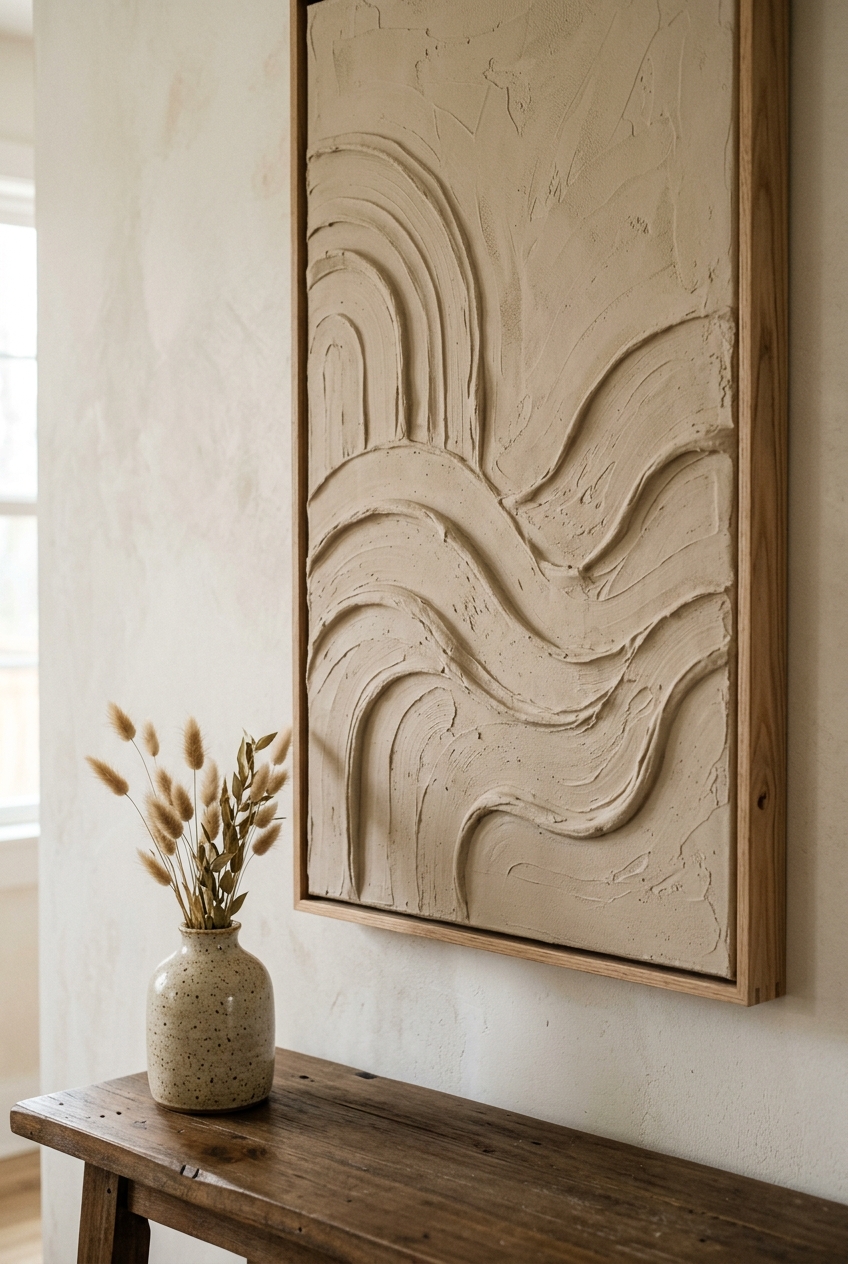
Estimated Cost: $14 – $18 | Time: 45 minutes + drying | Skill Level: Beginner
Materials Needed:
- 16×20 or 20×24 inch pre-stretched craft canvas ($6 – $8)
- Small tub of lightweight joint compound or drywall spackle ($5)
- Notched adhesive trowel or wide plastic putty knife ($3)
- Sample pot of matte interior latex paint (warm linen or bone white) ($4)
How to Make It: Scoop a generous mound of joint compound onto the center of your canvas. Using your putty knife, spread an even 1/4-inch base layer across the entire surface. Take your notched trowel and gently carve sweeping, concentric arch patterns across the damp plaster in fluid, deliberate motions. Allow the compound to cure undisturbed for 24 hours. Once completely bone-dry, apply two thin coats of matte latex paint with a soft bristle brush to seal the plaster and eliminate powdery chalking.
💡 Clara’s Styling Tip: Pair this piece with a DIY floater frame crafted from $4 pine lattice moulding strips from the hardware store. Staining the wood trim in warm natural oak makes the piece look like a $450 boutique gallery acquisition.
02. Baking Soda & Acrylic ‘Stoneware’ Painting
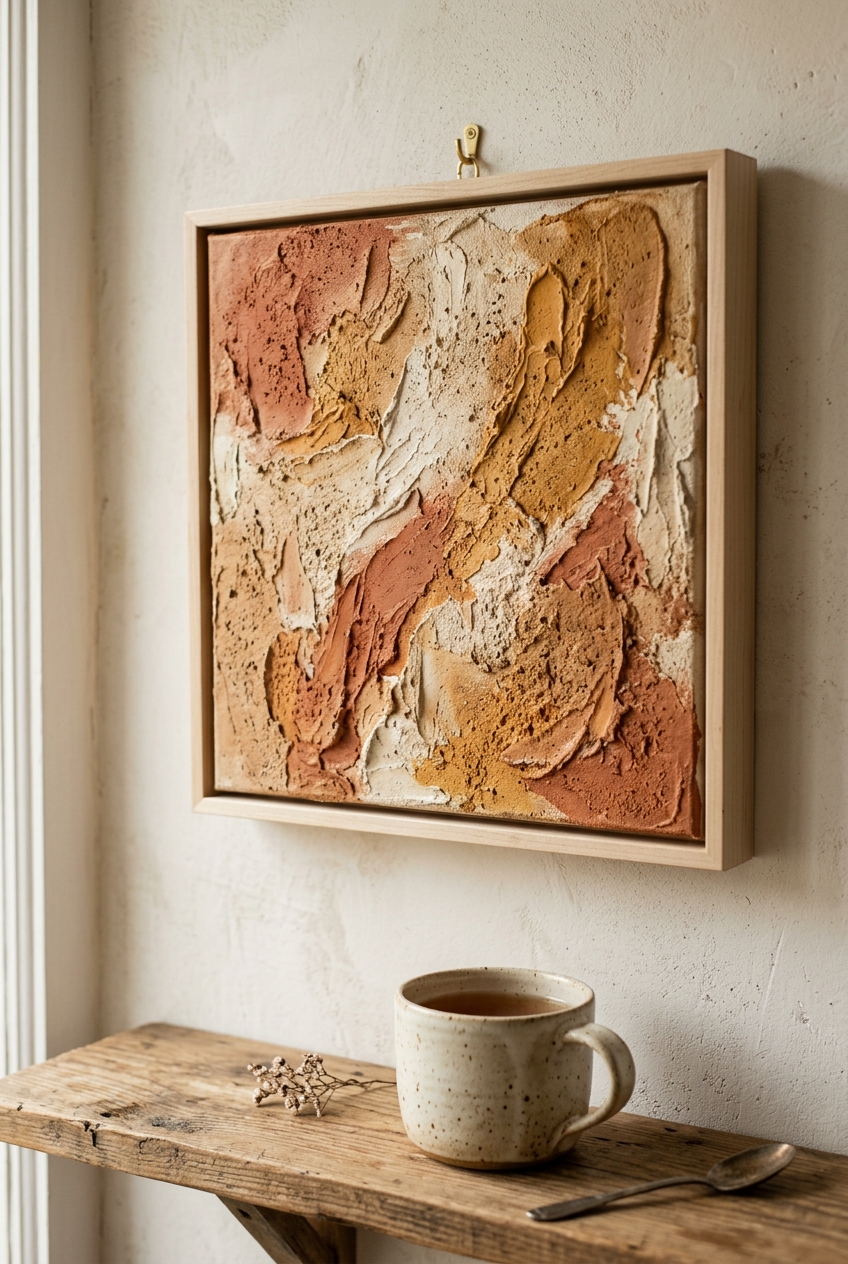
Estimated Cost: $8 – $12 | Time: 30 minutes | Skill Level: Beginner
Materials Needed:
- Thrifted canvas, canvas board, or scrap wood panel ($3 – $5)
- Acrylic craft paint in terracotta, ochre, and warm cream ($4)
- Standard household baking soda ($1)
- Wide foam brush or flexible palette knife ($2)
How to Make It: Whisk equal parts baking soda and matte acrylic paint in an old plastic container until it forms a thick, fluffy mousse consistency. Dab and stipple the mixture across your surface in crosshatch strokes. As the baking soda reacts with the paint emulsion, it dries into a gritty, porous ceramic finish resembling aged terracotta pottery or hand-thrown clay tiles.
💡 Clara’s Styling Tip: Use warm earthy pigment shades like dusty terracotta, raw umber, or muted olive. The matte mineral sheen absorbs glare from overhead lights, making it ideal for sunny living rooms.
03. Cardboard & Spackle Geometric Relief Plaque
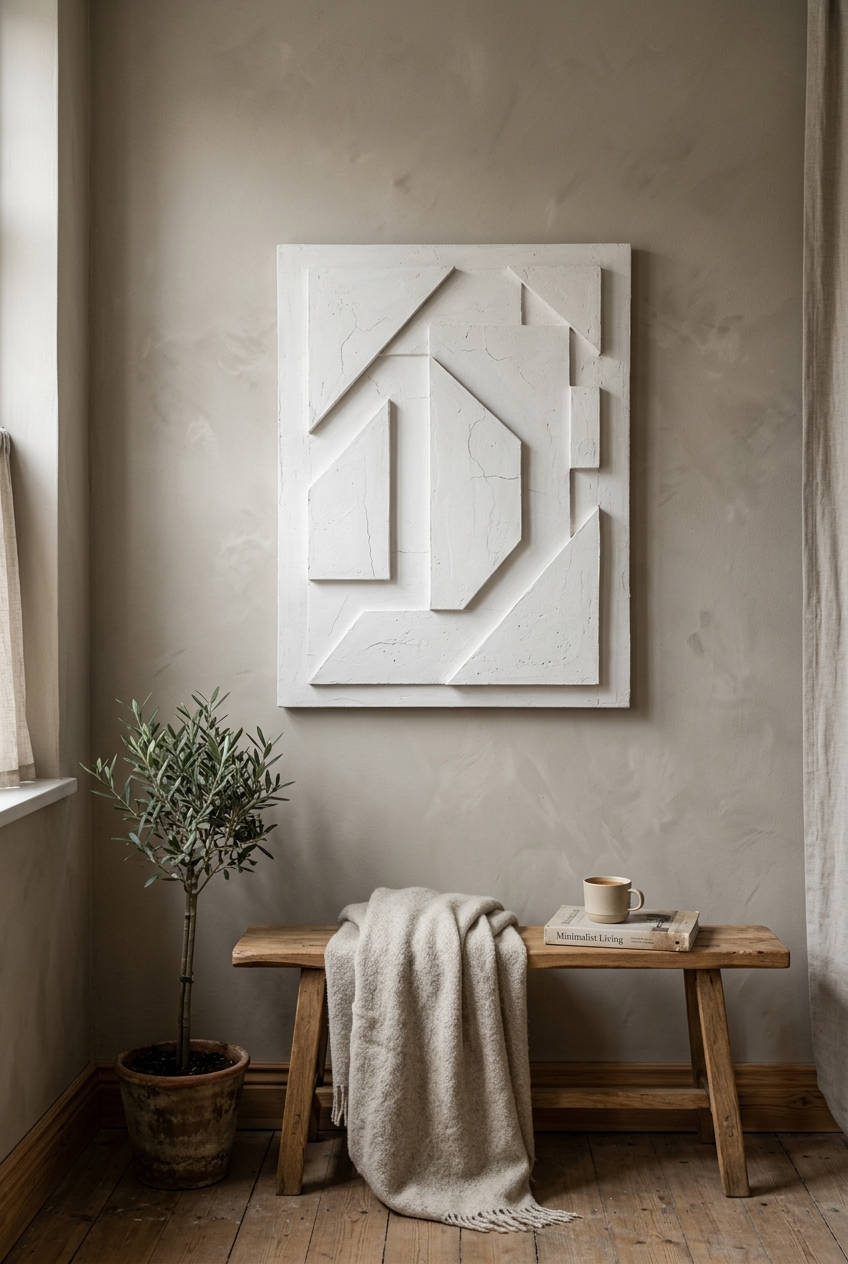
Estimated Cost: $10 – $14 | Time: 1 hour | Skill Level: Beginner
Materials Needed:
- Clean shipping cardboard boxes (Free)
- Utility knife and metal ruler ($3)
- Craft glue or hot glue gun ($3)
- Lightweight spackle or drywall mud ($5)
- 12×16 inch wood panel or sturdy foam board backing ($3)
How to Make It: Cut architectural geometric shapes—semi-circles, arches, pill shapes, and triangles—from discarded cardboard boxes. Layer and glue the shapes onto your wood backing board to create a raised 3D collage. Once dry, skim the entire board with a smooth coat of spackle using your fingers or a sponge to soften the cardboard edges and create a monolithic stone relief. Paint in monochromatic chalky white.
💡 Clara’s Styling Tip: Run a very lightly dampened sponge over the spackle right before it dries completely to melt away rough sanding lines and achieve an ultra-smooth cast-stone finish.
04. Tissue Paper & Mod Podge Wabi-Sabi Canvas
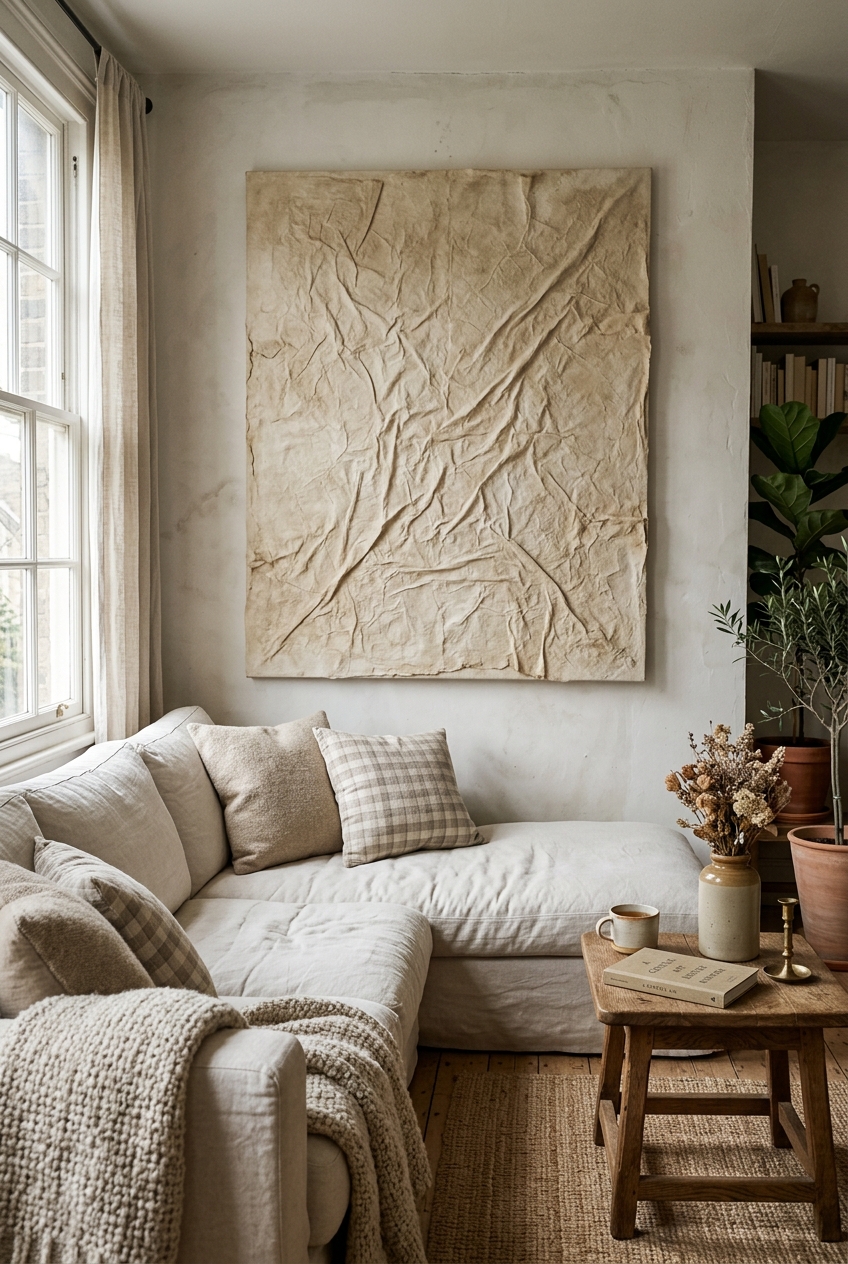
Estimated Cost: $9 – $13 | Time: 40 minutes | Skill Level: Beginner
Materials Needed:
- Stretched canvas (18×24 or 20×30 inch) ($7)
- Pack of plain white gift tissue paper ($1.50)
- Mod Podge matte or Elmer’s glue diluted with water ($3)
- Sample jar of warm beige or oatmeal wall paint ($3)
How to Make It: Generously brush Mod Podge onto the canvas. Crumple sheets of tissue paper into tight balls, smooth them out partially, and press them onto the wet canvas, bunching and gathering folds into organic ridges. Coat the top with another layer of glue. Once hardened, brush over a watery wash of raw linen paint; the pigment naturally pools in the deep creases, mimicking ancient parchment or hand-milled Japanese washi paper.
💡 Clara’s Styling Tip: Hang this directly opposite a floor lamp or window. The glancing light casts dramatic micro-shadows along the wrinkled tissue paper ridges, amplifying the texture tenfold.
05. Acoustic Slat Board Floating Art Piece
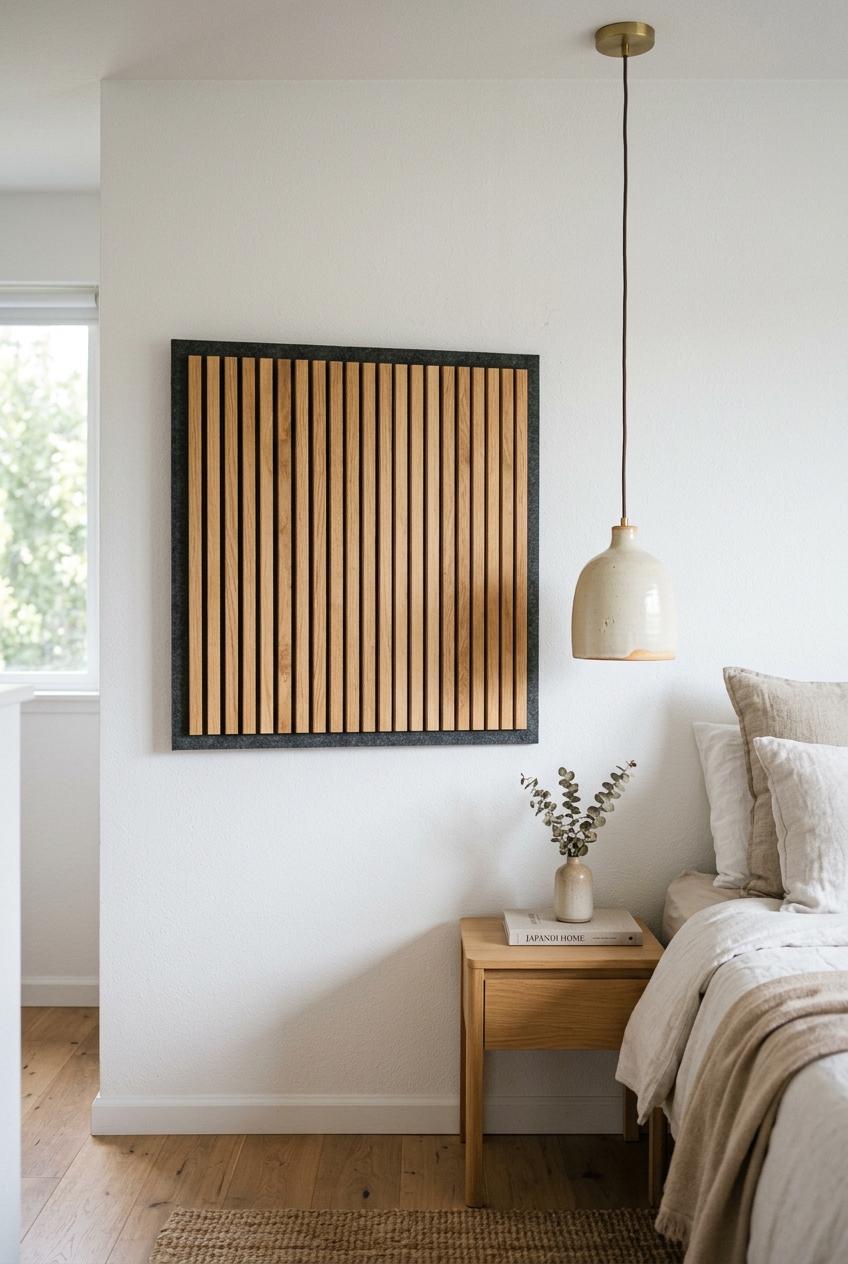
Estimated Cost: $22 – $28 | Time: 1.5 hours | Skill Level: Intermediate
Materials Needed:
- 24×24 inch section of fluted acoustic felt wood slat paneling ($18 for sample square or offcut)
- Fine-tooth handsaw or miter box ($5)
- Small bottle of Danish oil or matte poly ($4)
- Four 1-inch brass standoff wall anchors ($4)
How to Make It: Cut the acoustic panel square with a fine-tooth handsaw, sand the exposed edge, and apply a touch of Danish oil to the oak veneer. Mount the panel using 1-inch brass standoff wall anchors. The resulting floating installation dampens room echo while providing the sleek, linear Scandinavian aesthetic found in modern luxury hotels.
💡 Clara’s Styling Tip: Position this floating slat piece in an echoing hallway or home office near a desk microphone. It doubles as high-end wall decor and acoustic noise treatment!
06. Abstract Yarn-Relief Framed Plaster
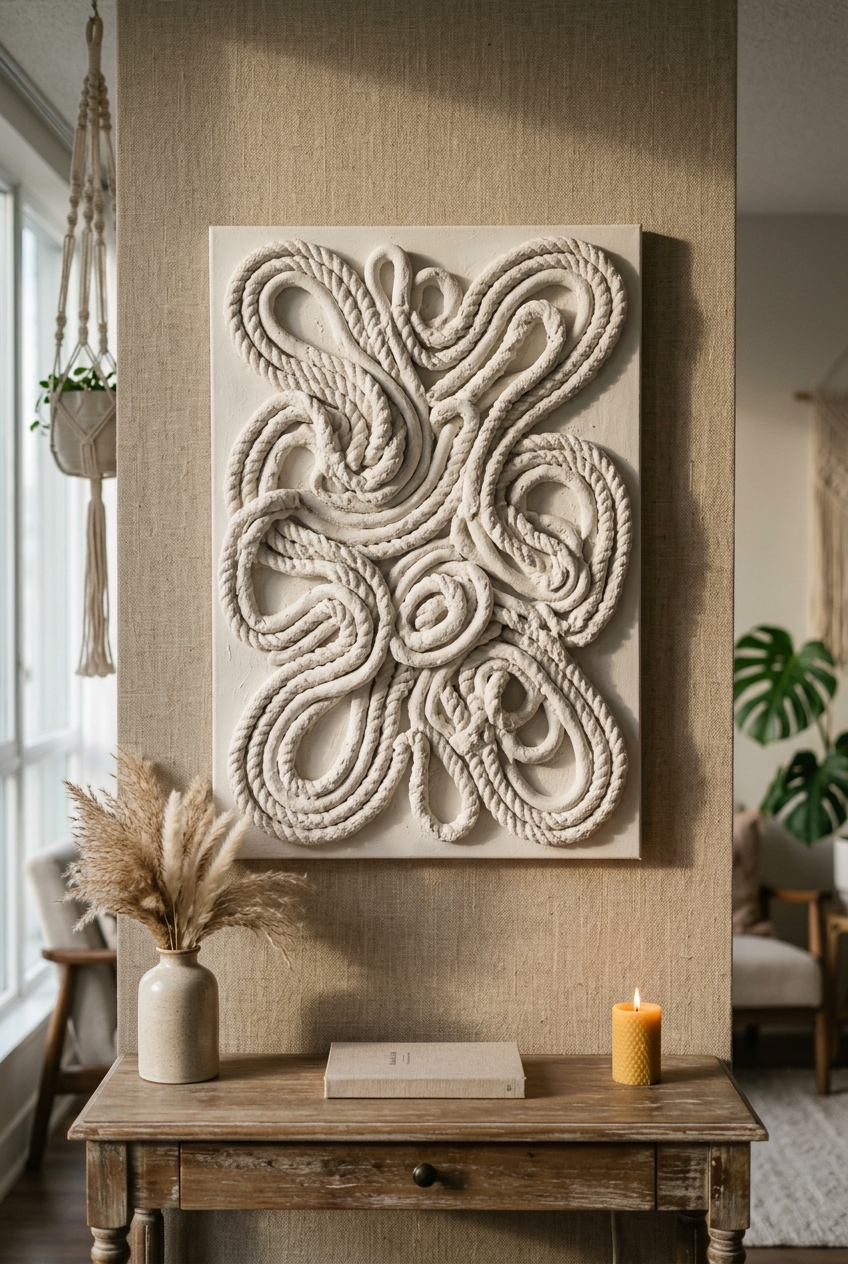
Estimated Cost: $12 – $16 | Time: 50 minutes | Skill Level: Beginner
Materials Needed:
- 16×20 inch stretched canvas ($6)
- 10 feet of chunky cotton mop yarn or macramé cord ($3)
- Hot glue gun and glue sticks ($3)
- Can of textured plaster spray paint or spackle ($5)
How to Make It: Trace a minimalist continuous line sketch onto your canvas. Hot-glue thick cotton yarn along the drawn lines. Once secure, coat the entire canvas and yarn with plaster spray paint or dab spackle over the yarn with a damp foam brush to meld the textile into the background. The raised curving lines create dramatic shadows that change beautifully as daylight moves across the room.
💡 Clara’s Styling Tip: Keep the loops continuous and fluid—think Henri Matisse or Jean Arp silhouettes. Leaving generous negative space between curves ensures the relief doesn’t look crowded.
Category 2: Botanicals, Nature & Biophilic Displays
Bringing natural greenery into home decor instantly lowers stress, adds vibrant organic textures, and breaks up rigid wall lines. You don’t need to splurge on preserved moss installations or expensive botanical art prints when nature provides the ultimate raw materials for free.
07. Vintage Pressed Botanical Fern & Wildflower Gallery
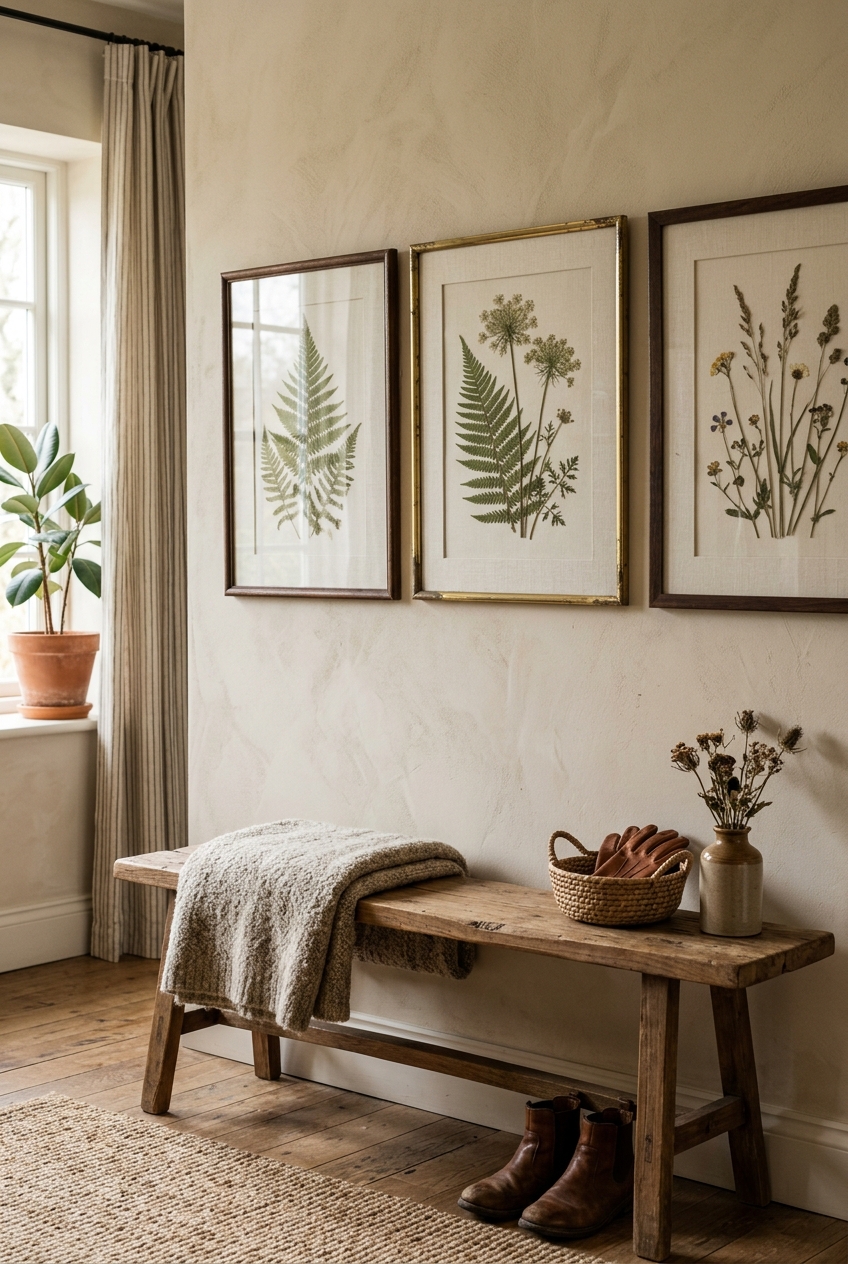
Estimated Cost: $14 – $19 | Time: 1 hour + pressing | Skill Level: Beginner
Materials Needed:
- Thrift store picture frames (brass, walnut, or gilded) ($2 – $4 each)
- Heavy watercolor paper or cream linen fabric ($4)
- Foraged fern fronds and meadow flowers (Free)
- Clear archival glue or double-sided photo tape ($3)
How to Make It: Harvest fresh, flat botanical cuttings from your yard or neighborhood trail. Sandwich the cuttings between sheets of parchment paper inside a heavy coffee table book or stack of encyclopedias for 7 to 10 days until completely dry and paper-thin. Cut your watercolor paper to fit your frames, adhere the pressed botanicals using a tiny pinhead dot of clear archival adhesive, and assemble. Hang in a symmetrical grid of three or four for an authentic English conservatory look.
💡 Clara’s Styling Tip: To prevent dried plants from fading quickly under UV light, display them on walls that receive bright indirect light rather than scorching direct sun rays.
08. Suspended Test Tube Botanical Propagation Wall
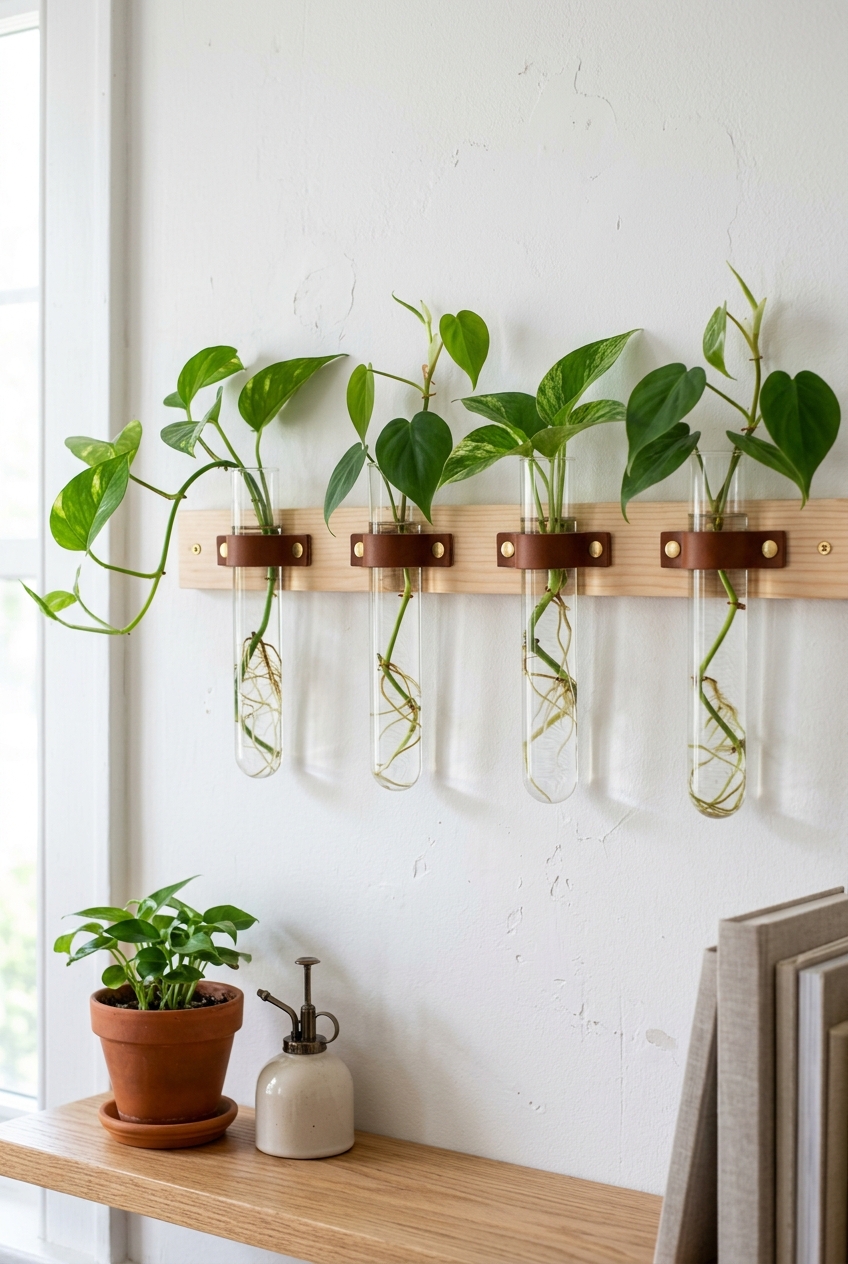
Estimated Cost: $16 – $22 | Time: 45 minutes | Skill Level: Beginner
Materials Needed:
- Set of 4 to 6 rimmed glass test tubes ($7 on Amazon or craft stores)
- 1×2 smooth pine board cut to 24 inches ($4)
- Brown leather strip remnants or faux-leather belt ($4)
- Brass upholstery tacks or brass screws ($3)
- Trailing vine cuttings (pothos, heartleaf philodendron, monstera adansonii) (Free)
How to Make It: Sand and oil your 1×2 pine board. Fasten small loops of leather or bend copper pipe clips at even 4-inch intervals along the board using brass upholstery tacks. Slip the rimmed test tubes into the loops, fill each with fresh water, and insert your favorite trailing vine cuttings. As the plants develop delicate white root systems in the glass, your wall becomes an ever-changing living art display.
💡 Clara’s Styling Tip: Top up the water weekly with room-temperature filtered water and a single drop of liquid plant fertilizer once roots reach two inches in length.
09. Framed Dried Eucalyptus & Lavender Herbarium
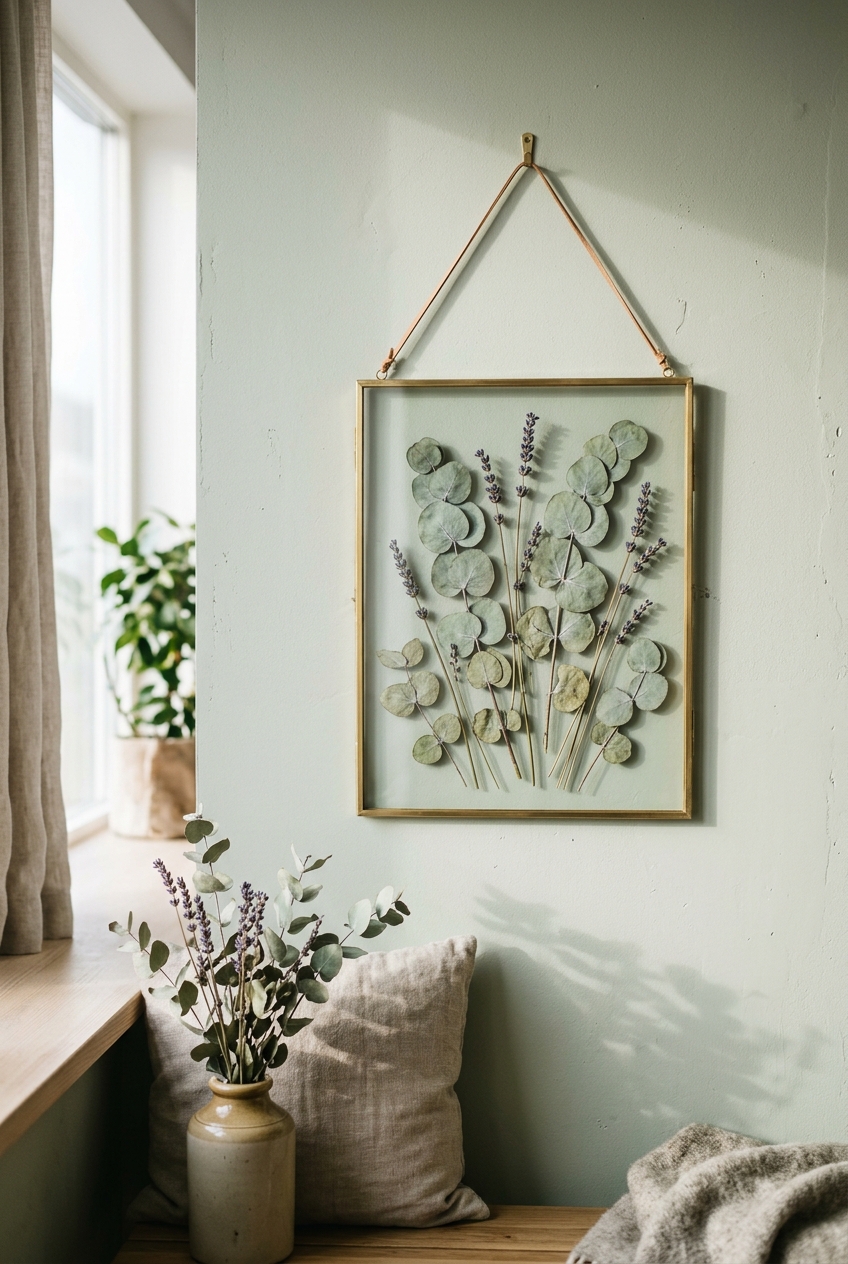
Estimated Cost: $12 – $16 | Time: 30 minutes | Skill Level: Beginner
Materials Needed:
- Fresh eucalyptus bundle ($4 from the grocery floral section)
- Dried culinary lavender stems ($3)
- Double-glass floating frame with hanging chain ($8)
- Household clothes iron and parchment paper
How to Make It: Press silver dollar eucalyptus stems between paper towels with a dry iron on low heat for 60 seconds to flatten them without losing their dusty blue-green hue. Arrange the eucalyptus branch alongside two lavender stems between the panes of the floating glass frame. When hung against an off-white wall, the shadows cast through the clear glass give the stems a three-dimensional floating illusion.
💡 Clara’s Styling Tip: Hang this above a bathroom towel rack. The warm humidity from showers naturally activates the aromatic essential oils inside the dried eucalyptus and lavender!
10. Air Plant Driftwood Wall Sculpture
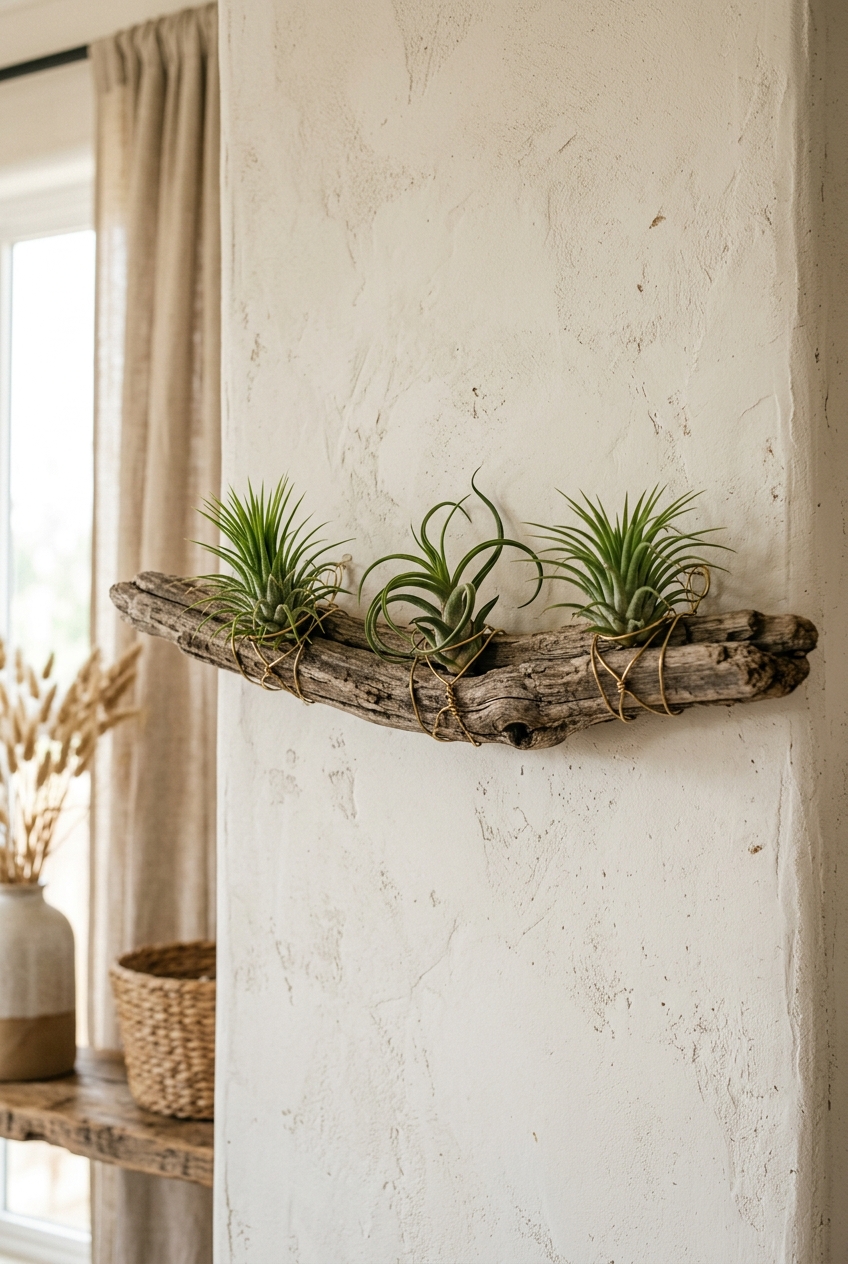
Estimated Cost: $14 – $18 | Time: 35 minutes | Skill Level: Beginner
Materials Needed:
- Weathered branch or beach driftwood piece (Free)
- 20-gauge malleable brass crafting wire ($4)
- 2 to 3 live Tillandsia air plants ($8)
- Two antique brass cup hooks ($2)
How to Make It: Clean and lightly scrub your driftwood with a dry wire brush. Wrap brass wire around the branch, shaping loose wire cradles that securely hold the air plants without pinching their foliage. Mount the branch horizontally on your wall with brass cup hooks. Simply mist the air plants with water once a week or slip them out of their wire rings for a quick 20-minute soak.
💡 Clara’s Styling Tip: Never use copper wire with air plants—copper is toxic to bromeliads! Always stick to raw brass, floral wire, or aluminum craft wire.
11. Botanical Cyanotype Sun-Print Triptych
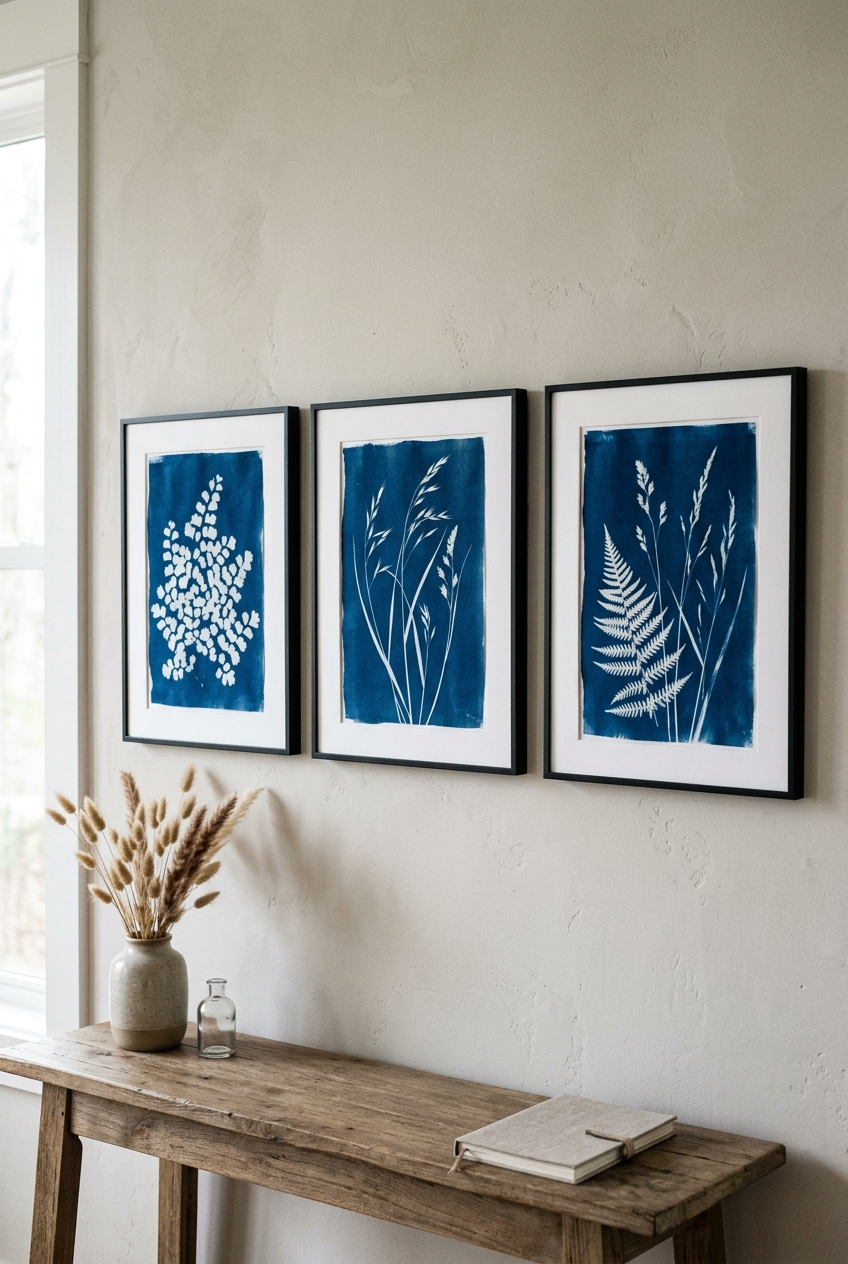
Estimated Cost: $16 – $22 | Time: 45 minutes | Skill Level: Beginner
Materials Needed:
- Sun-print solar photographic paper pack ($9)
- Pressed fern fronds or meadow grasses (Free)
- Shallow tray of cold water
- Three slim black document frames with white matting ($9 for a 3-pack)
How to Make It: Place a fern frond directly over a sheet of cyanotype paper and expose it to direct outdoor sunlight for 2 to 3 minutes. Submerge the paper in cool tap water for 1 minute to fix the image. As it dries, the silhouette transforms into an intense Prussian blue print featuring crisp white leaf silhouettes. Frame the triptych for a punch of rich indigo color in your living room or study.
💡 Clara’s Styling Tip: Add a splash of hydrogen peroxide to your water bath during the rinse step. It instantly oxidizes the print into its deepest, richest navy blue tone.
12. Framed Dehydrated Citrus Slices
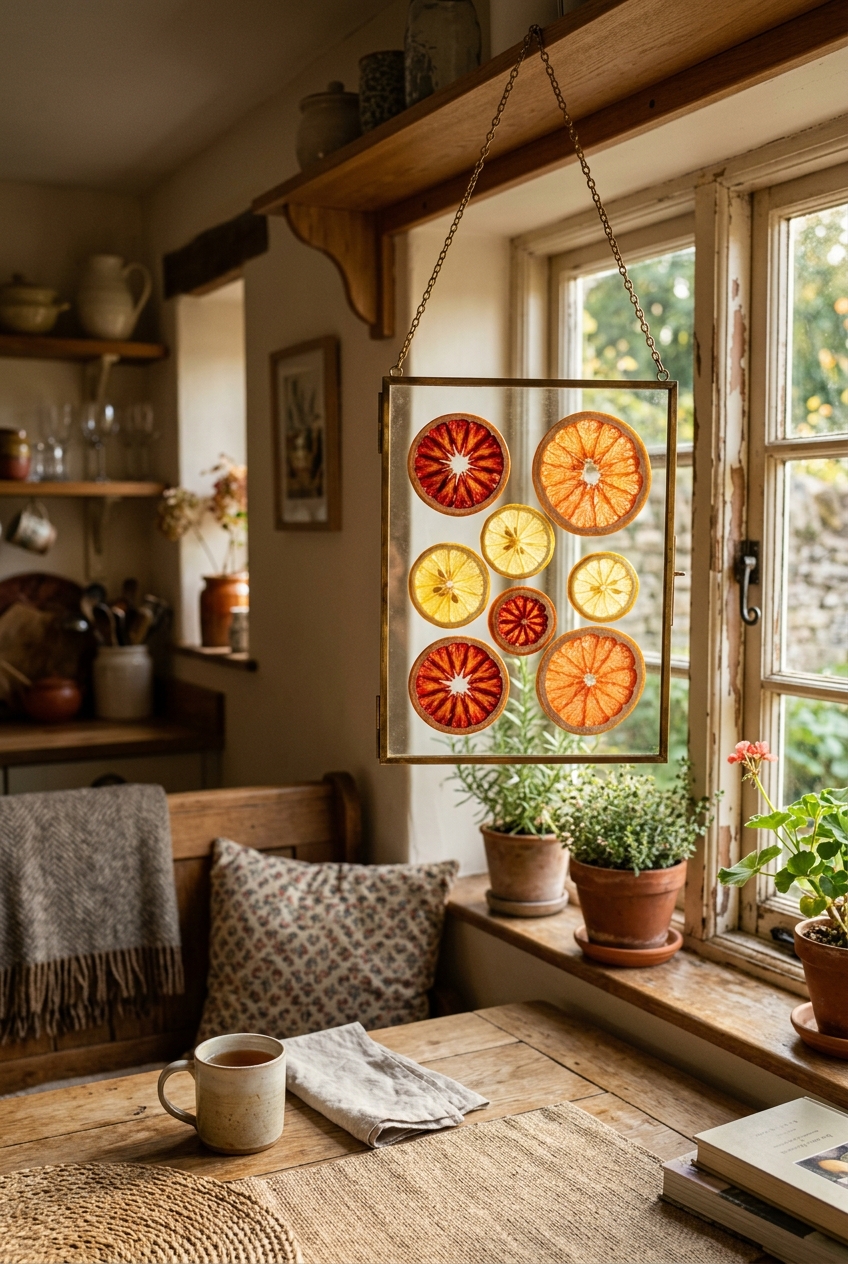
Estimated Cost: $10 – $14 | Time: 40 minutes prep + baking | Skill Level: Beginner
Materials Needed:
- 2 blood oranges, 1 grapefruit, 1 Meyer lemon ($4)
- Baking sheet and parchment paper
- Brass floating glass picture frame ($7 – $8)
- Clear drying craft sealer spray ($3)
How to Make It: Slice citrus paper-thin (about 1/8-inch) with a mandoline or sharp knife. Blot excess moisture with paper towels, lay slices on parchment paper, and bake in your oven at 180°F (80°C) for 3 to 4 hours until completely dehydrated and translucent like stained glass. Arrange the ruby red and amber wheel patterns inside a glass floating frame for an eye-catching kitchen or dining nook accent.
💡 Clara’s Styling Tip: Mist the dehydrated fruit lightly with a matte clear UV spray sealer before framing to preserve the bright translucent colors for years without browning.
Category 3: Wood, Architectural Accents & Floating Displays
Bare walls crave architectural interest. Adding wood elements and geometric depth immediately gives a standard drywall room the grounded, custom-built feel of an architect-designed home.
13. Modern Fluted Wood Dowel Accent Panel
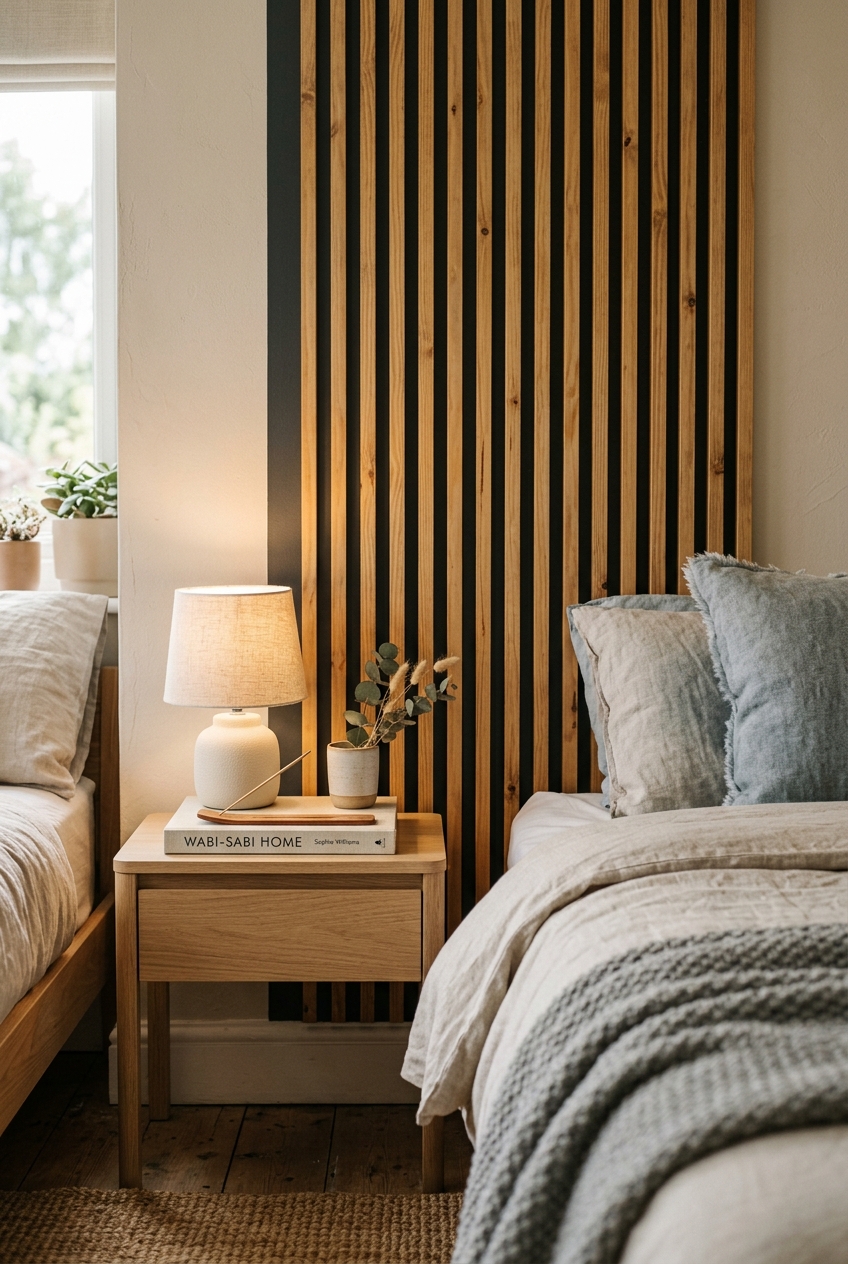
Estimated Cost: $20 – $26 | Time: 2 hours | Skill Level: Intermediate
Materials Needed:
- 10 to 12 half-round pine dowels (1/2-inch wide x 36 inches long) ($12)
- Thin 1/4-inch plywood board or MDF backing sheet ($6)
- Wood glue and small foam roller ($4)
- Wood stain (Honey Oak or Walnut) ($4)
How to Make It: Cut your plywood backing to your desired vertical panel size (e.g., 18×36 inches). Sand your half-round dowels smooth and wipe away sawdust. Apply wood glue to the back of each dowel and press them side-by-side onto the plywood backing, using painter’s tape across the front to hold them tightly together while curing. Once dry, wipe on a coat of warm wood stain, let it penetrate for 5 minutes, and buff off the excess with a clean rag. Hang using heavy-duty Command picture hanging strips for a completely nail-free, renter-safe architectural accent.
💡 Clara’s Styling Tip: Because the entire fluted wood panel is built onto a lightweight plywood backing, you only have to mount one single flat board rather than attaching individual slats directly into your rental walls!
14. Rustic Hanging Jute Rope Swing Shelf
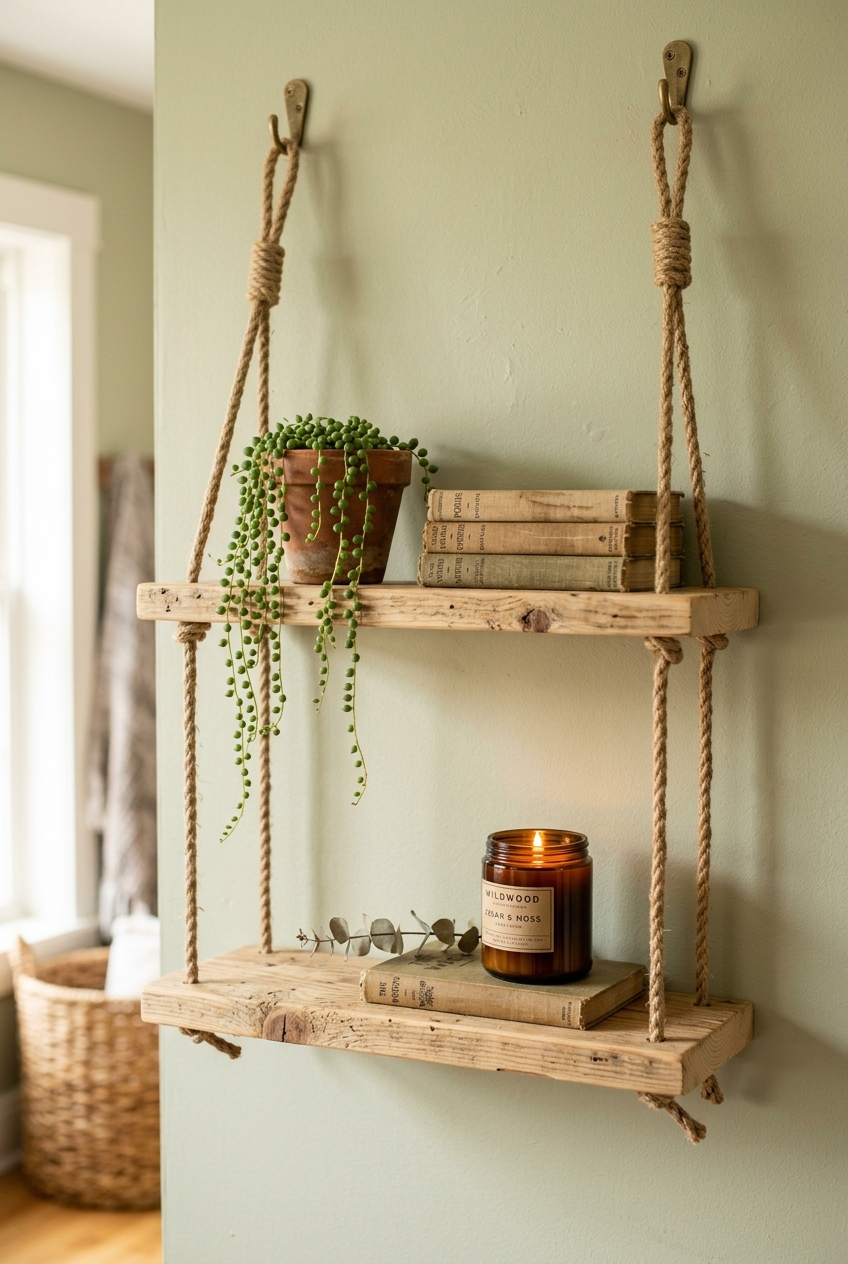
Estimated Cost: $15 – $19 | Time: 1 hour | Skill Level: Beginner
Materials Needed:
- Two scrap 1×6 pine wood boards (cut to 18 inches) ($6)
- 15 feet of 3/8-inch natural twisted jute rope ($5)
- Drill with 1/2-inch spade bit
- Two brass screw hooks or heavy anchor hooks ($3)
How to Make It: Drill a 1/2-inch hole into each corner of both pine boards, about 1 inch inward from the edges. Sand the wood and stain or leave raw with clear wax. Thread the jute rope through the top shelf holes, tie tight stopper knots underneath each corner, and continue threading down through the second shelf, securing with another set of knots. Hang the top loops from two ceiling or wall hooks. Style with trailing succulents, an amber candle, and vintage books.
💡 Clara’s Styling Tip: Place a spirit level across the shelf while tightening your knots. Leveling the front and back simultaneously ensures your planters sit safely without sliding.
15. Renter-Friendly Painted Terracotta Arch Color-Block
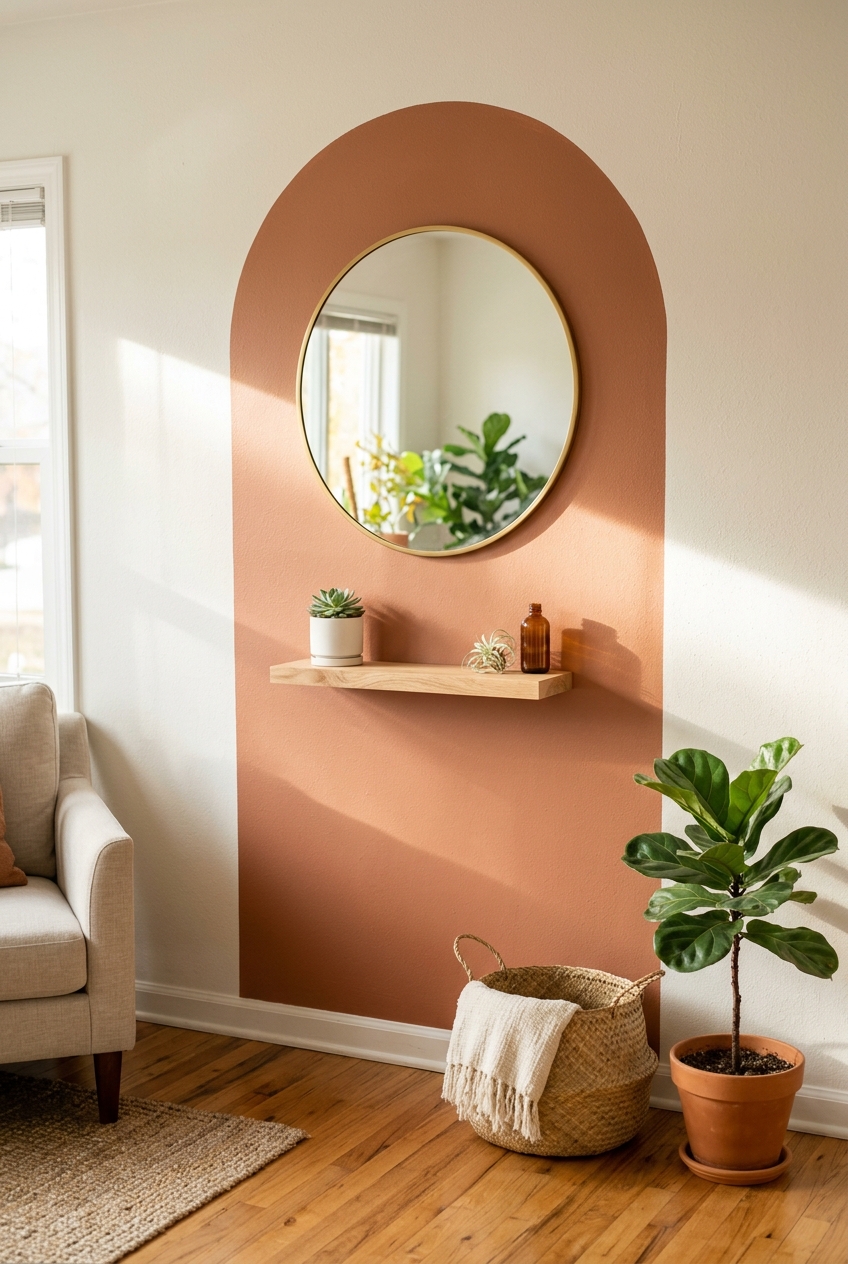
Estimated Cost: $14 – $18 | Time: 1.5 hours | Skill Level: Beginner
Materials Needed:
- Sample pint of warm terracotta or clay latex paint ($6)
- Painter’s blue tape ($4)
- Pencil, piece of string, push pin
- High-density mini paint roller and tray ($4)
How to Make It: Determine the height and width of your arch (a standard 30-inch width and 70-inch height works wonders behind an entryway table or mirror). Mark your vertical boundary lines with painter’s tape. To draft the curved top, tie a pencil to a string measuring half the width of your arch (15 inches). Secure the string end with a pushpin at the center point between your tape lines and swing the pencil like a compass to draw a perfect half-circle arc. Paint two thin coats inside the lines and peel the tape while the second coat is slightly tacky for razor-sharp edges.
💡 Clara’s Styling Tip: Painting an arch behind a round mirror, small floating shelf, or bar cart visually zones the area, creating the illusion of a dedicated architectural nook without adding a single partition wall.
16. Minimalist Picture Ledge Floating Shelf
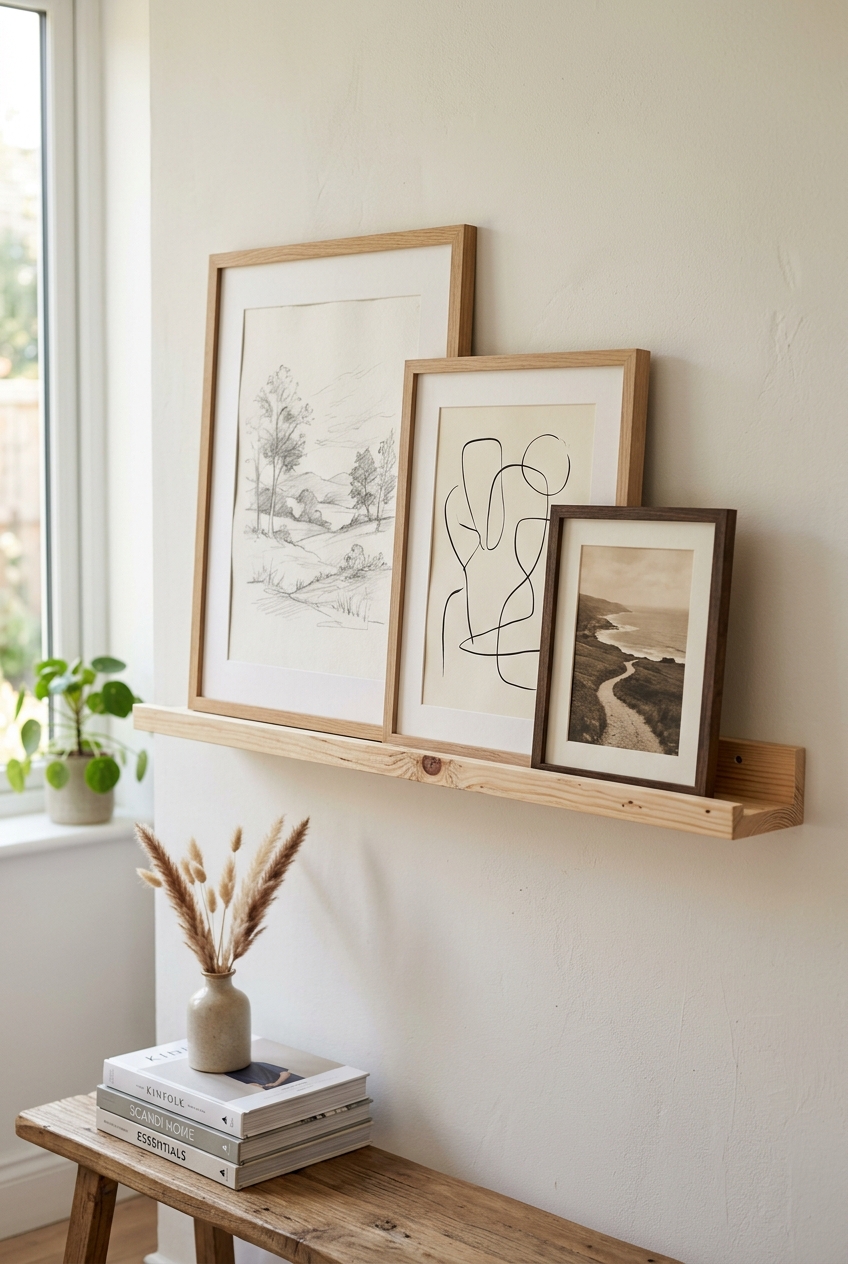
Estimated Cost: $12 – $16 | Time: 1 hour | Skill Level: Intermediate
Materials Needed:
- One 1×3 pine board (backboard) ($4)
- One 1×2 pine board (base) ($3)
- One 1×1 trim strip (front lip) ($2)
- Wood glue and countersunk screws ($3)
- Natural clear wax or white wash stain ($3)
How to Make It: Fasten the 1×2 flat base to the front of the 1×3 backboard with wood glue and countersunk screws from behind. Attach the 1×1 trim along the front edge of the base to create a retaining lip. Sand and finish. Mount to wall studs or with drywall anchors. Picture ledges allow you to layer, rotate, and swap art prints, postcards, and framed sketches effortlessly without making fresh nail holes every time you redecorate.
💡 Clara’s Styling Tip: Layer your art: place the tallest frame in the back offset to one side, layer a medium frame overlapping in the middle, and finish with a small framed photo or dried bud vase in front.
17. Hexagonal Wood Craft-Stick Honeycomb Shelves
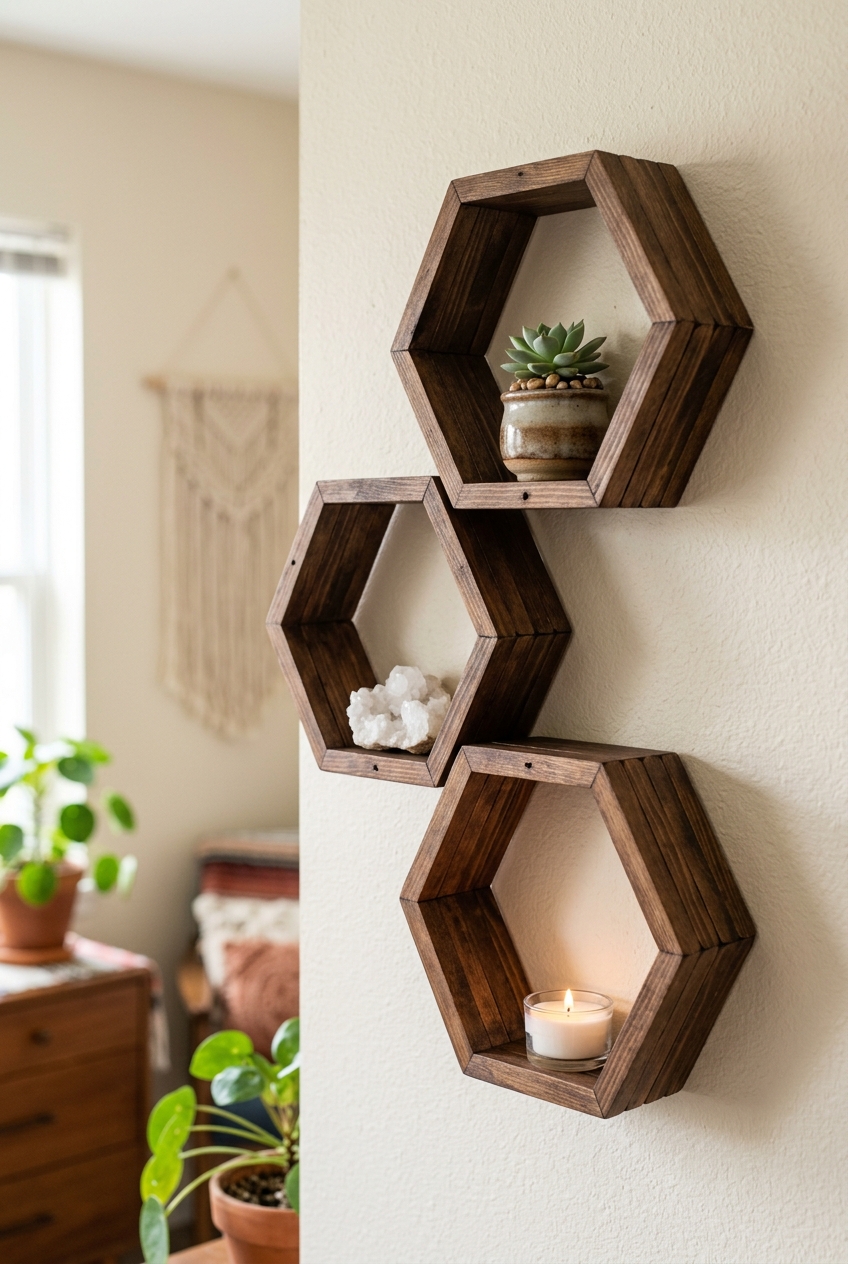
Estimated Cost: $7 – $11 | Time: 1 hour | Skill Level: Beginner
Materials Needed:
- Box of 100 jumbo natural wooden craft sticks ($4)
- Bottle of wood glue ($3)
- Small jar of dark walnut or espresso wood stain ($3)
- Printed hexagon paper guide template (Free)
How to Make It: Print a hexagon template to guide your layout. Arrange six craft sticks into a hexagon, overlapping the corners with a small dab of wood glue. Continue stacking and gluing layers of sticks on top of the corners until your shelf reaches a depth of 12 to 15 sticks (about 1.5 inches deep). Once cured overnight, stain with dark walnut. These featherweight honeycomb shelves hang easily on a single finishing nail and hold crystals, mini succulents, and tea lights.
💡 Clara’s Styling Tip: Hang a cluster of three hexagons interlocking together. Because each shelf weighs less than 6 ounces, two small clear Command adhesive strips will securely hold them on rental drywall.
18. Peel-and-Stick Faux Board & Batten Accent
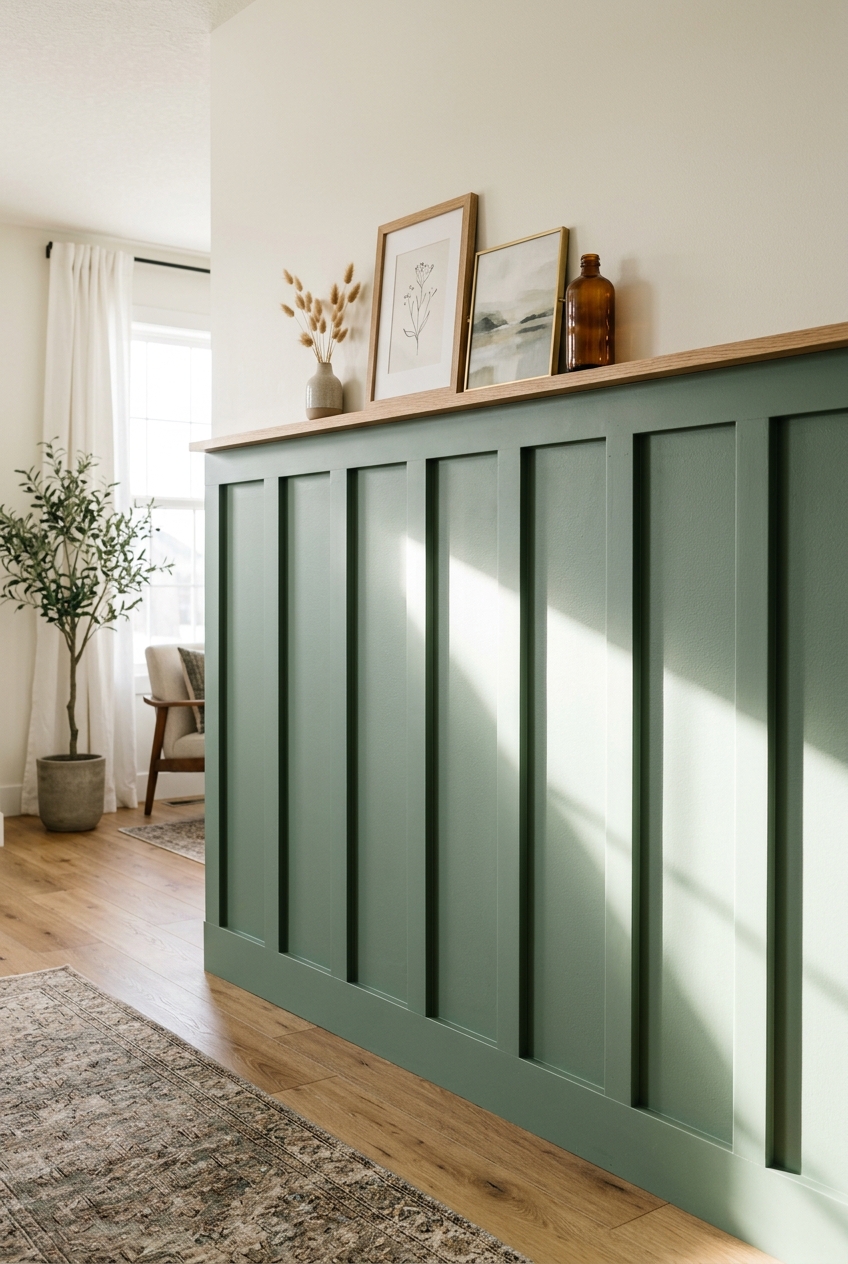
Estimated Cost: $24 – $29 | Time: 2.5 hours | Skill Level: Intermediate
Materials Needed:
- Pre-taped adhesive foam wall trim mouldings ($18 for multi-pack)
- Measuring tape, pencil, and 24-inch spirit level
- Utility knife or miter shears ($4)
- Sample quart of satin wall paint in sage green or deep navy ($6)
How to Make It: Measure your wall and determine equal spacing for vertical battens (typically 12 to 16 inches apart). Cut the flexible adhesive trim to length with a utility knife. Use a spirit level to ensure straight placement, peel the backing tape, and firmly press onto the wall. Paint over the trim and the wall beneath it in a rich cohesive hue (such as charcoal navy or warm mushroom). When your lease ends, a warm hairdryer softens the adhesive for clean removal.
💡 Clara’s Styling Tip: Cap the top of your vertical battens with a horizontal strip and a 1-inch flat wooden picture rail ledge for displaying vintage oil paintings and ceramic bud vases.
Category 4: Fiber Art, Warm Textiles & Modern Boho
Rooms dominated by hard edges, glass tables, and plaster drywall often feel cold and sterile. Soft textile wall hangings, woven natural fibers, and chunky yarn accents introduce crucial acoustic dampening and welcoming warmth.
19. Birch Dowel & Chunky Wool Yarn Wall Tapestry
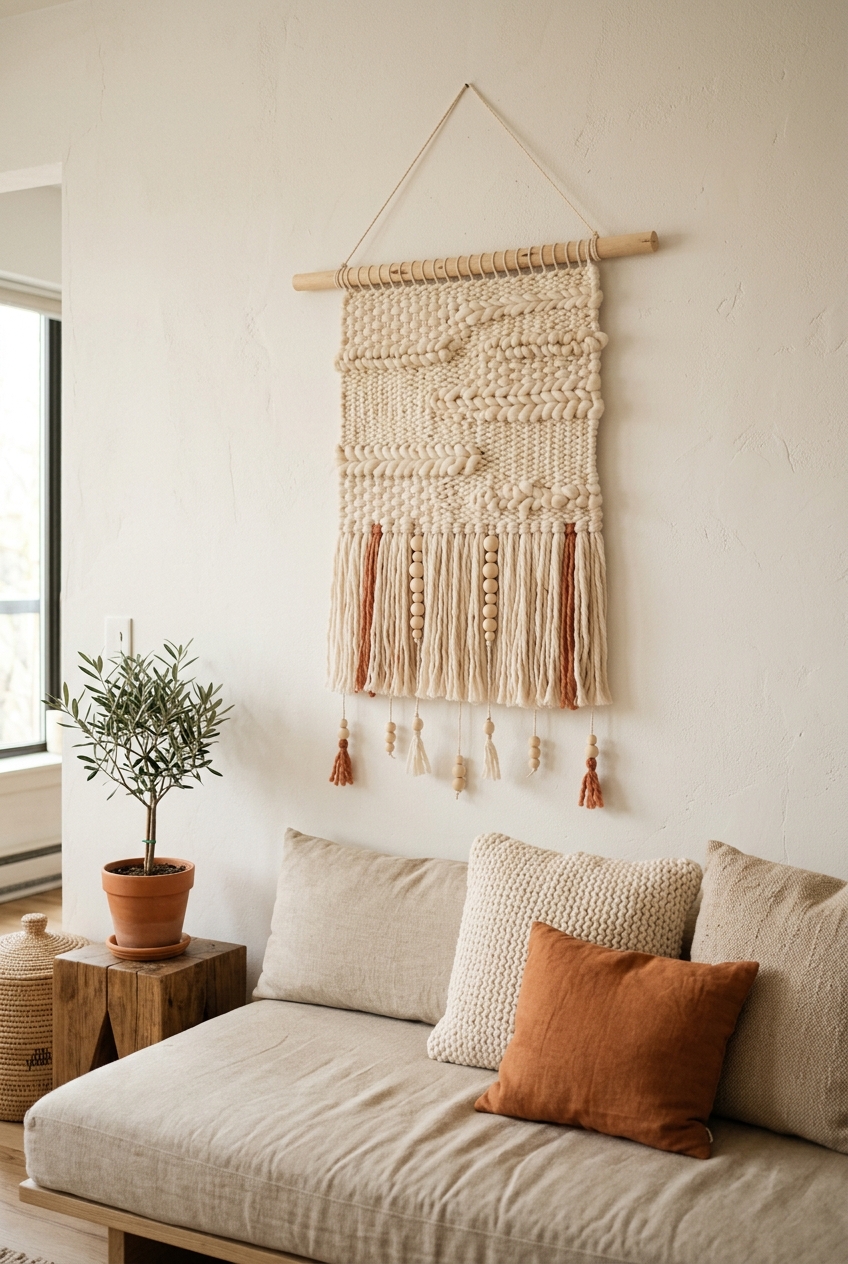
Estimated Cost: $15 – $20 | Time: 1.5 hours | Skill Level: Beginner
Materials Needed:
- 1/2-inch round smooth birch wooden dowel (24 inches long) ($3)
- Skein of unbleached chunky cream roving yarn ($7)
- Accent skein of terracotta or mustard wool yarn ($5)
- Unfinished wooden round craft beads with large holes ($3)
How to Make It: Cut yarn strands into double your desired hanging length (around 40 inches). Fold each strand in half, wrap the loop over the top of the wooden dowel, pull the tail ends through the loop, and tighten (the classic Lark’s Head knot). Repeat across the length of the dowel, mixing textures and colors. Thread wooden beads onto select strands and trim the bottom fringe into a chevron arrow or gentle inverted curve with sharp fabric scissors.
💡 Clara’s Styling Tip: Mix two or three different yarn thicknesses—such as chunky roving, twisted cotton rope, and bouclé wool—to give your tapestry rich visual complexity reminiscent of expensive loom-woven tapestries.
20. Curated Thrifted Woven Basket Wall Gallery
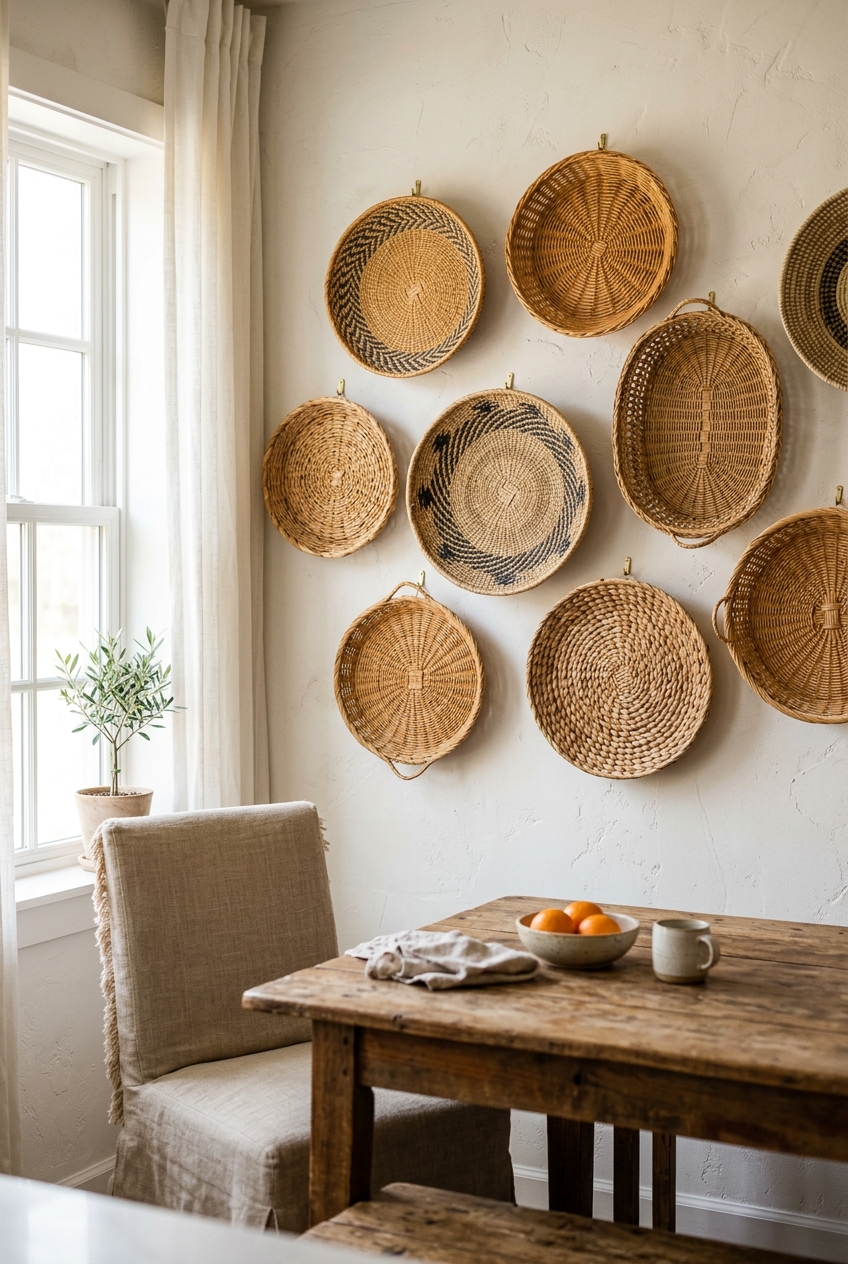
Estimated Cost: $16 – $22 | Time: 45 minutes | Skill Level: Beginner
Materials Needed:
- 5 to 7 shallow woven wicker, seagrass, and bamboo trays ($1.50 – $3 each at thrift stores)
- Slender brass dressmaker pins or clear mini Command hooks ($4)
- Measuring tape or brown craft paper for template
How to Make It: Gather baskets with diverse weave patterns, varying depths, and subtle color accents (natural straw, honey wicker, and black geometric dyes). Lay them out on the floor first, positioning the largest basket off-center as the anchor and swirling smaller baskets outward organically. Pin them to your wall through the center weaves using slender brass picture pins. This lightweight installation covers large square footage on a minimal budget.
💡 Clara’s Styling Tip: Trace each basket onto newspaper or kraft paper, cut out the circles, and tape them to the wall with blue tape to perfect your arrangement before putting in a single pin.
21. Framed Heirloom Fabric or Quilt Remnant
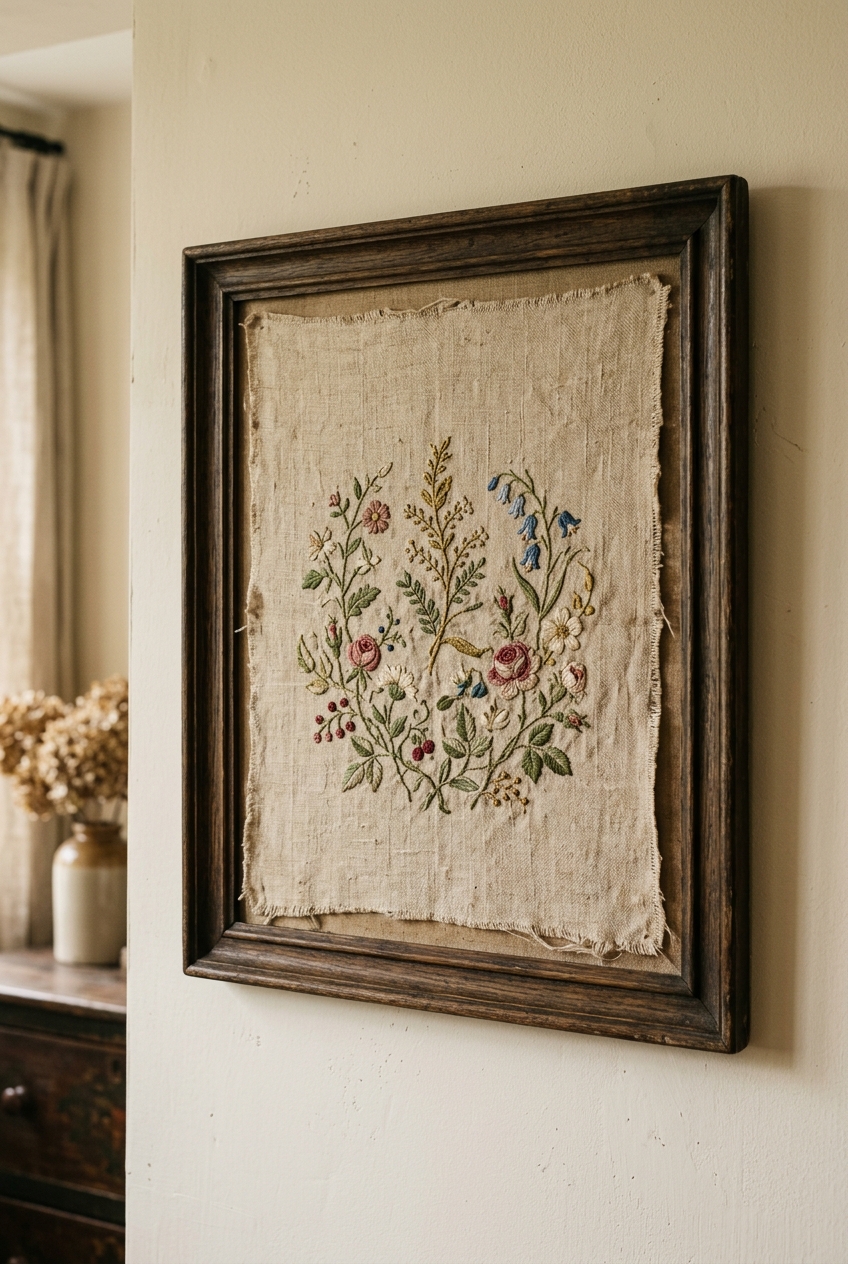
Estimated Cost: $12 – $16 | Time: 30 minutes | Skill Level: Beginner
Materials Needed:
- Vintage botanical embroidered linen scrap or antique fabric swatch ($4 – $6)
- Sheet of stiff foam core backing board ($3)
- Thrifted or discount dark oak picture frame ($5)
- Acid-free double-sided tape or flat quilting pins
How to Make It: Cut a piece of rigid foam board to fit snugly inside your frame. Lay your fabric swatch face-down, center the foam board over it, pull the edges taut, and secure them to the back using masking tape or flat pins. Place inside the frame without glass to highlight the tactile weave and frayed hem of the textile.
💡 Clara’s Styling Tip: Leave the raw, frayed deckled edge of the linen exposed over a neutral linen mat board rather than tucking it away. The rough edges celebrate the handmade provenance of the fabric.
22. Macramé Feather Leaf Wall Mobile
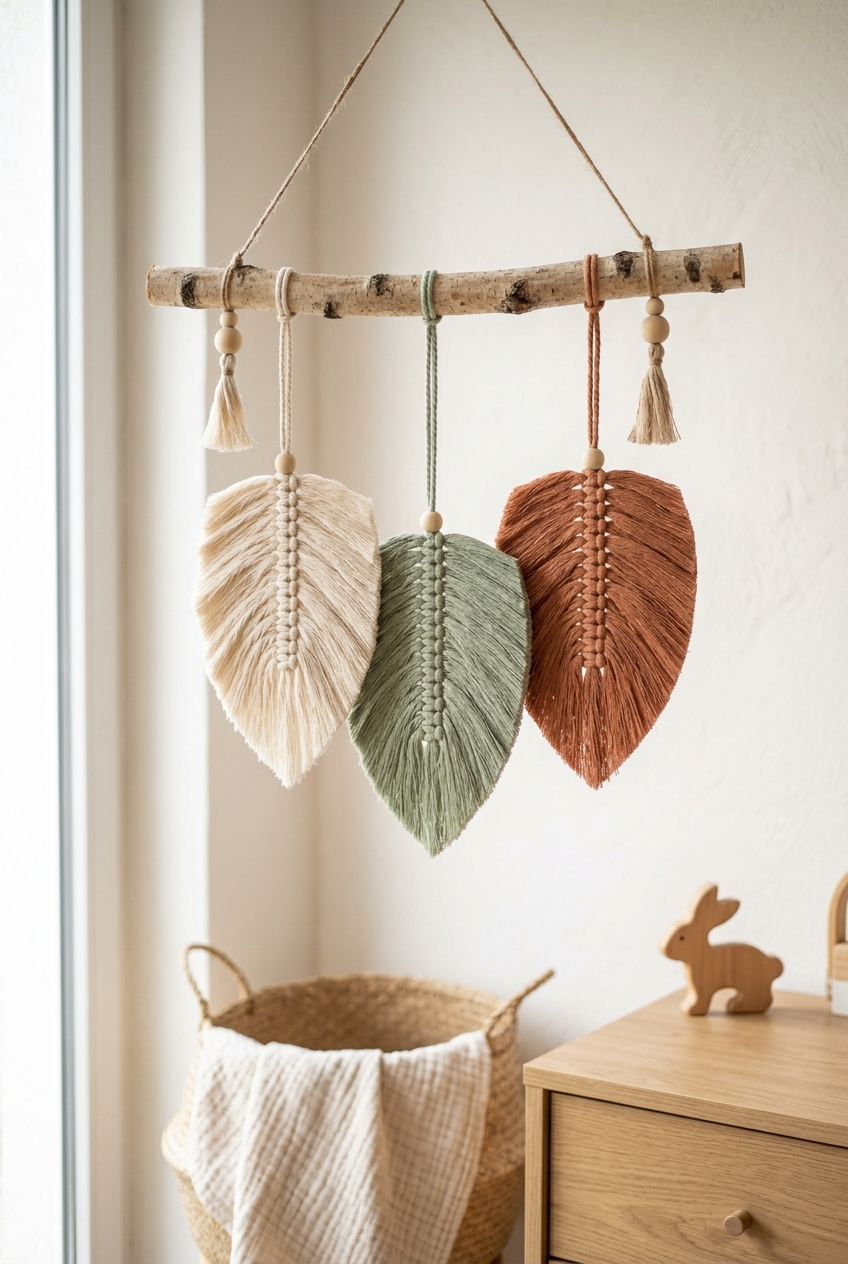
Estimated Cost: $10 – $14 | Time: 1 hour | Skill Level: Beginner
Materials Needed:
- 4mm single-strand twisted macramé cotton cord ($7)
- Smooth birch or driftwood branch ($2)
- Wire pet slicker brush or fine-tooth comb
- Fabric stiffener spray or strong hairspray ($3)
- Fabric scissors
How to Make It: Tie a 12-inch spine cord to your branch. Knot pairs of 6-inch cord segments down the central spine using square knots. Once your leaf body is full, brush out the cotton cords thoroughly with your pet brush until the fibers unravel into a silky fringe. Trim into an elegant feather shape with scissors, spray generously with fabric stiffener, and let dry completely so the feathers hold their crisp silhouette.
💡 Clara’s Styling Tip: Dip the tips of the ivory macramé feathers in strongly brewed black tea or diluted terracotta dye for 10 minutes to create an organic, dipped-ombre gradient.
23. Embroidery Hoop Botanical Fabric Wall Cluster
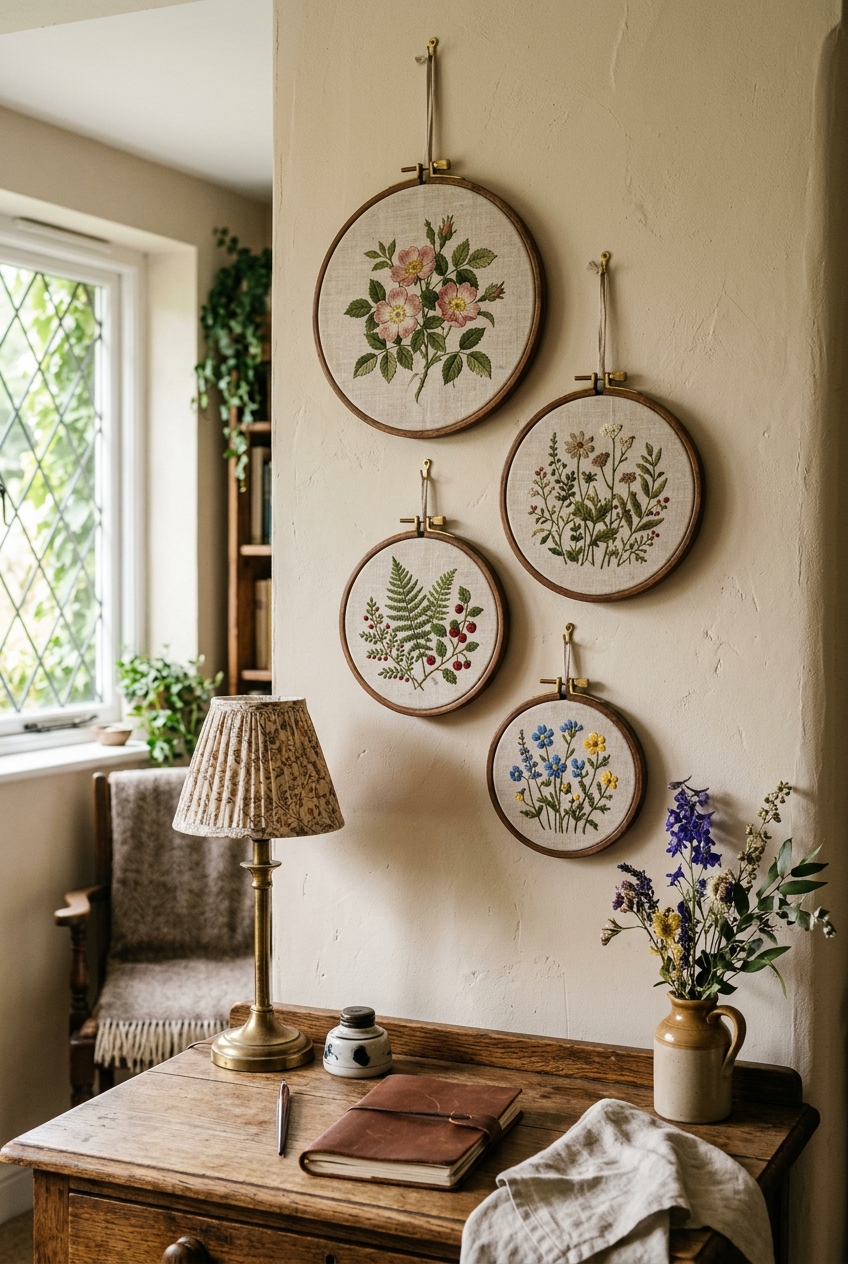
Estimated Cost: $11 – $15 | Time: 40 minutes | Skill Level: Beginner
Materials Needed:
- 4 wooden embroidery hoops (4, 6, 8, and 10 inches) ($6 for set)
- Floral and botanical linen fat-quarter fabric remnants ($4)
- Clear fabric glue or hot glue ($2)
- Fabric shears
How to Make It: Stretch different sections of your botanical pattern fabric tightly inside each wooden hoop, tightening the brass screw at the top. Trim the excess fabric around the back to a 1/2-inch border and glue it neatly to the inside rim. Cluster the hoops tightly on your wall above a desk or nightstand for an instant burst of cottagecore charm.
💡 Clara’s Styling Tip: Hang each hoop by looping a delicate strip of vintage velvet ribbon or torn linen ribbon over a tiny antique brass nail for a soft, curated finish.
24. Wooden Bead Garland with Jute Tassels Wall Swag
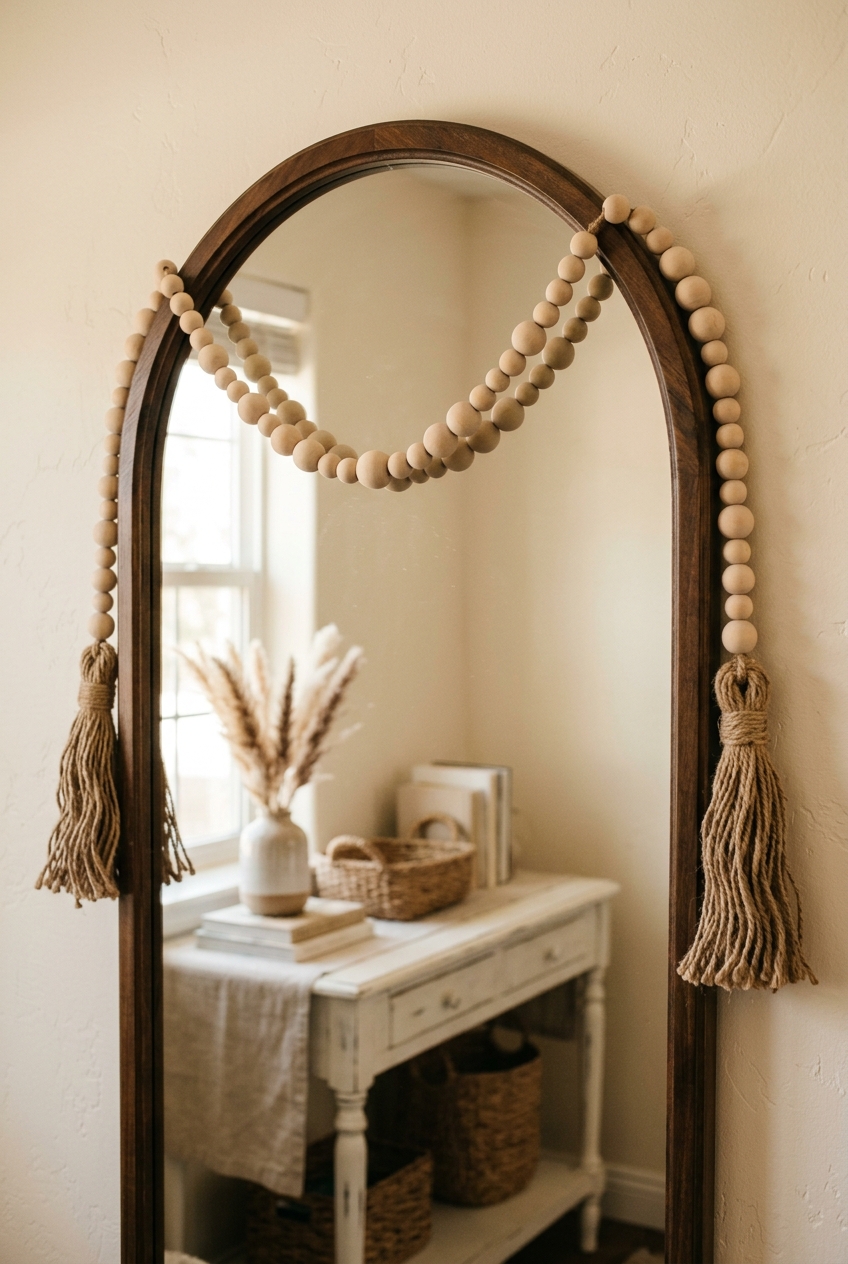
Estimated Cost: $8 – $12 | Time: 30 minutes | Skill Level: Beginner
Materials Needed:
- Bag of assorted raw unfinished beech wood beads (16mm to 25mm) ($5)
- Ball of natural jute twine ($3)
- Piece of cardboard (5×7 inches) for tassel making
- Large tapestry needle
How to Make It: Thread alternating 16mm, 20mm, and 25mm wooden beads onto a 5-foot length of twine. Create two oversized 5-inch tassels by wrapping jute twine around a piece of cardboard 30 times, tying the top loop, cutting the bottom loops, and wrapping the neck tightly. Knot a tassel to each end of the bead string and drape casually over a decorative wall mirror, coat rack, or wall sconce.
💡 Clara’s Styling Tip: Leave the wooden beads completely raw and unfinished. The pale, untreated wood grain provides the perfect organic contrast against darker walnut or brass decor.
Category 5: Upcycled Thrift Flips & Statement Paper Crafts
Thrifting and clever paper crafting are the ultimate secret weapons for high-impact decorating on a microscopic budget. With a tiny dab of metallic wax, an oversized mat board, or sculptural clay, humble cast-offs become statement conversation starters.
25. Framed High-End Wallpaper Sample Mural
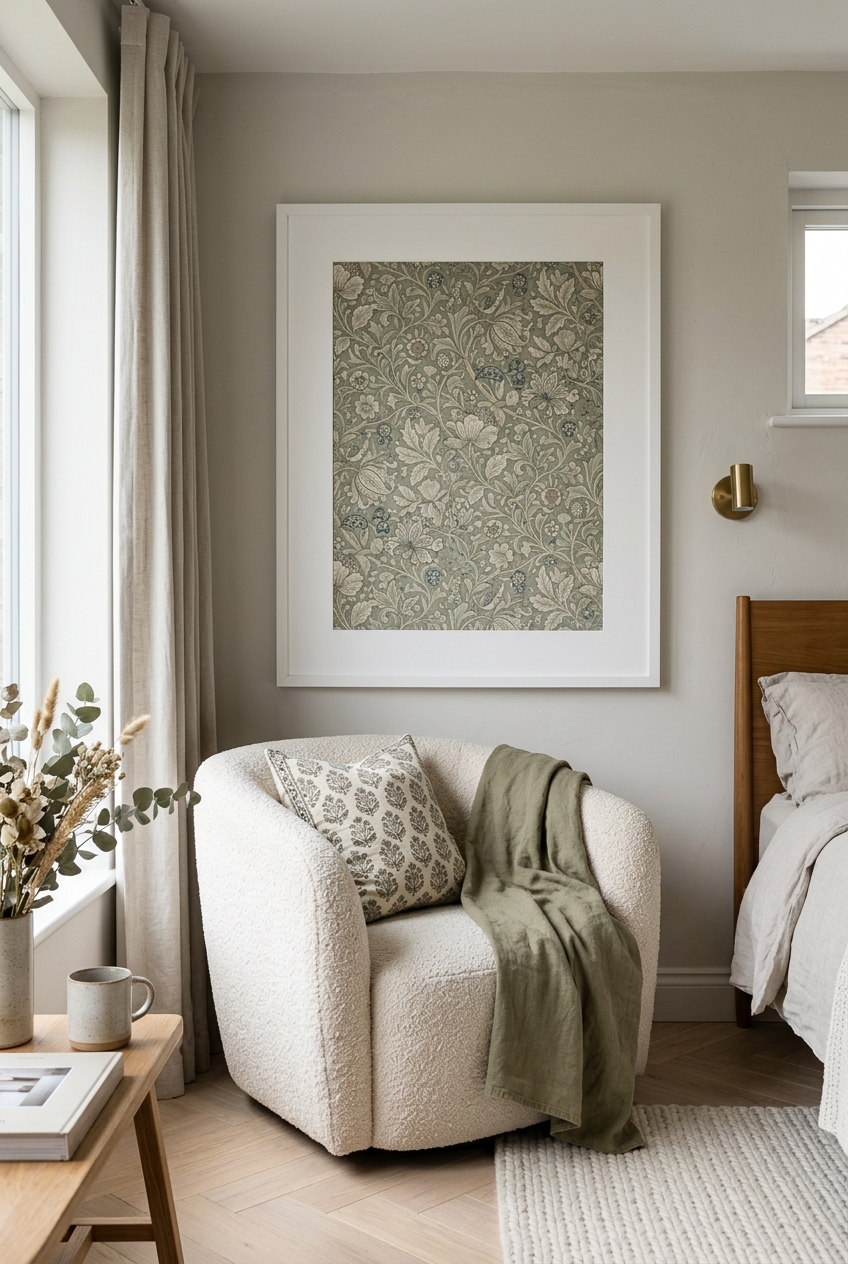
Estimated Cost: $10 – $15 | Time: 25 minutes | Skill Level: Beginner
Materials Needed:
- Sample memo sheet of designer luxury wallpaper (William Morris or Schumacher) ($4 – $6)
- Oversized picture frame with extra-wide pre-cut white mat board ($8 – $10)
- Acid-free double-sided mounting tape ($2)
How to Make It: Designer wallpaper samples are printed on thick, heavy paper stock with rich tactile embossing and metallic inks that would cost hundreds per roll. Center the wallpaper sample behind the oversized mat aperture, secure the corners with archival tape, and seal inside your frame. The stark contrast between the wide white mat and the intricate pattern mimics high-end museum presentation.
💡 Clara’s Styling Tip: Whenever you are framing inexpensive paper or small art, choose a frame that is at least twice the size of the artwork and add an extra-wide 3-to-4 inch mat board. Wide matting instantly tricks the eye into perceiving luxury gallery value.
26. Antique Thrift Mirror Gold Leaf Transformation
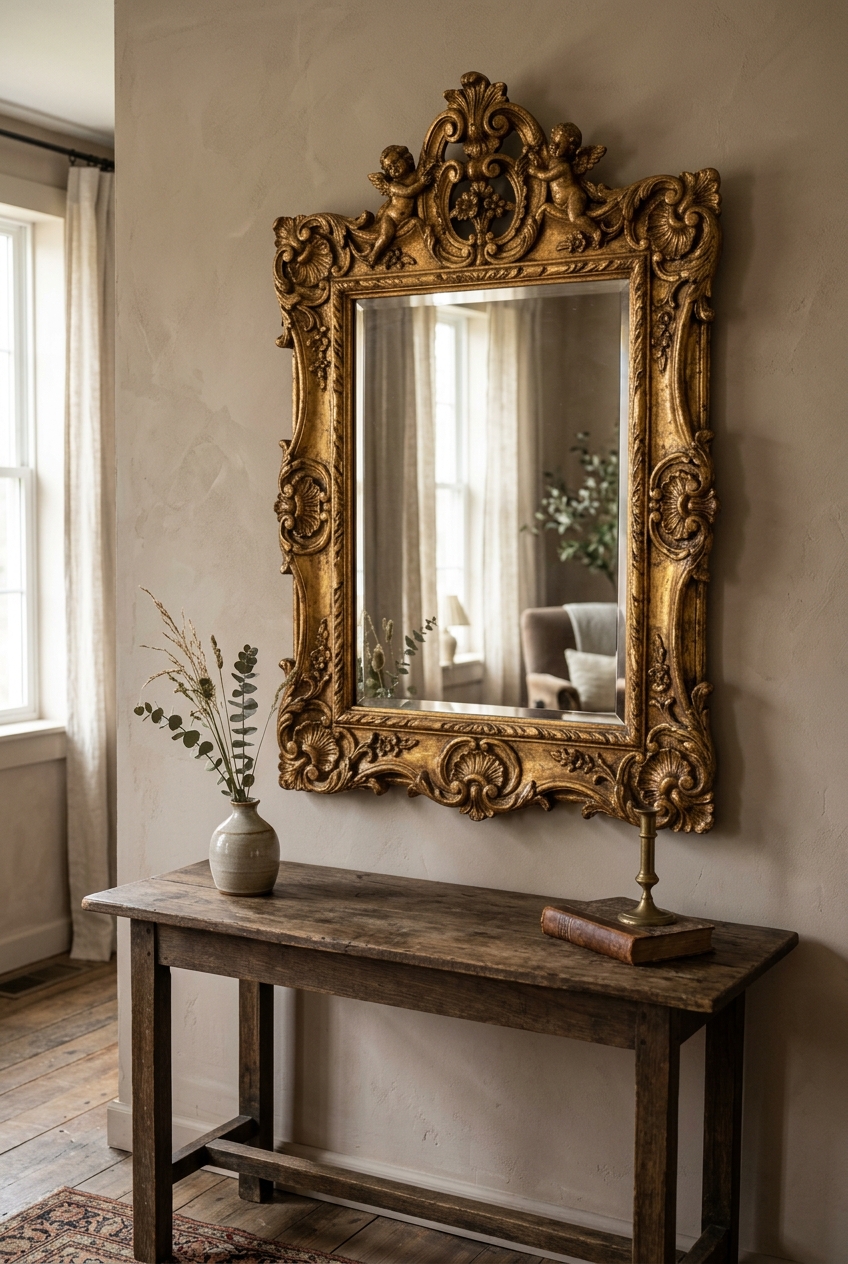
Estimated Cost: $14 – $19 | Time: 1 hour | Skill Level: Beginner
Materials Needed:
- Outdated ornate resin or plastic thrift store mirror ($5 – $8)
- Tube of Rub ‘n Buff metallic finish wax paste (Antique Gold or European Gold) ($8)
- Rubbing alcohol and soft lint-free cotton cloth
How to Make It: Thrift stores are flooded with heavy plastic or faux-wood 1980s mirrors with dated dark brown or faux-cherry finishes. Clean the frame thoroughly with rubbing alcohol. Squeeze a pea-sized dot of Rub ‘n Buff wax onto your fingertip or cloth and buff it across the carved ornate relief details, letting the deeper crevices remain dark for natural antiqued patina. Buff to a warm metallic sheen with a clean cloth 10 minutes later.
💡 Clara’s Styling Tip: Apply the wax with your bare index finger. The natural heat from your skin melts the carnauba wax into the intricate ornamental carvings much more smoothly than a cloth.
27. Handcrafted Geometric Air-Dry Clay Wall Mobile
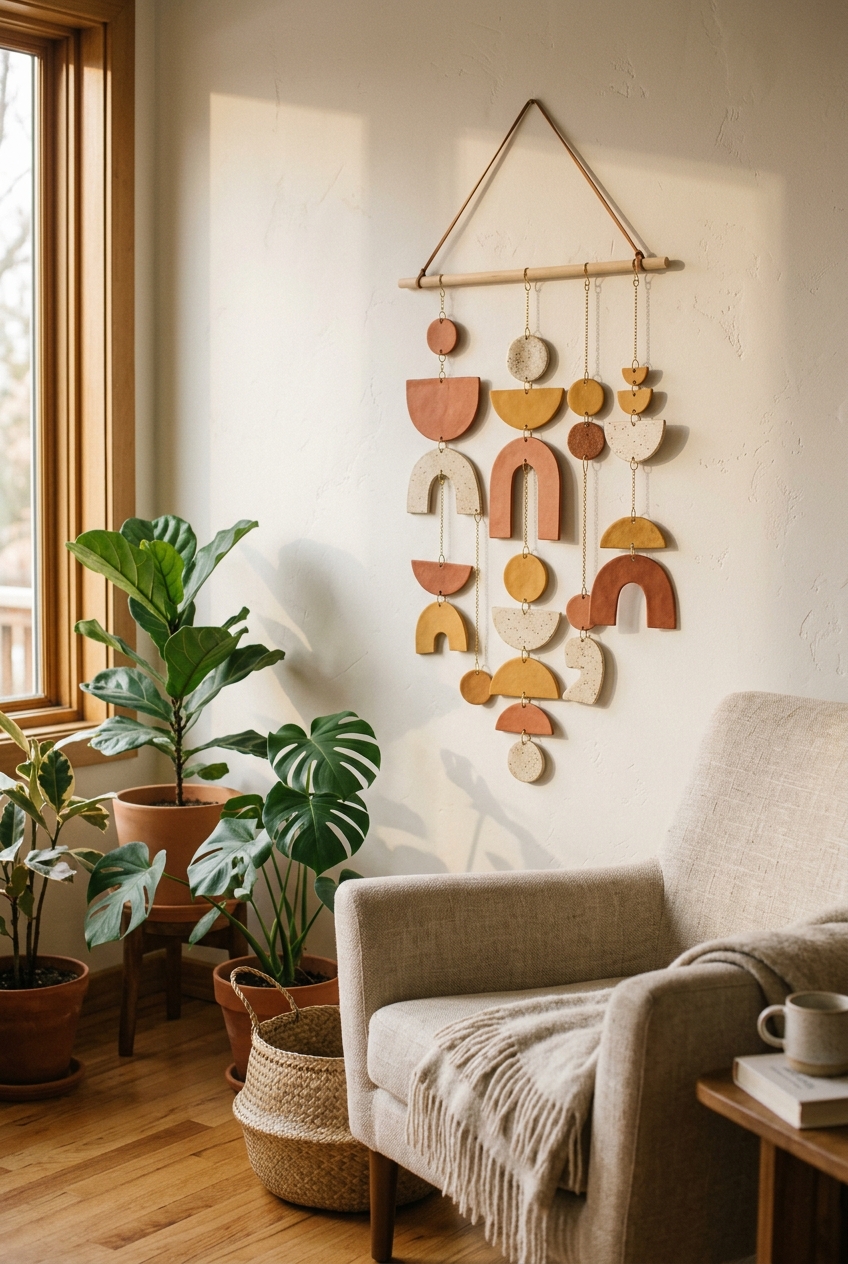
Estimated Cost: $12 – $17 | Time: 1.5 hours + drying | Skill Level: Beginner
Materials Needed:
- 2.2 lb pack of white and terracotta air-dry clay ($7)
- Drinking glass or cookie cutters for clean shapes
- Wooden toothpick or straw for punching holes
- Pack of brass jump rings and jewelry pliers ($4)
- Mini wooden dowel or brass hanging ring ($2)
How to Make It: Roll clay out onto parchment paper to an even 1/4-inch thickness. Cut out geometric shapes: arches, semicircles, discs, and crescents. Use a toothpick to poke neat holes through the top and bottom of each piece before drying. Allow clay to cure completely for 48 hours. Connect the shapes vertically into cascading columns using brass jump rings and suspend from a mini wooden dowel or directly from a brass wall pin.
💡 Clara’s Styling Tip: Mix a sprinkle of real fine coffee grounds or black pepper into white air-dry clay while kneading to mimic the speckled ceramic look of artisan stoneware.
28. Vintage Book Page French Poetry Gallery Wall
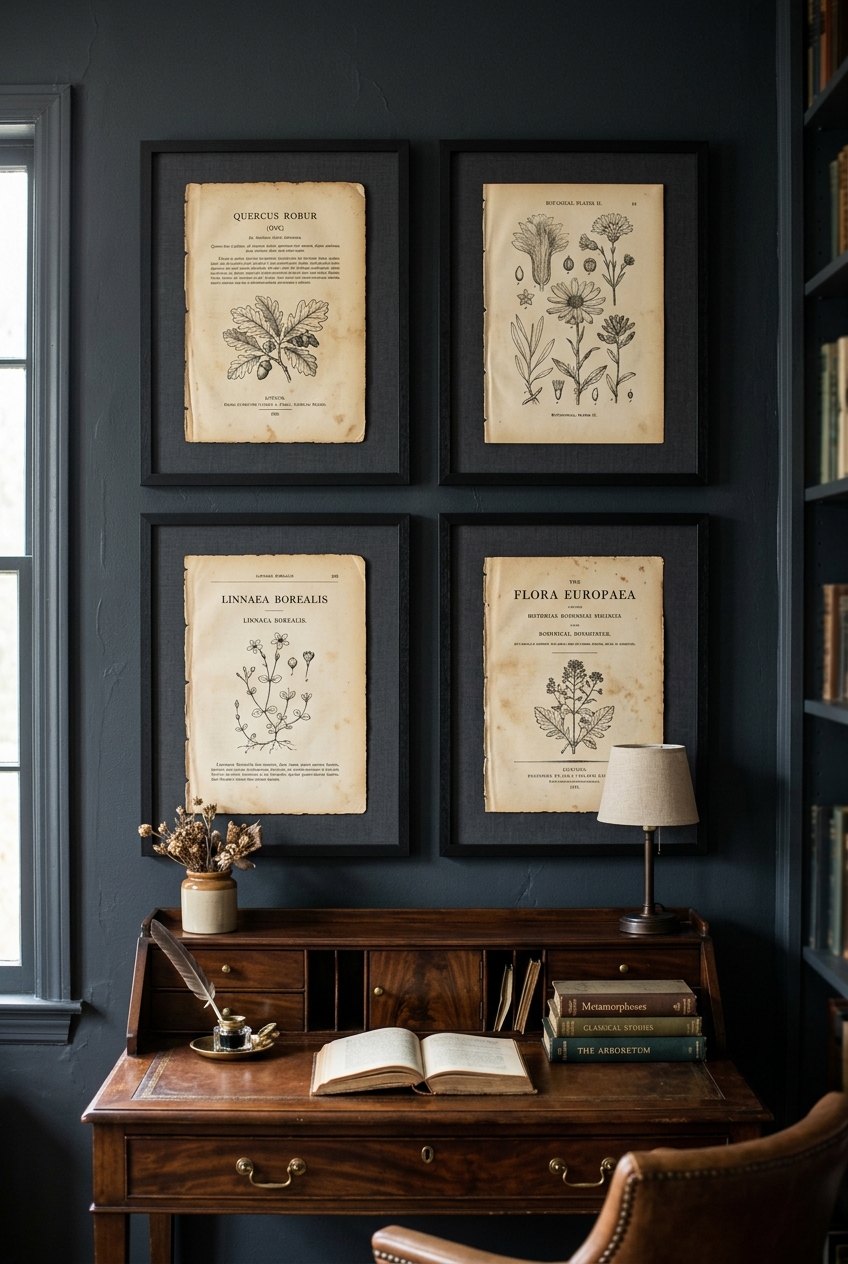
Estimated Cost: $8 – $12 | Time: 45 minutes | Skill Level: Beginner
Materials Needed:
- Damaged vintage book with yellowed pages ($1 from library book sales or thrift shops)
- Set of four slim black 8×10 document frames ($8 for multi-pack)
- Dark charcoal or black cardstock sheets ($2)
- Double-sided foam tape squares ($2)
How to Make It: Carefully tear out four pages featuring beautiful typography, botanical illustrations, or classic poetry with deckled edges. Float each page on top of a dark gray or crisp ivory cardstock mat using a small square of foam mounting tape for a subtle 3D lift. The yellowed paper and authentic ink typesetting give your wall instant Parisian literary charm.
💡 Clara’s Styling Tip: Use a damp foam brush to gently wet the outer paper margins before tearing. Tearing along the wet line yields a gorgeous, feathery deckled edge like hand-milled French paper.
29. Pressed Brass Wire Contour Silhouette Art
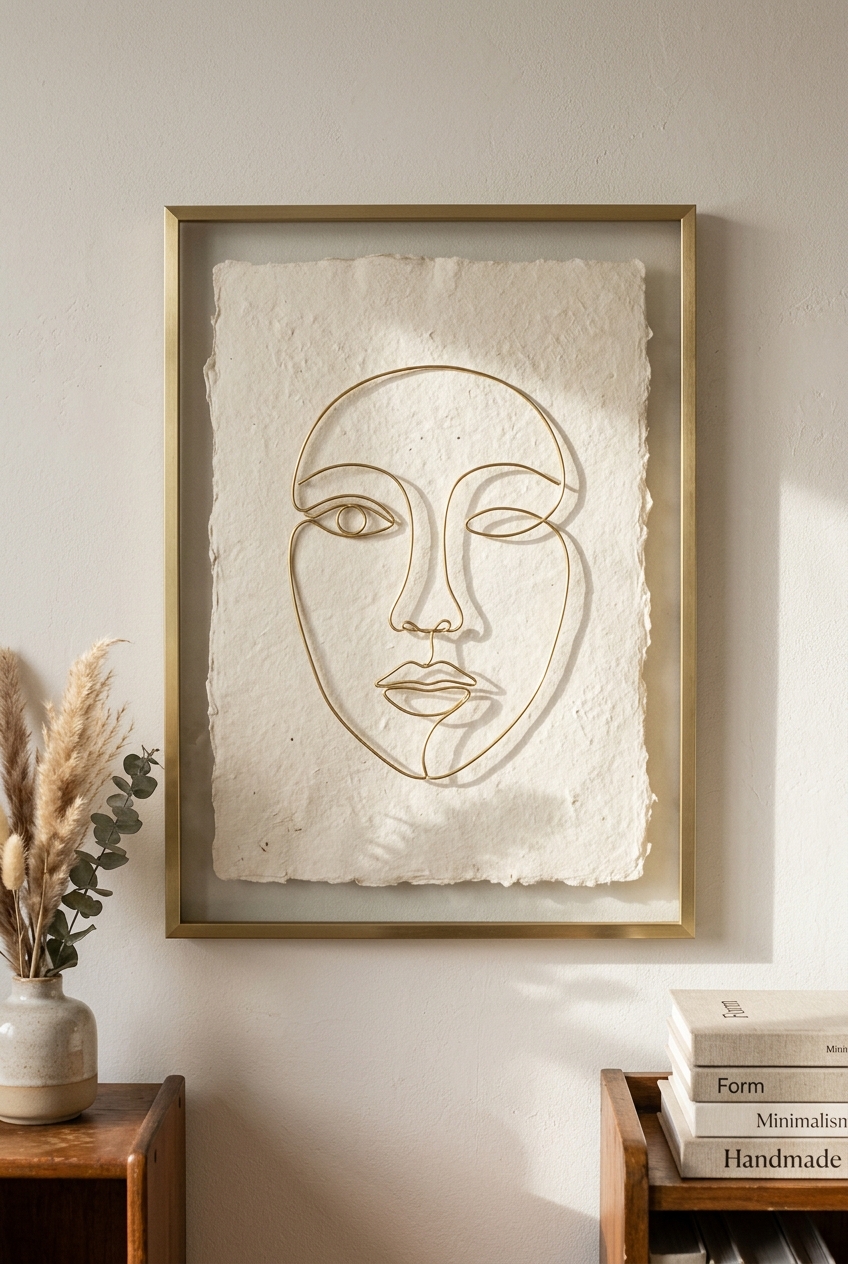
Estimated Cost: $9 – $13 | Time: 40 minutes | Skill Level: Beginner
Materials Needed:
- 18-gauge malleable brass crafting wire ($5)
- Needle-nose jewelry pliers ($3)
- Sheet of heavy deckled cotton watercolor paper ($2)
- Slim brass or glass picture frame ($4)
- Clear drying craft glue
How to Make It: Print a single-line minimalist profile sketch or botanical stem as a template. Using needle-nose pliers, bend and sculpt the pliable brass wire along the drawn lines into a continuous contour silhouette. Secure the finished wire shape onto your paper backing with tiny drops of clear craft adhesive and frame. As light catches the raised brass wire, it creates delicate linear shadows across the paper.
💡 Clara’s Styling Tip: Keep the wire in one unbroken, continuous segment from start to finish. The fluidity of a single line gives the artwork an effortless, Picasso-style modern flair.
30. DIY Oversized Japanese Paper Globe Sconce
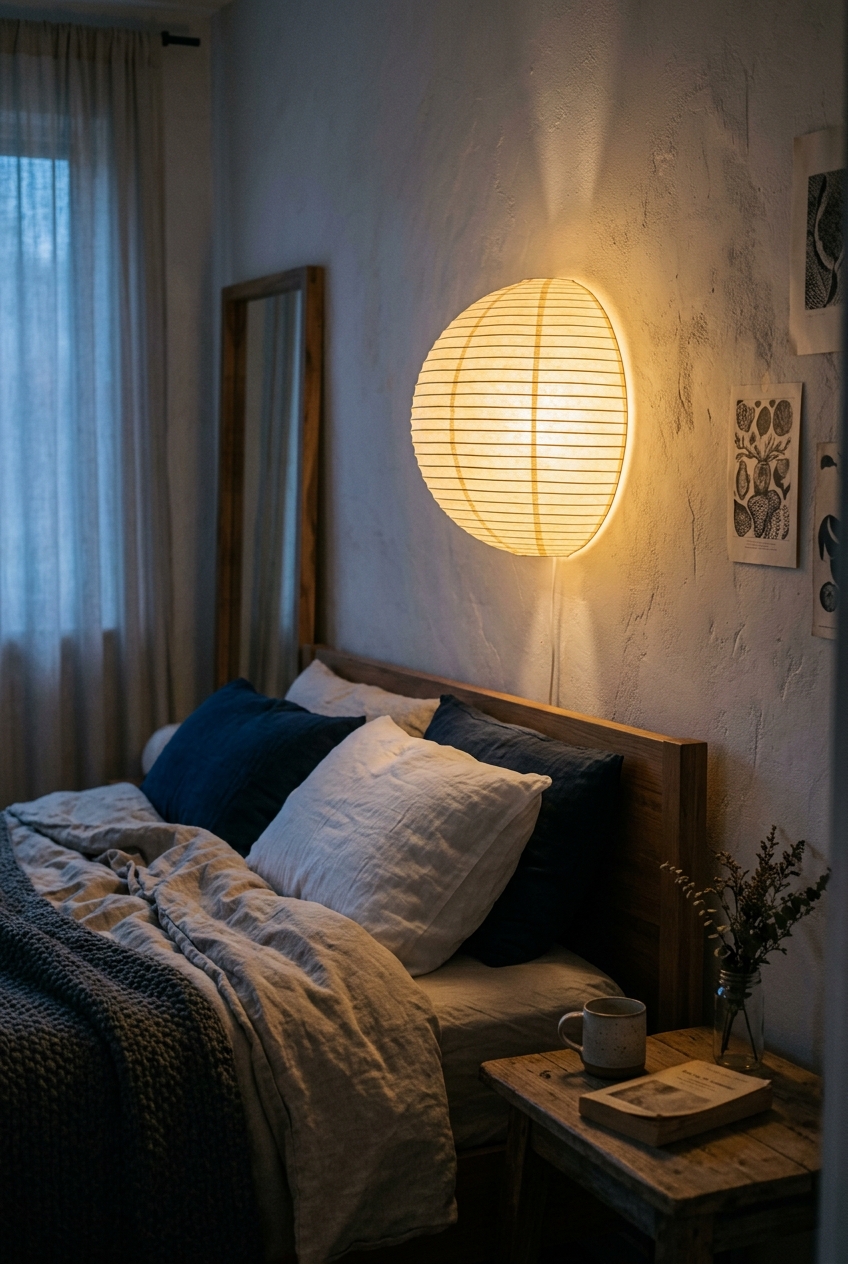
Estimated Cost: $18 – $24 | Time: 45 minutes | Skill Level: Beginner
Materials Needed:
- 16-inch round paper lantern globe shade ($6)
- Battery-operated remote-controlled puck light ($8 for a 2-pack)
- Utility scissors or craft knife
- Clear Command wall hook ($4)
How to Make It: Slice the back third off the paper globe shade with sharp scissors so it sits flush against the wall in a half-dome silhouette. Mount your remote-controlled LED puck light to the wall with Command adhesive and hang the paper lantern shade directly over it. The rice paper diffuses a soothing, sculptural warm glow inspired by iconic Isamu Noguchi Akari lamps—completely cordless and wire-free.
💡 Clara’s Styling Tip: Choose an LED puck light that has a warm 2700K color temperature and a built-in timer. It turns on automatically at dusk, casting a tranquil golden ambience across your room.
5 Golden Rules to Make Under-$30 DIY Wall Art Look Like $300
No matter which of these 30 projects you decide to craft this weekend, keep these five interior design principles top of mind to ensure your finished projects never look like cheap crafts:
Rule 1: Scale is Everything (Go Bigger Than You Think)
The number one mistake in budget decorating is hanging dinky, undersized art on a sprawling wall. A tiny 8×10 frame floating alone on a massive sofa wall immediately reveals budget constraints. If you have a large blank wall, group small pieces into a unified grid gallery or build a large-scale 24×36 canvas. Your wall art should span roughly two-thirds to three-quarters of the width of the furniture piece sitting below it.
Rule 2: Master the 57-Inch Hanging Standard
Galleries and museums across the globe hang artwork so that the vertical center of the piece sits exactly 57 to 60 inches from the floor (average human eye level). Hanging art too high—often near the ceiling—is the fastest way to make a room feel disjointed. When hanging above a sofa or headboard, position the bottom edge of the frame approximately 6 to 8 inches above the furniture back.
Rule 3: Invest in Generous Matting Over Expensive Frames
You can buy a $5 poster frame from a discount store, but when you pair it with a custom-cut, heavy 3-inch white or off-white mat board, the piece instantly shifts into fine-art territory. Wide matting creates visual breathing room and forces the eye to focus intently on the artwork.
Rule 4: Restrain Your Color Palette to 2–3 Tones
Budget DIYs often look cluttered when too many primary colors compete. To achieve that serene, curated look, stick to an intentional, tight color story: warm bone whites, muted oatmeals, rich earthy terracottas, and accents of aged antique brass or natural oak. Monochromatic and tonal art always registers as sophisticated and deliberate.
Rule 5: Embrace Renter-Friendly Hardware
You never have to sacrifice your security deposit for style. Keep a toolkit of heavy-duty Command picture hanging strips (use the velcro-style strips rated for 16 lbs), Hercules/monkey hooks (which slip into drywall leaving only a pinhole), and pushpin brass nails for lightweight fiber and basket art.
Frequently Asked Questions
What is the absolute cheapest DIY wall decor for renters?
The cheapest DIY wall decor projects are foraged botanical pressed prints (#07) and vintage book page gallery walls (#28). Both projects cost under $10 total by utilizing free botanical stems from outdoors or $1 thrifted vintage books, displayed in inexpensive multi-pack frames mounted with damage-free Command strips.
How do I prevent joint compound from cracking on large DIY canvases?
Cracking occurs when joint compound dries too quickly or is applied in excessively thick layers. To prevent cracking, use lightweight spackle or premixed all-purpose joint compound, apply in layers no thicker than 1/4 inch, and let it dry naturally away from direct heating vents or fans. You can also mix a couple tablespoons of PVA glue into the compound before applying for added flexibility.
How can I make cheap Dollar Tree or discount frames look expensive?
Transform discount frames with three simple tricks: 1) Remove the shiny, fake plastic sheen by spraying with matte chalk spray paint or buffing with antique gold Rub ‘n Buff wax; 2) Discard the flimsy paper insert and replace it with a thick, acid-free white mat board cut to an extra-wide border; and 3) Clean the glass thoroughly on both sides with vinegar to eliminate cloudy factory residue.
How much weight can Command strips realistically hold for DIY wall art?
Large Command Picture Hanging Strips can hold up to 16 pounds when using four pairs distributed on all four corners of the frame. Ensure you clean the wall with rubbing alcohol before applying, press each strip firmly for 30 seconds, and wait 1 hour for the adhesive to bond before hanging your artwork.
Turn Your Blank Walls into a Personal Gallery
Decorating a home should be an empowering creative journey, not a financial burden. You do not need to wait for a windfall or buy mass-produced, soul-less department store prints to make your living space feel stylish and welcoming. Pick one or two projects from this list that spark your imagination this weekend—grab a jar of joint compound, forage a few leafy stems, or hunt down an ornate thrifted frame—and give your blank walls the tactile, high-end personality they deserve.
Have you tried crafting any of these budget wall art ideas, or do you have a favorite dollar-store hack of your own? Drop your thoughts and photos in the comments below!


0 Comments